Engineer App guides
Engineer App · Inspections
Running an initial inspection
Last updated 10 Aug 2026
An initial inspection is the first full inspection of a newly registered door. It establishes the door's baseline condition and compliance status: you capture the full door profile, then work through the complete checklist. This guide covers the whole flow, from scanning the door's tag to the final sign off.
Before you start
The door must already be registered on DoorTRACE. If it isn't, register it first: see Registering a door. You'll also use your phone's camera for the reference photo and any evidence photos, so make sure camera access is allowed (the app asks the first time you scan or take a photo). The entire inspection works offline if you've downloaded offline data from the Home screen, so patchy signal on site won't stop you.
Start the inspection
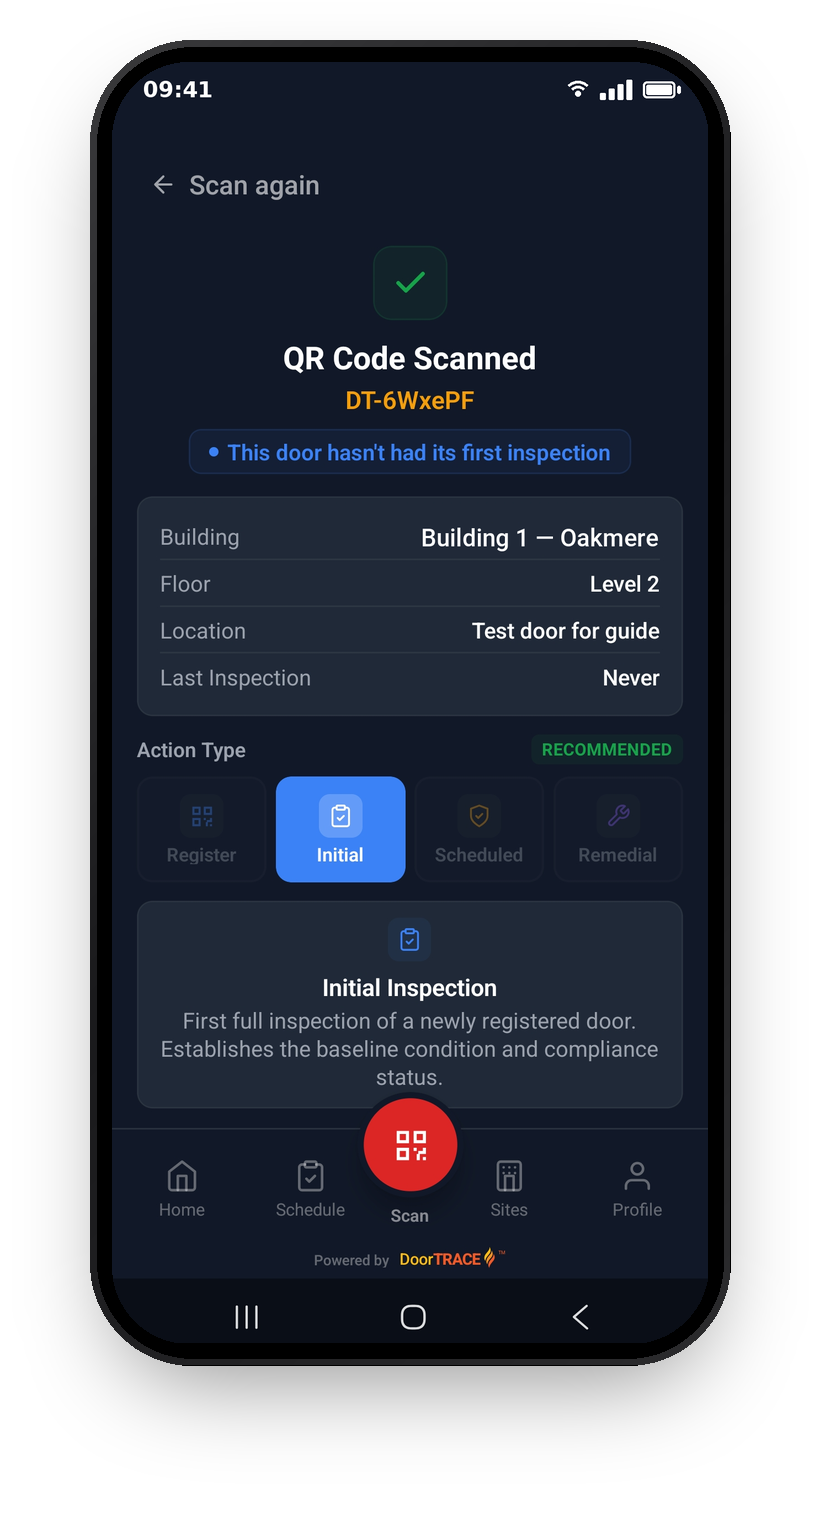
From the Scan tab, scan the QR tag on the door, or tap Type code to enter it manually. The app looks up the door and shows you what it knows: the building, floor, location, and last inspection. For a registered door that has never been inspected, Initial is preselected in the Action Type row with a "Recommended" badge, and the banner reads "This door hasn't had its first inspection". Tap Start Initial Inspection to begin. An initial inspection has four steps, shown as coloured bars at the top of the screen: Details, Inspection, Review and Sign Off.
Capture the door details
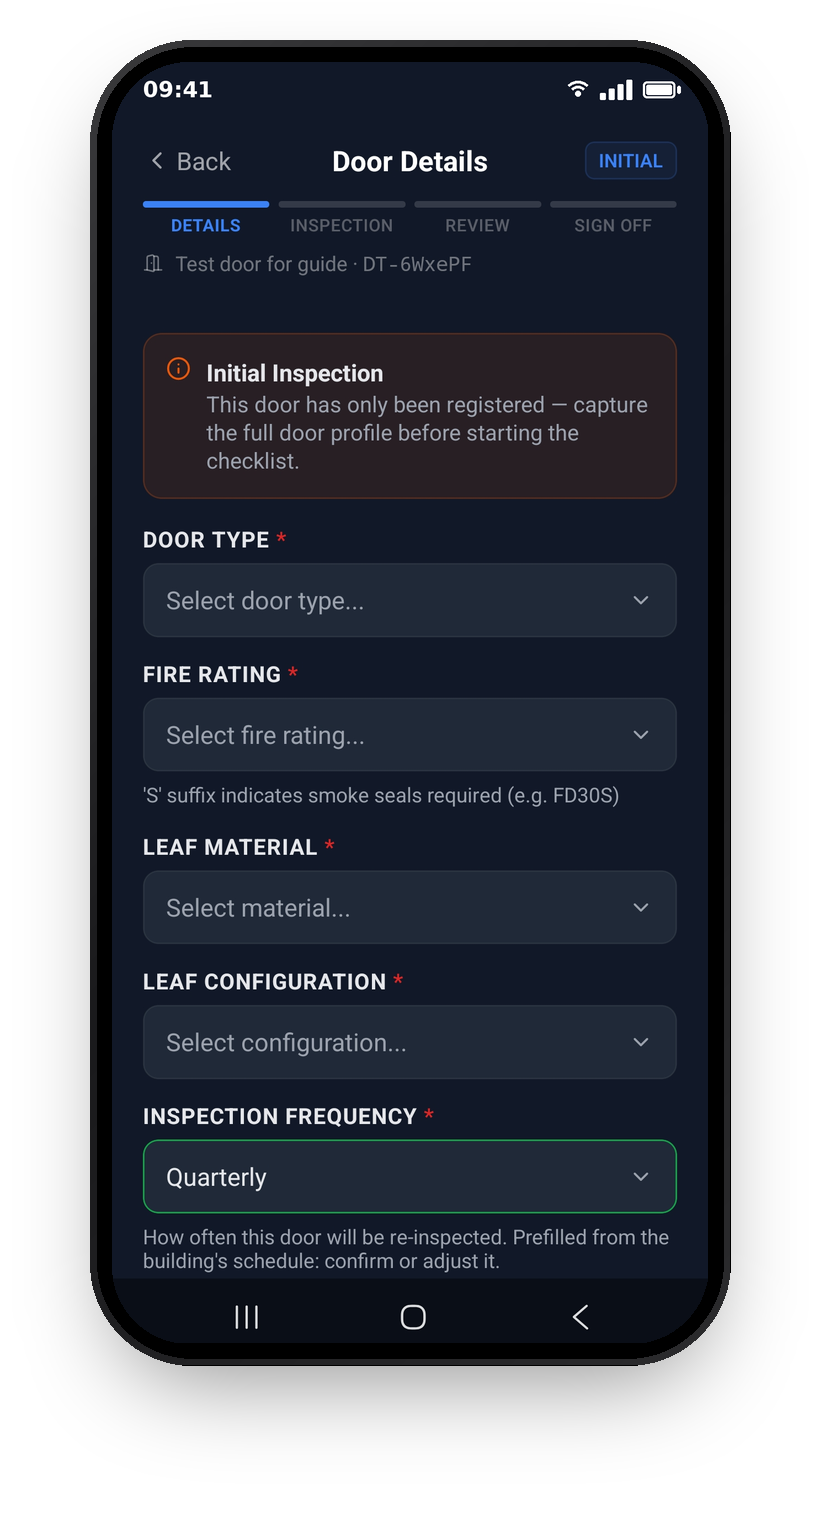
The first step builds the door's profile. Six fields are required, marked with a red asterisk: Door Type, Fire Rating (the 'S' suffix, as in FD30S, means smoke seals are required), Leaf Material, Leaf Configuration, Inspection Frequency and a reference photo. Inspection Frequency comes prefilled from the building's schedule: confirm it, or adjust it if this door needs something different.
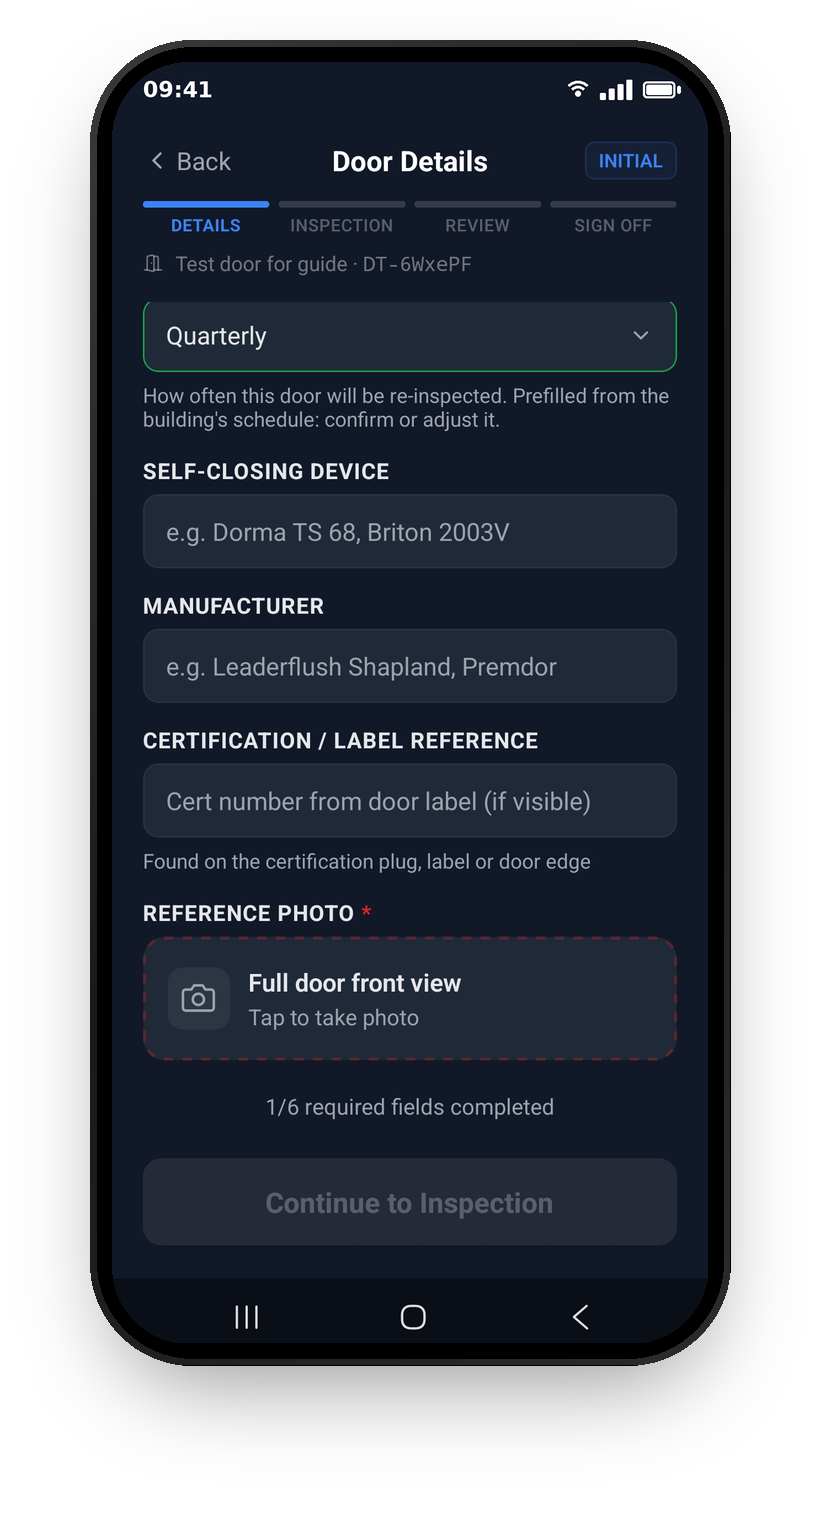
Further down, Self-Closing Device, Manufacturer and Certification / Label Reference are optional but worth filling in where the information is visible: the certification reference is found on the certification plug, label or door edge. The Reference Photo is a full front view of the door, and the counter underneath shows how many required fields you've completed. When all six are done, Continue to Inspection lights up.
Important: if you pick a frequency slower than quarterly for a communal, stairwell or lobby door in a building over 11 metres, an amber notice appears: "Regulation 10 minimum may apply". It's advisory and won't stop you continuing, but the company may adjust the frequency later to meet the quarterly checks required under Regulation 10.
Work through the checklist
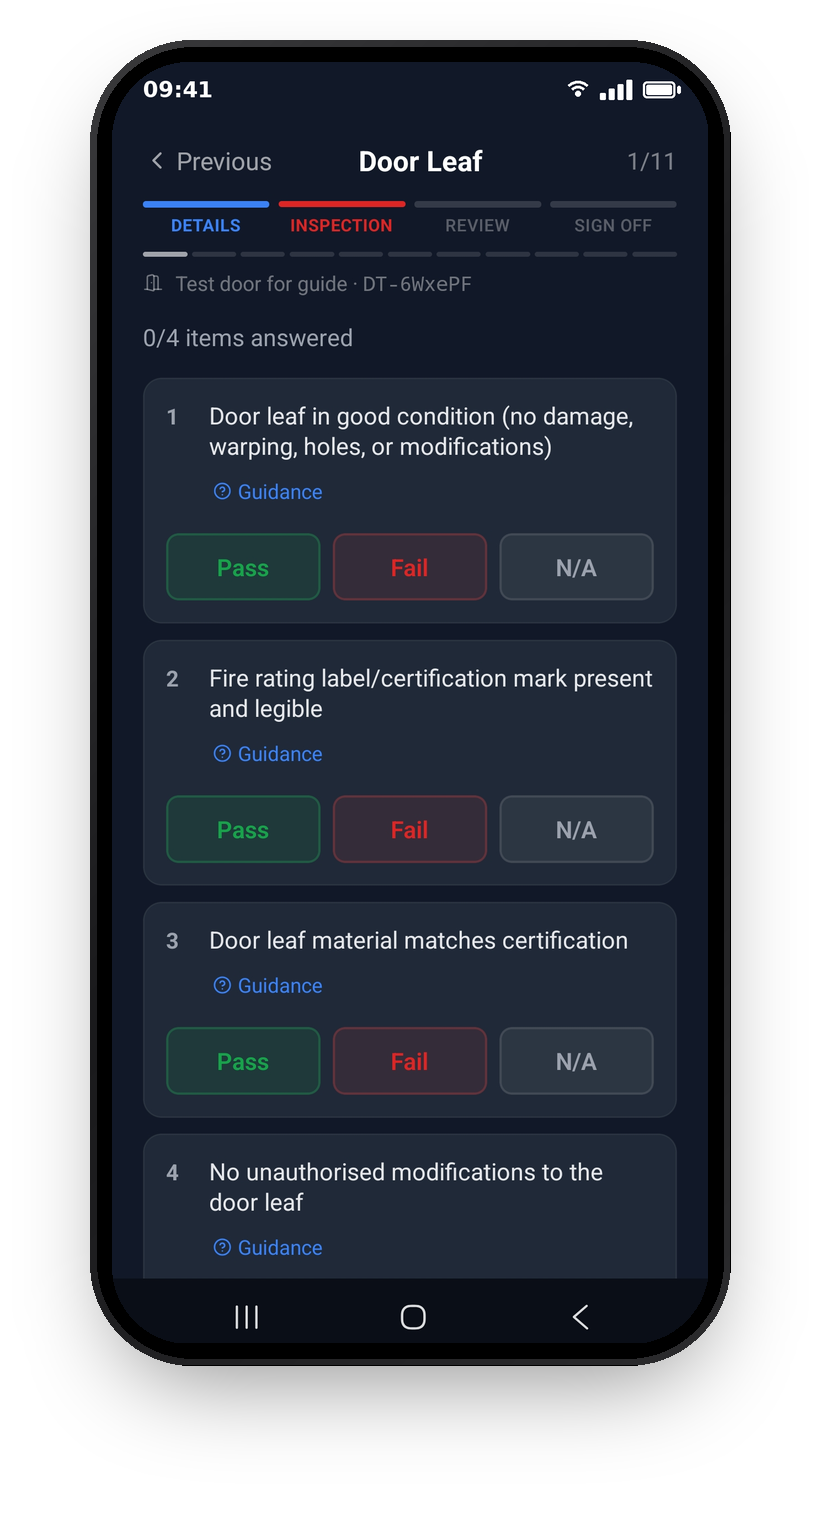
The checklist has 41 items across 11 categories, from Door Leaf through to Overall, and you work through one category per page. The header shows which category you're on, a page counter, and a progress bar for each category that turns green as you complete it. Every item has Pass, Fail and N/A buttons. Answer every item in a category to unlock Continue; on the last category the button becomes Review Inspection.
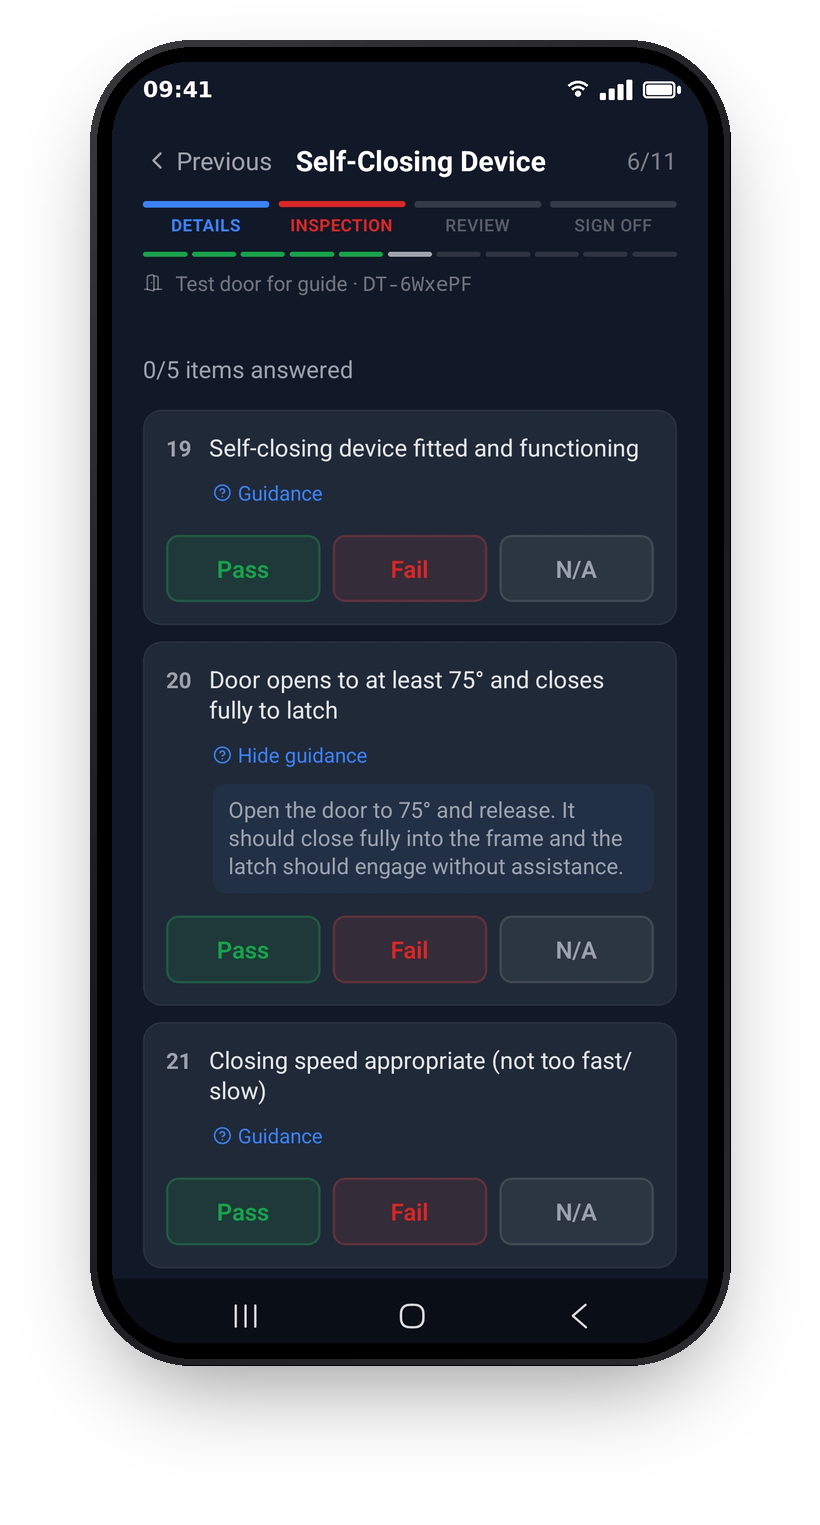
Not sure exactly what an item is asking? Every item has a Guidance toggle. Tap it and a short explanation appears describing what to check, where to look and what good looks like, written for that specific item. Tap Hide guidance to collapse it again. The guidance is there to keep judgements consistent between engineers, so use it freely: it doesn't affect the result.
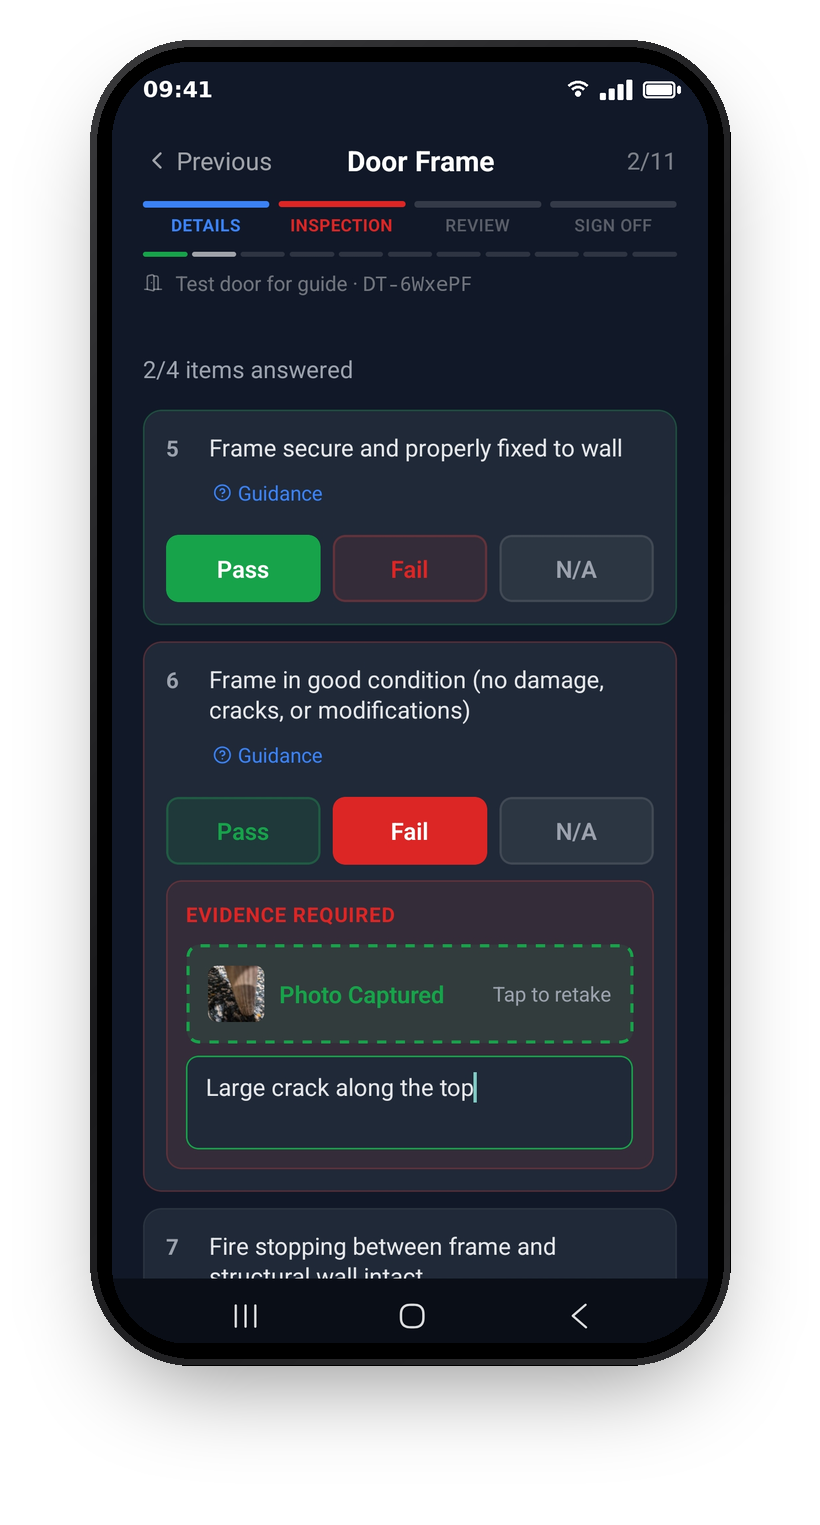
Failing an item needs evidence: a photo and a note describing the issue. Until both are in, the item shows "Photo and note required for all failed items" and the category won't let you continue. Take the photo close enough to show the problem clearly, and write the note as you'd want to read it back in a report. If you've answered everything on a page but evidence is missing, an "Evidence missing" warning tells you what's outstanding.
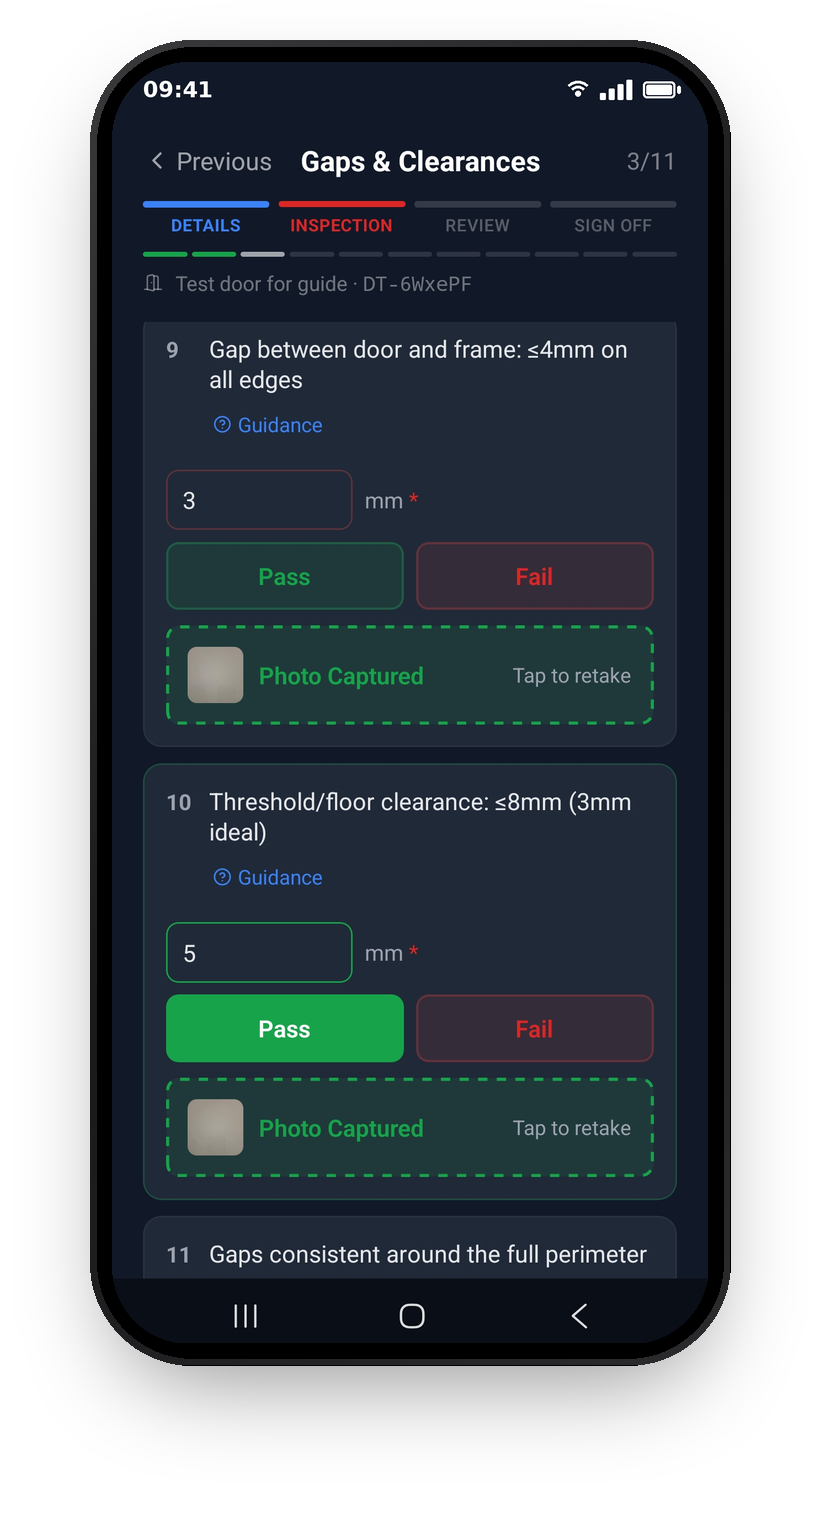
Two items work differently: the gap between door and frame, and the threshold clearance. For these you enter the measured value in millimetres and a photo is always required, whatever the result. You judge Pass or Fail yourself against the thresholds shown in the item text: there's no N/A, since every door has gaps to measure.
Review the results
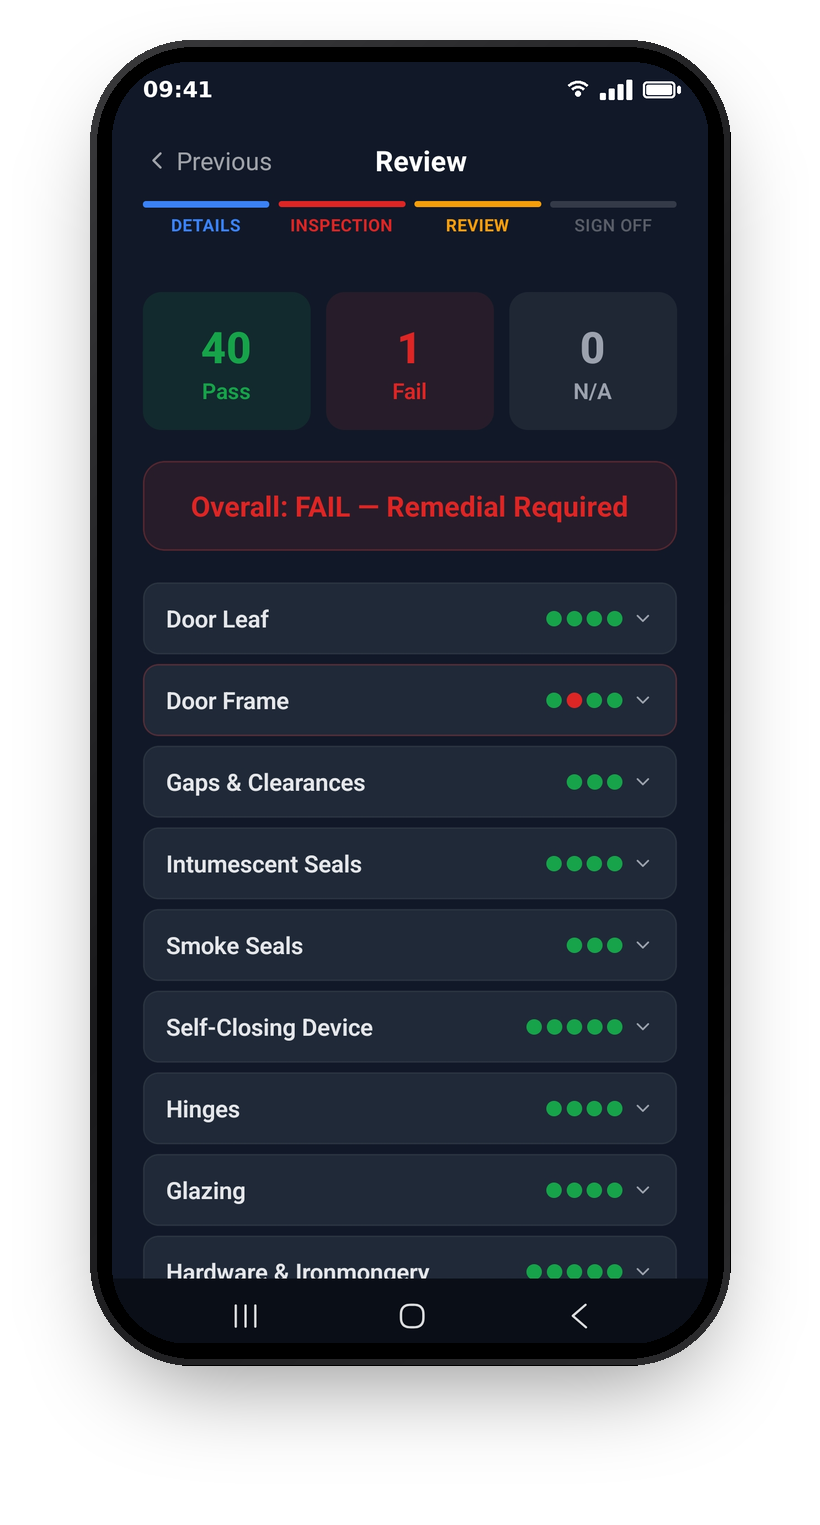
The review step totals up your Pass, Fail and N/A counts and shows the overall result. A clean sheet reads PASS; if anything failed, it reads FAIL - Remedial Required and the category containing the failure is outlined in red so it's easy to find.
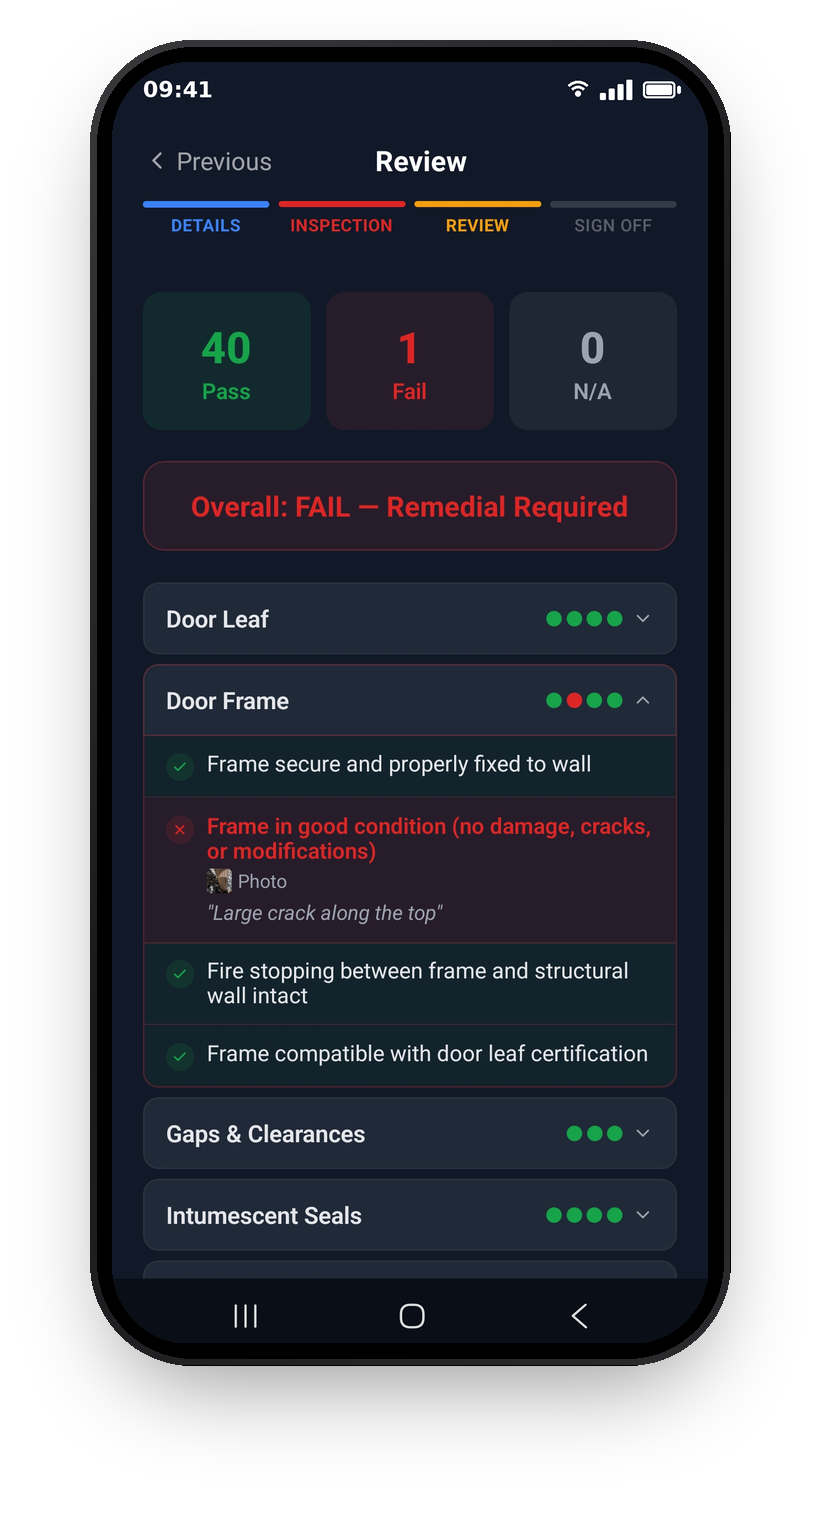
Tap any category to expand it and see every item's result, any measurement you recorded, and the photos and notes attached to failures. If something doesn't look right, use Previous to step back into the checklist and correct it before going any further. When you're happy the record is accurate, tap Proceed to Sign Off.
Sign off and submit
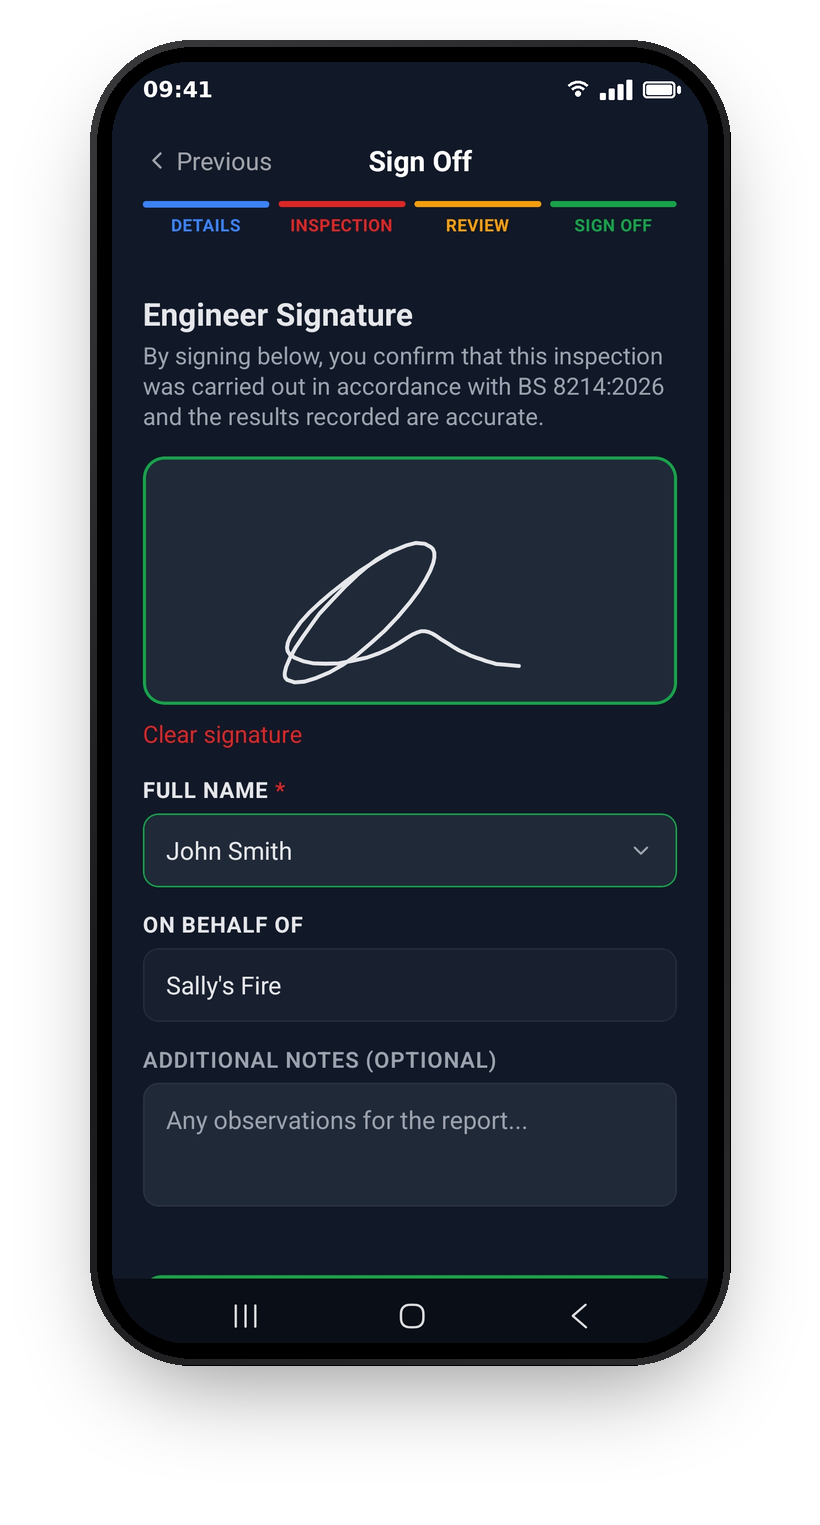
The sign off confirms the inspection was carried out in accordance with BS 8214:2026 and that the results are accurate. Draw your signature in the box (Clear signature lets you redo it), then choose your name under Full Name from the list of authorised signatories. On Behalf Of shows the company the inspection is recorded against and can't be edited. Add anything else worth noting in Additional Notes, then tap Submit Inspection.
Important: for flat entrance doors, the sign off also asks "Was access to the flat entrance granted for this inspection?" with Access Granted and Access Denied buttons. If access was denied, a note is required, for example when and how you attempted access.
After you submit
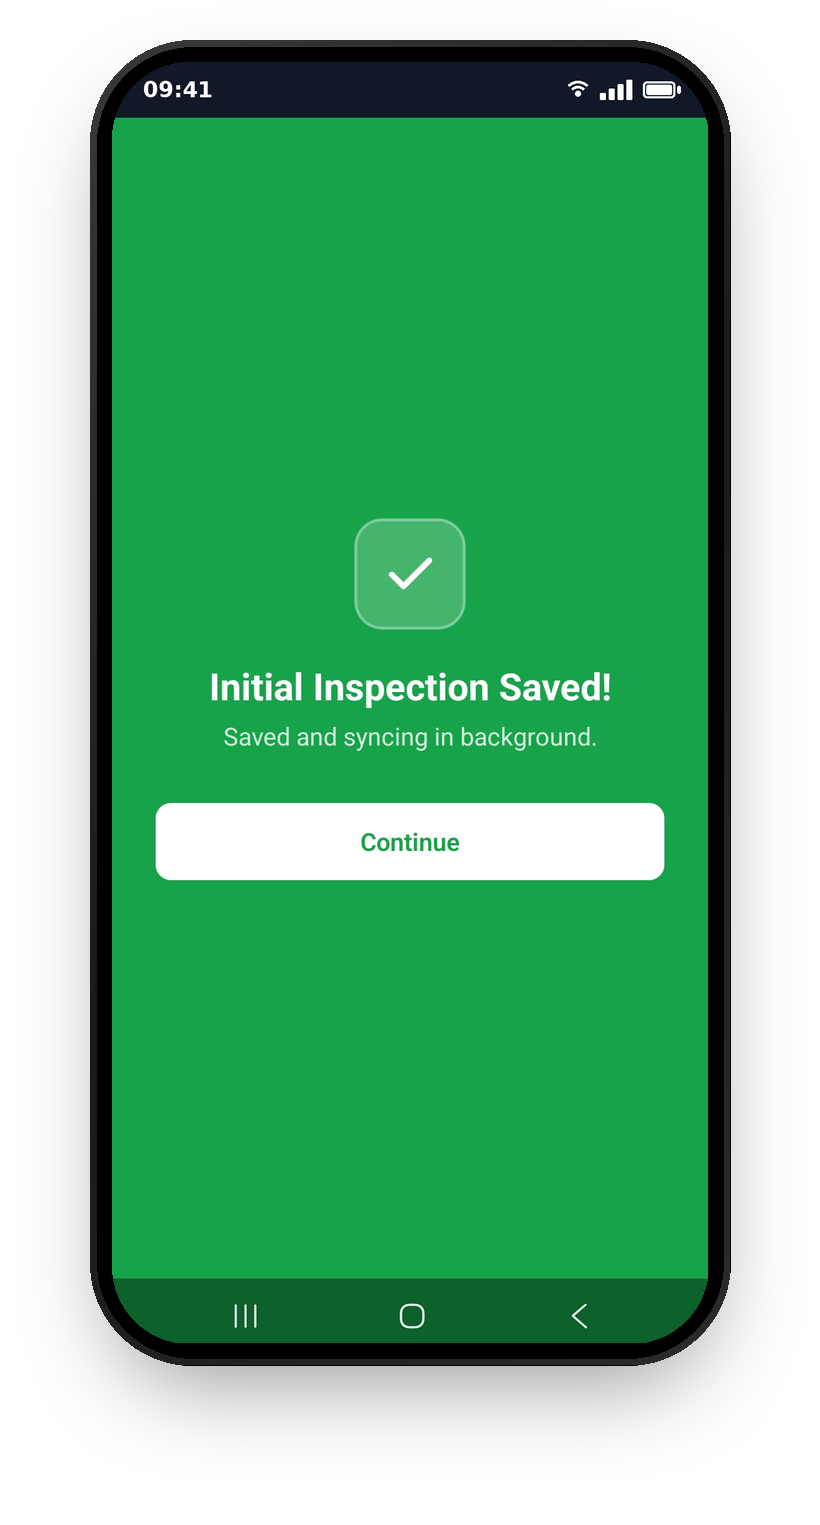
You'll see "Initial Inspection Saved!" on a green screen. The inspection, photos and signature upload in the background: if you're offline, it reads "Saved to device. Will sync automatically when connected." and uploads on its own once you're back in signal. Tap Continue to return to the app.
Important: nothing is saved until you submit. If you leave part-way through, the app warns you: "Any progress on this inspection will be lost if you leave now." Plan to complete the inspection at the door in one go.
What's next
With the baseline established, the door moves onto its inspection schedule. See Running a scheduled inspection for how routine inspections work from here.
Still can't find the answer?
Send us a message and we'll help. We respond within one working day.