FM Portal guides
FM Portal · Settings
Securing your account
Last updated 26 Sept 2026
Your company has one portal login, and everything in DoorTRACE sits behind it. The Security page in Settings is where you protect that login: add a second check at sign-in with an authenticator app, limit sign-ins to the countries you work in, see which browsers are signed in and end any you do not recognise, and change your password. This guide takes each box in turn and covers what happens at the sign-in screen once two-factor authentication is on.
Before you start
To turn on two-factor authentication you need an authenticator app on your phone, such as Google Authenticator, Authy or 1Password. Have your portal password to hand: turning two-factor on or off and changing your password all ask for it. Nothing on this page needs a separate password window; the password box you see is the check.
Opening the Security page
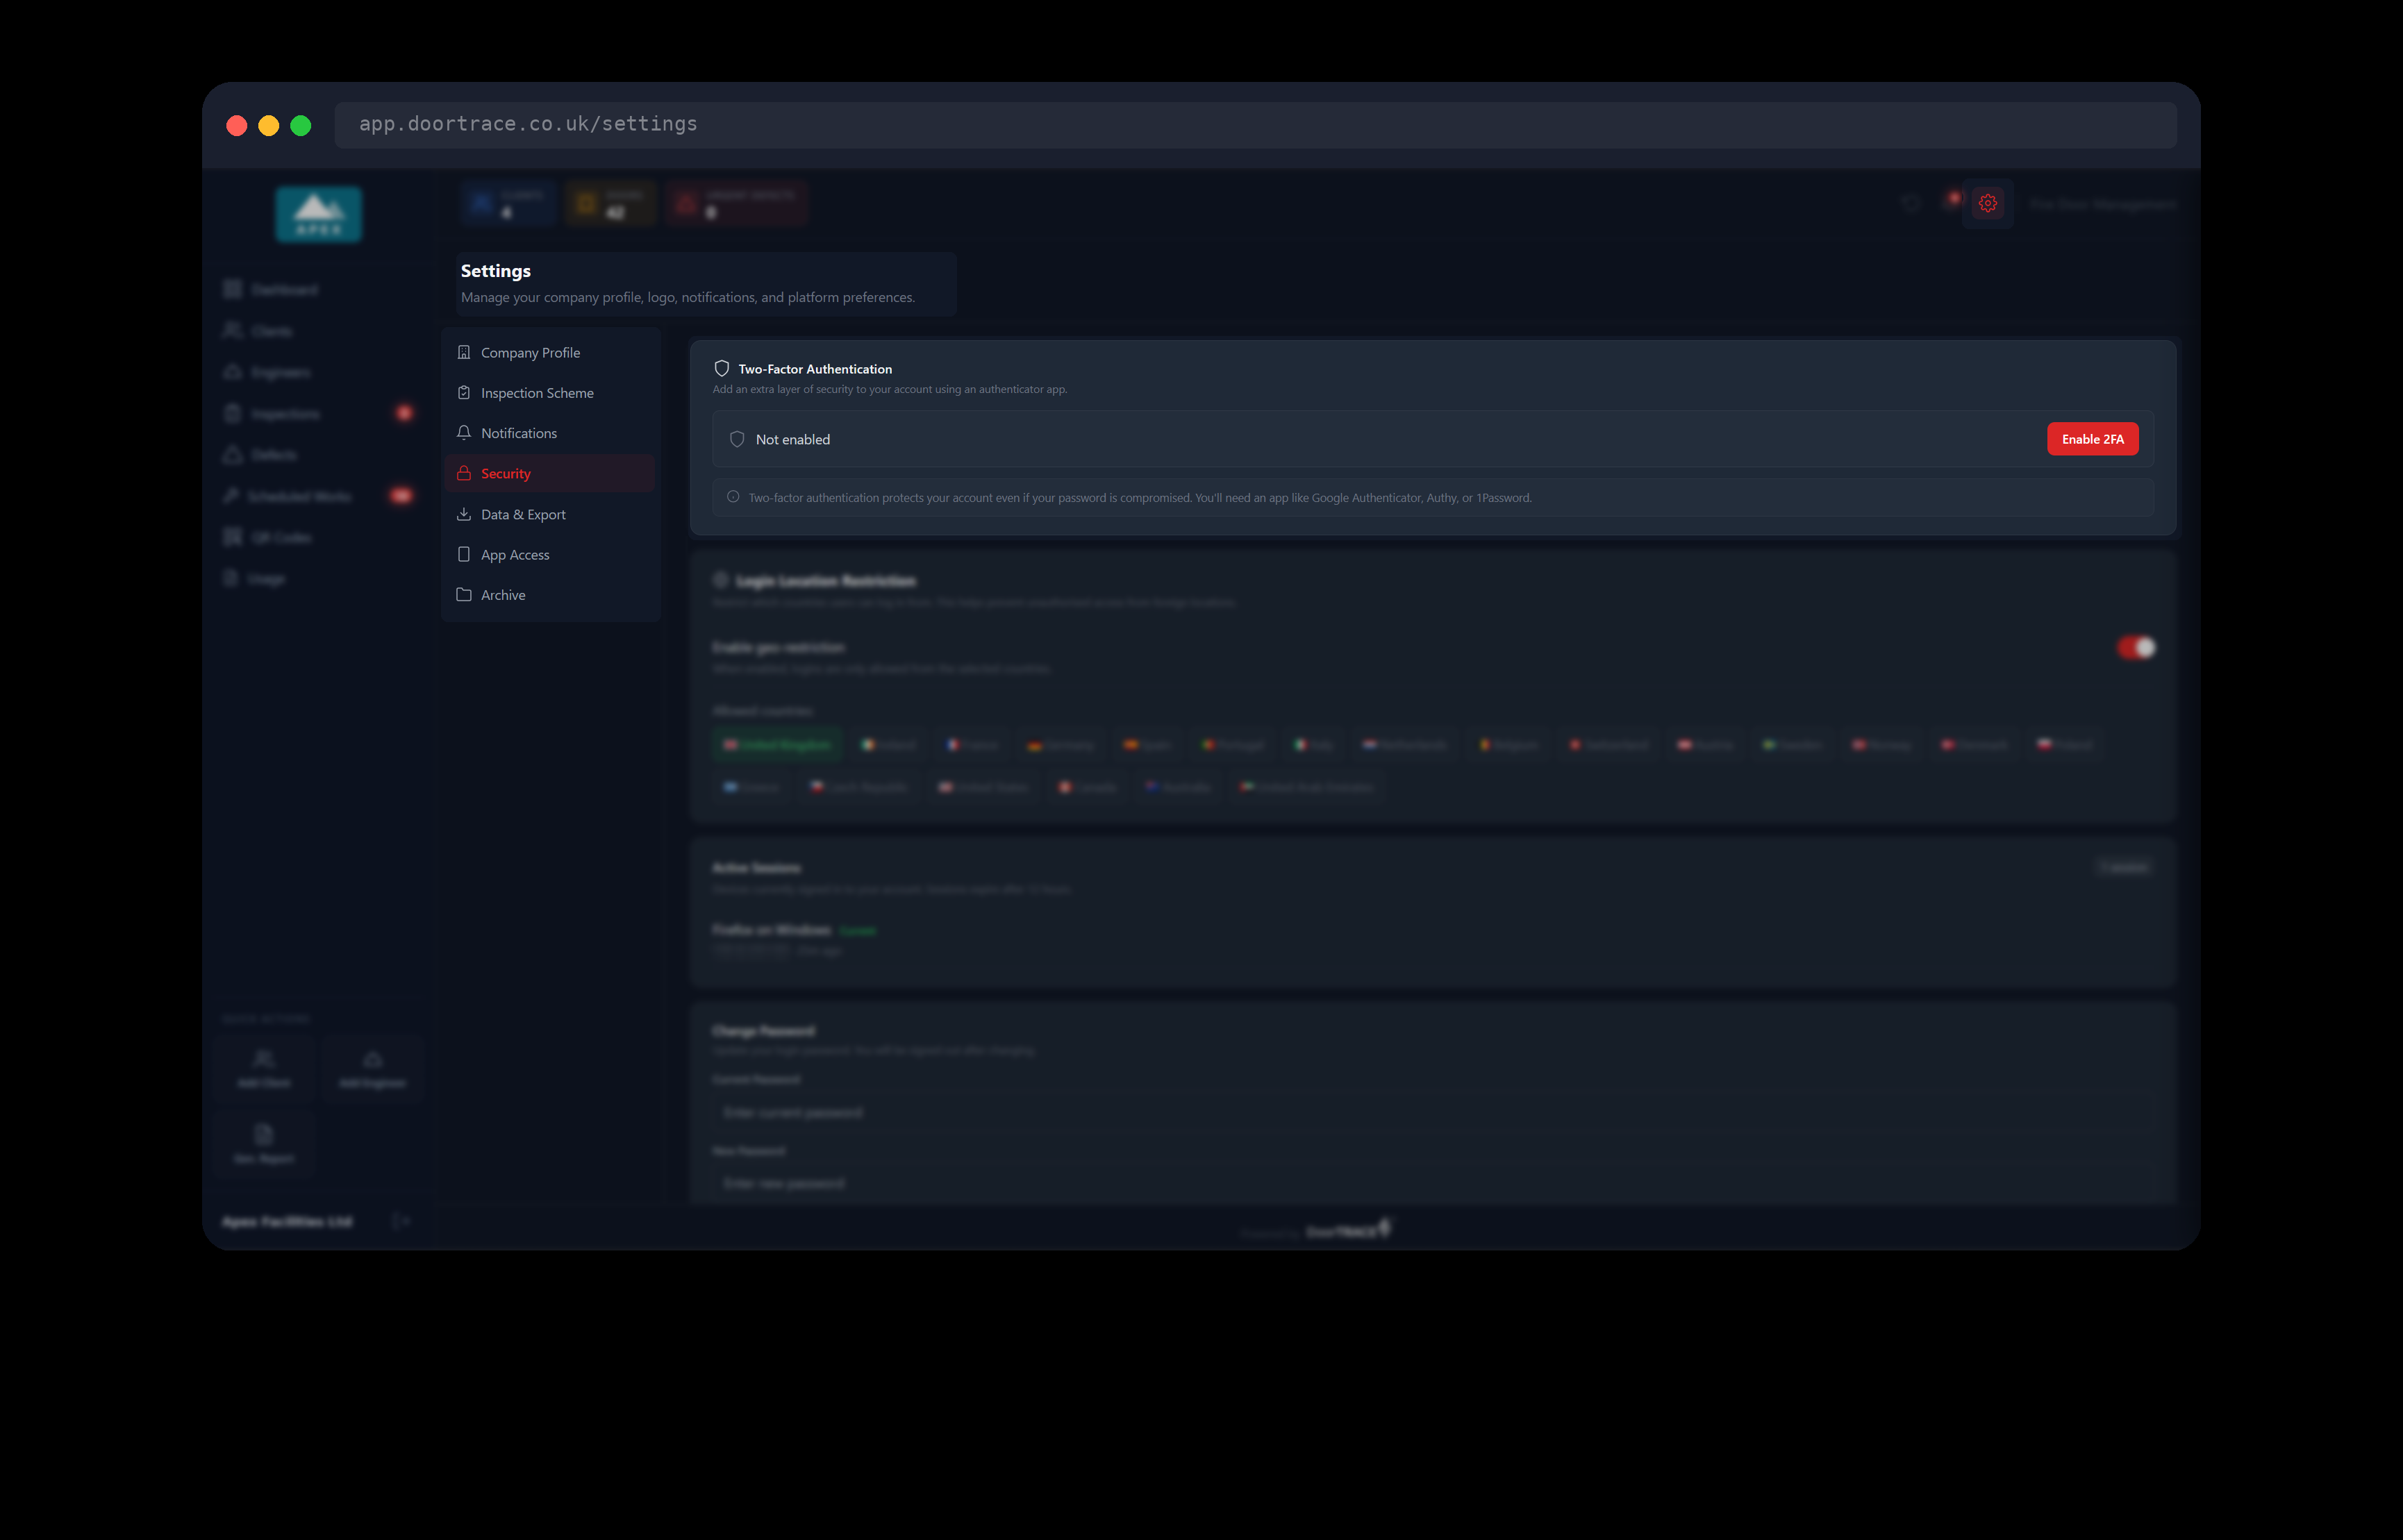
Click the cog icon at the top right of the portal, next to the bell, then click Security in the list on the left of the Settings page. It is the fourth item, under Notifications. The page has four boxes, top to bottom: Two-Factor Authentication, Login Location Restriction, Active Sessions and Change Password. Each box fetches its own settings when the page opens, so for a moment you may see "Loading two-factor authentication status…", "Loading login location restriction…" or "Loading sessions…". If you move to another Settings page part way through a step, the step is abandoned and the box goes back to its starting view when you return.
Turning on two-factor authentication
The Two-Factor Authentication box shows Not enabled until you set it up. Two-factor authentication means that after your email and password, the sign-in screen also asks for a six-digit code from an authenticator app on your phone. Someone who learns your password still cannot get in without your phone.
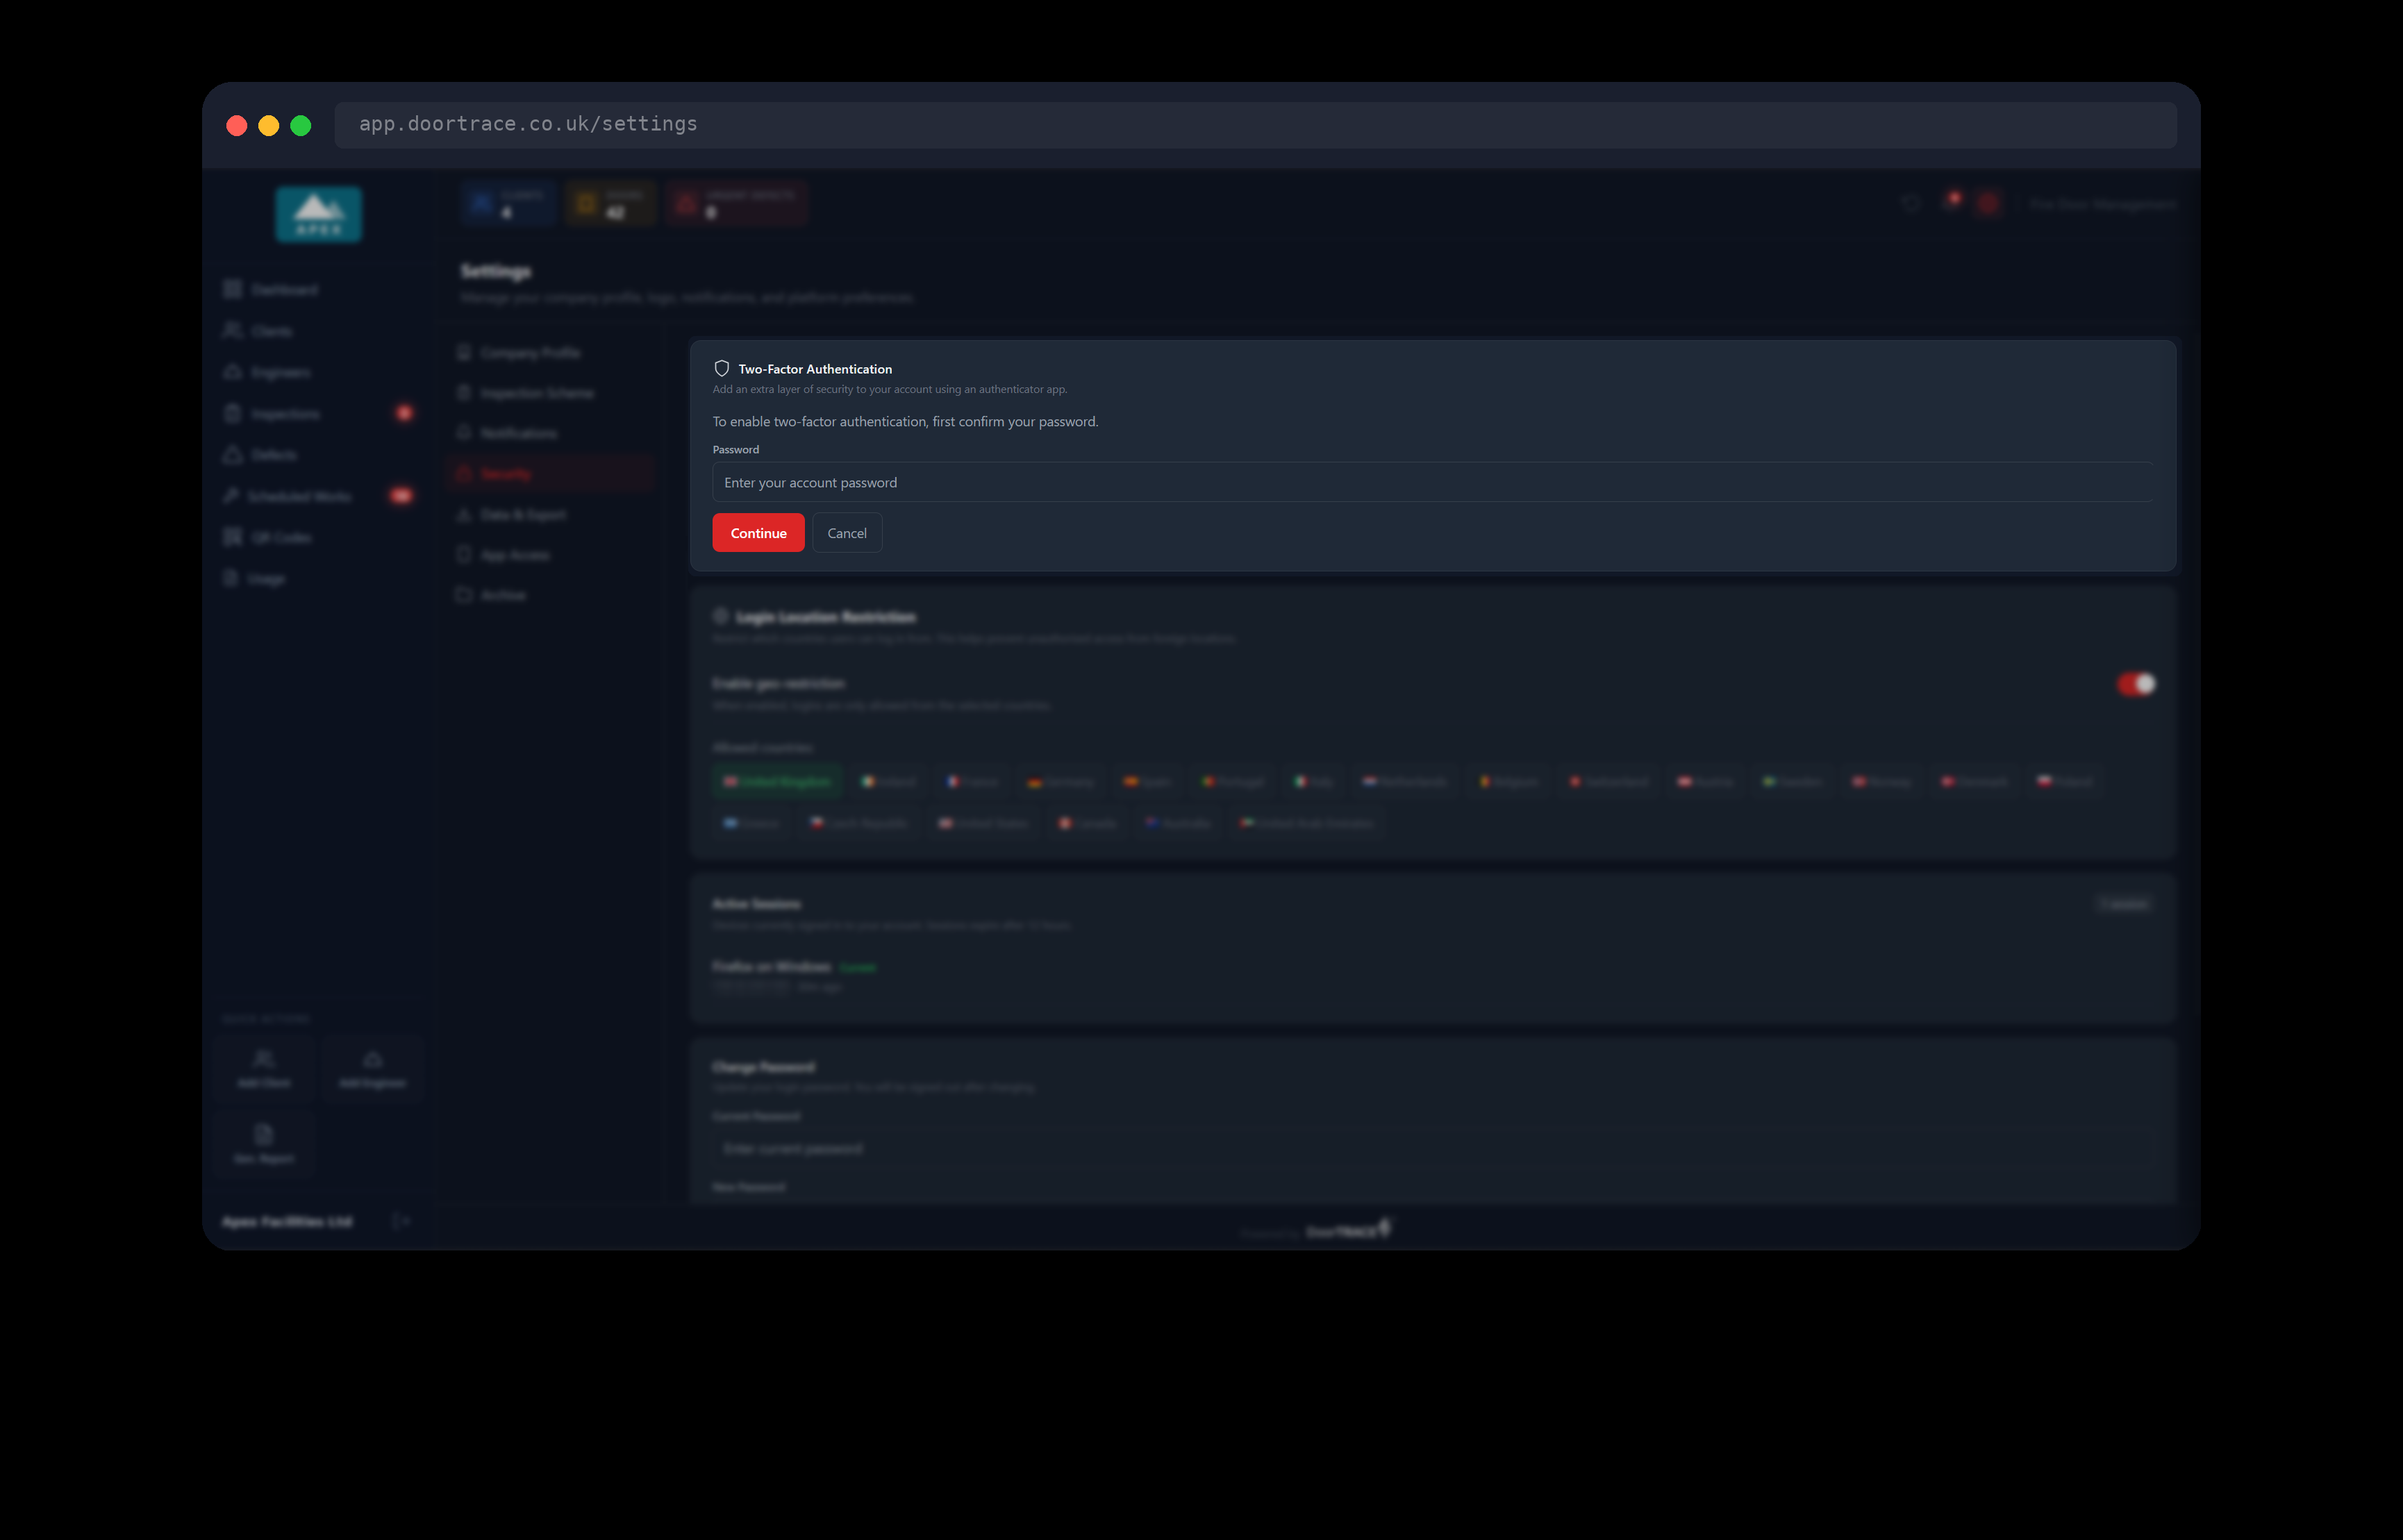
Click Enable 2FA. The box asks you to confirm your password first: type it under Password and click Continue (it shows "Verifying…" while checking). A wrong password shows "Incorrect password." in red and you can try again. Cancel takes you back with nothing changed.
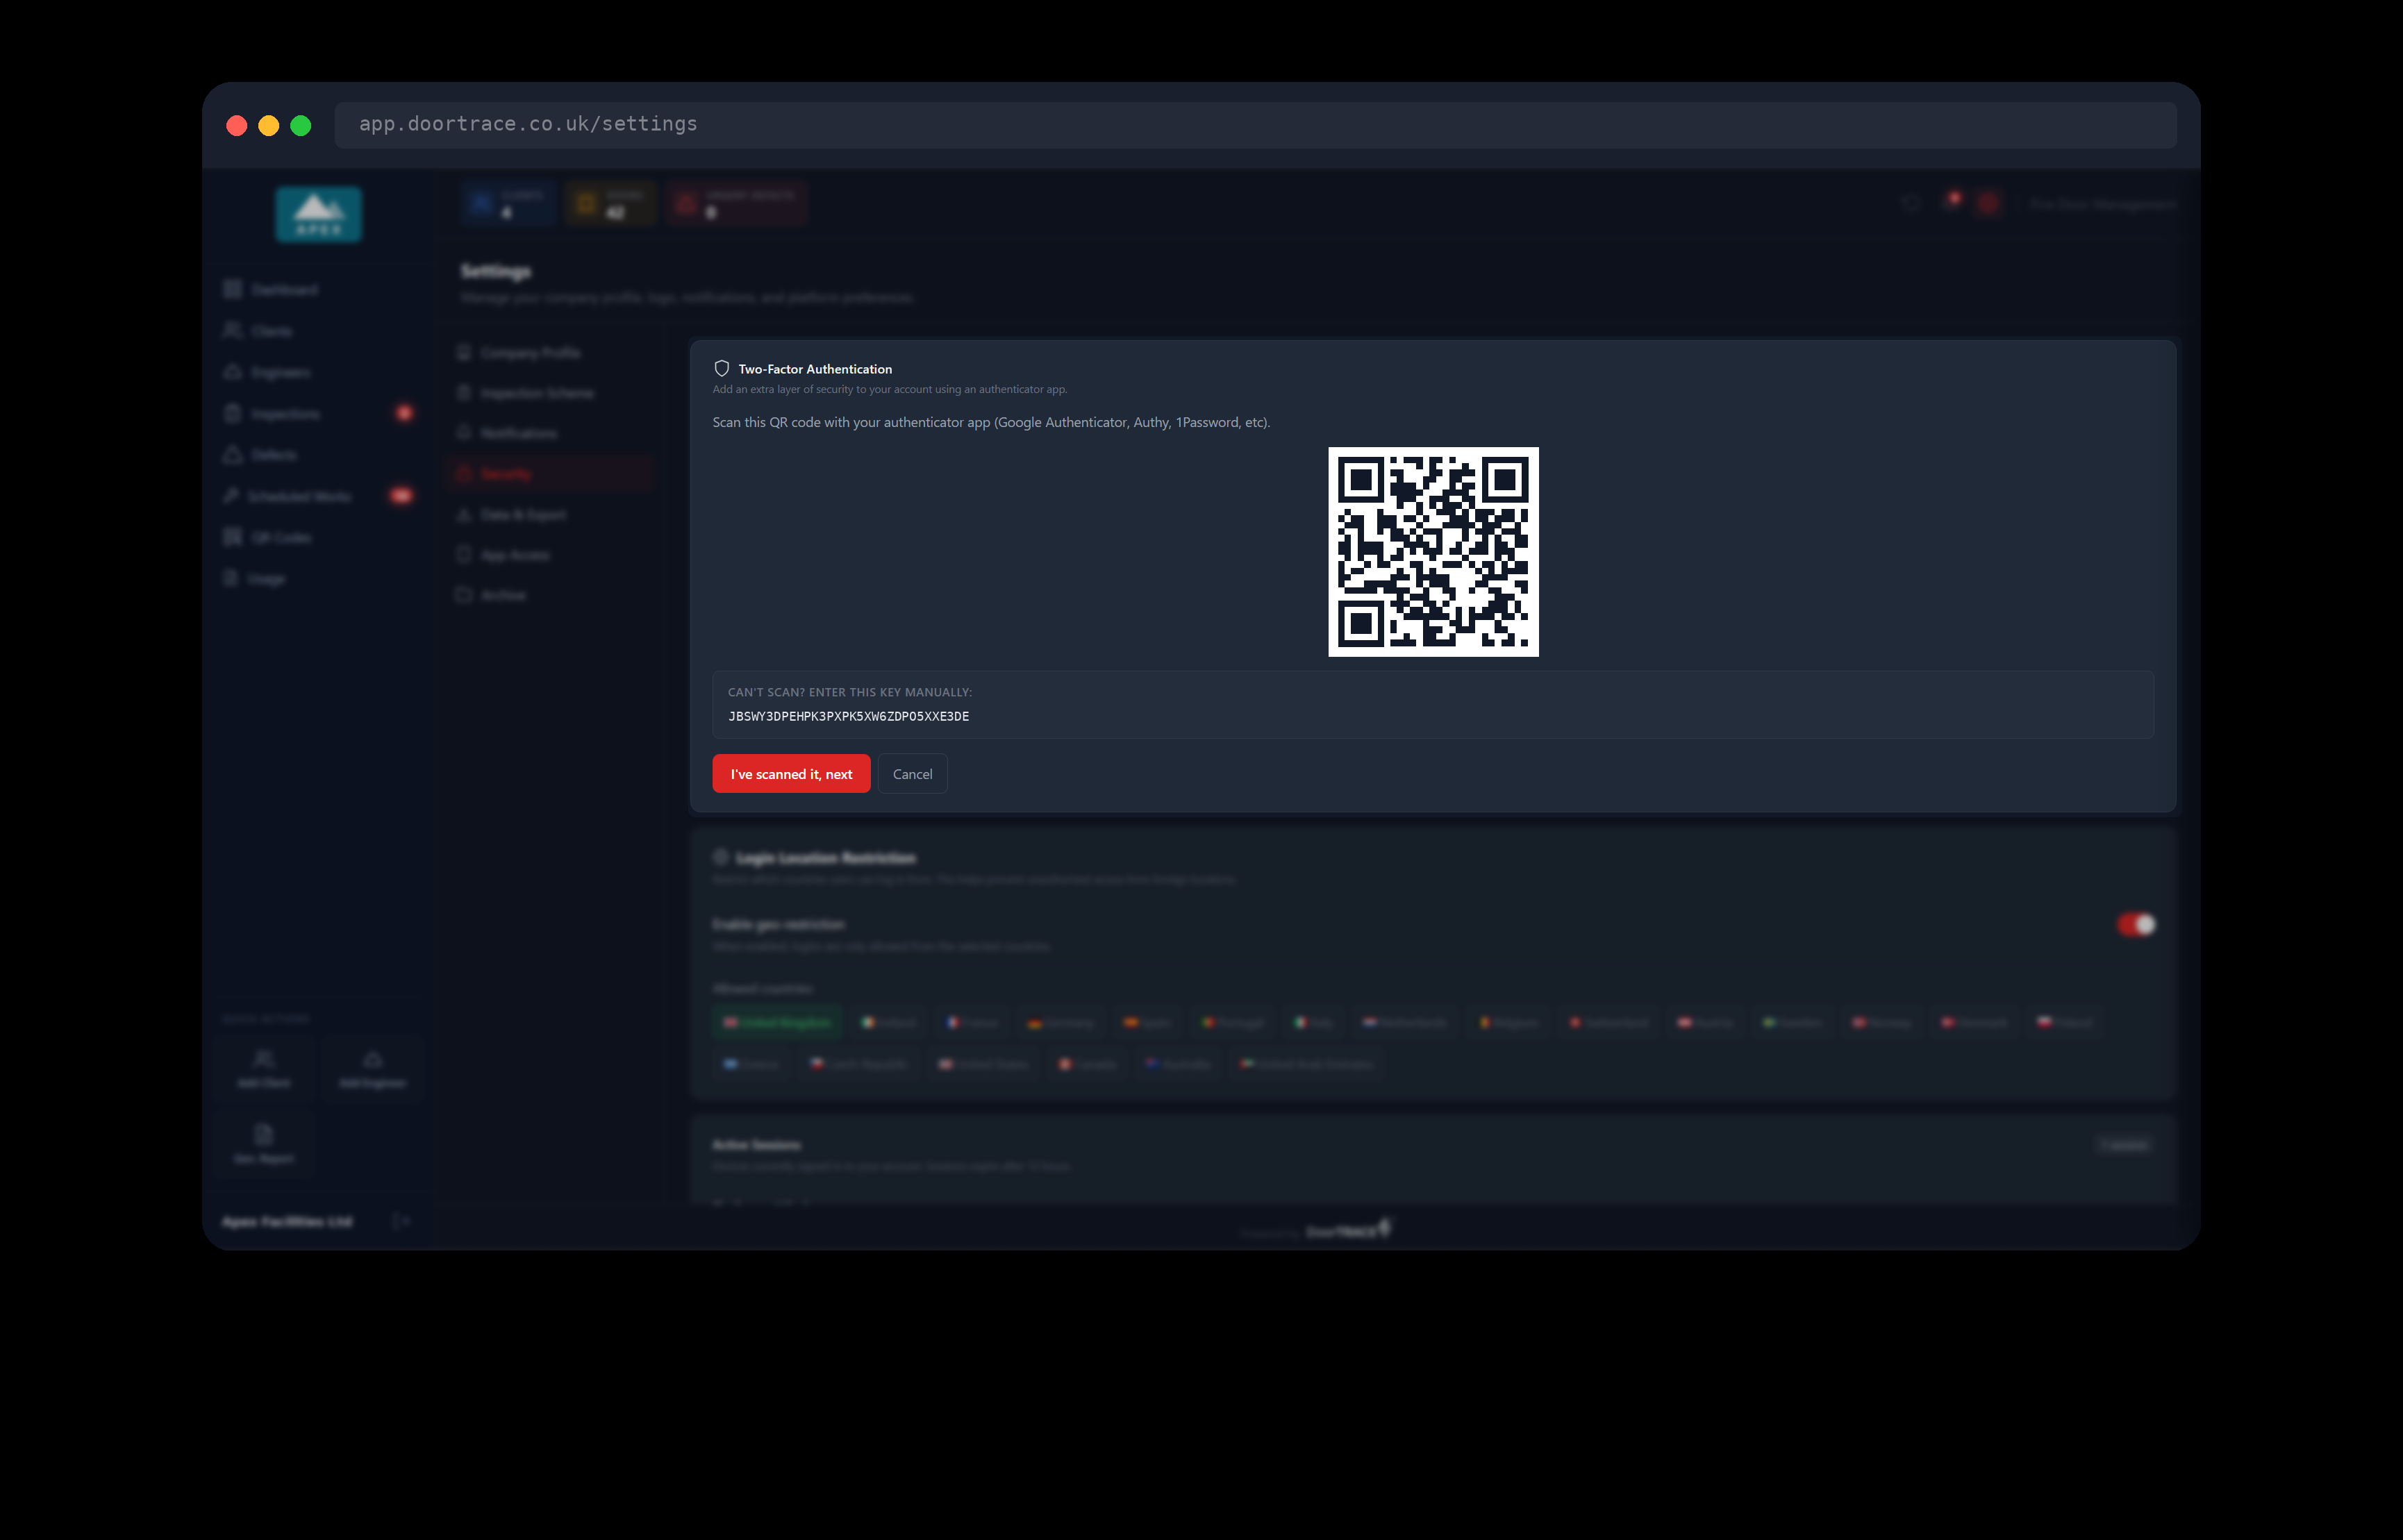
Next you see a QR code. Open your authenticator app, choose to add an account, and scan the code with your phone's camera. If you cannot scan it, the key shown under "CAN'T SCAN? ENTER THIS KEY MANUALLY:" can be typed into the app instead. The app then starts showing a six-digit code that changes every 30 seconds. Click I've scanned it, next. Two-factor is not on yet at this point: if you click Cancel here, nothing has been switched on.
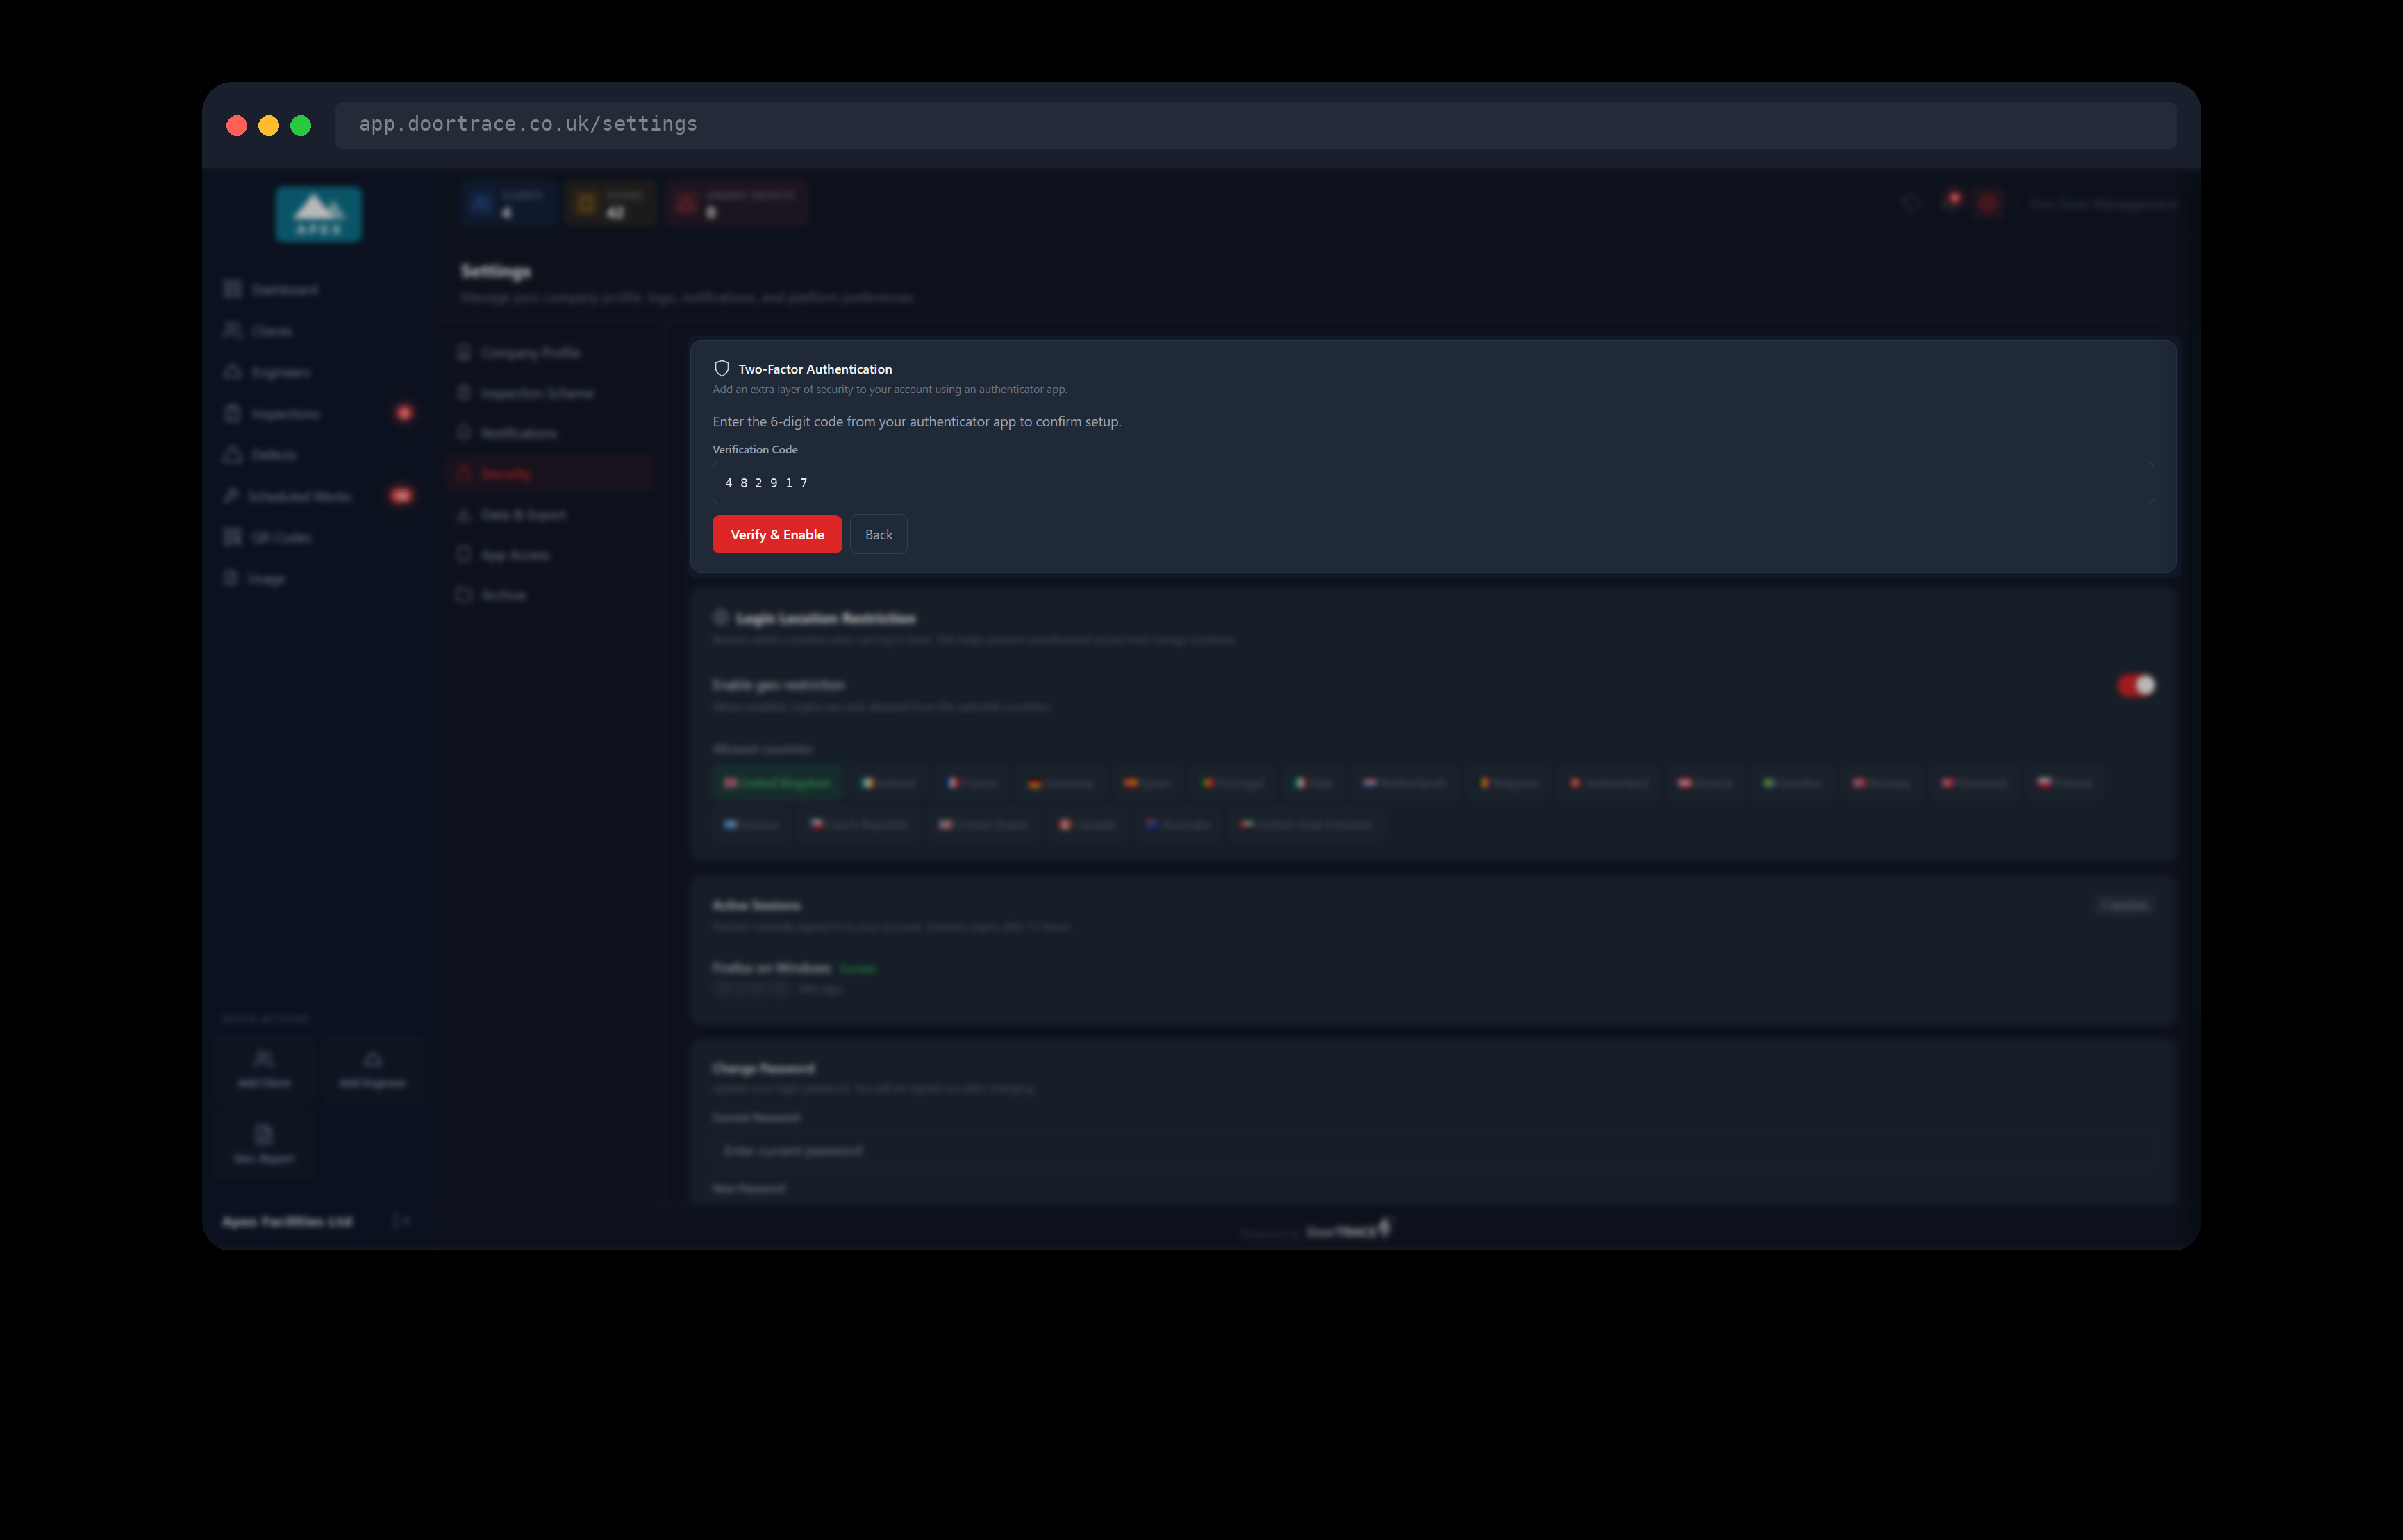
Type the current six-digit code from your app under Verification Code and click Verify & Enable. The button stays greyed out until you have typed all six digits. If the code is refused you will see "Invalid code. Check your authenticator app and try again.": wait for the app to show a fresh code and type that one. Back returns you to the QR code.
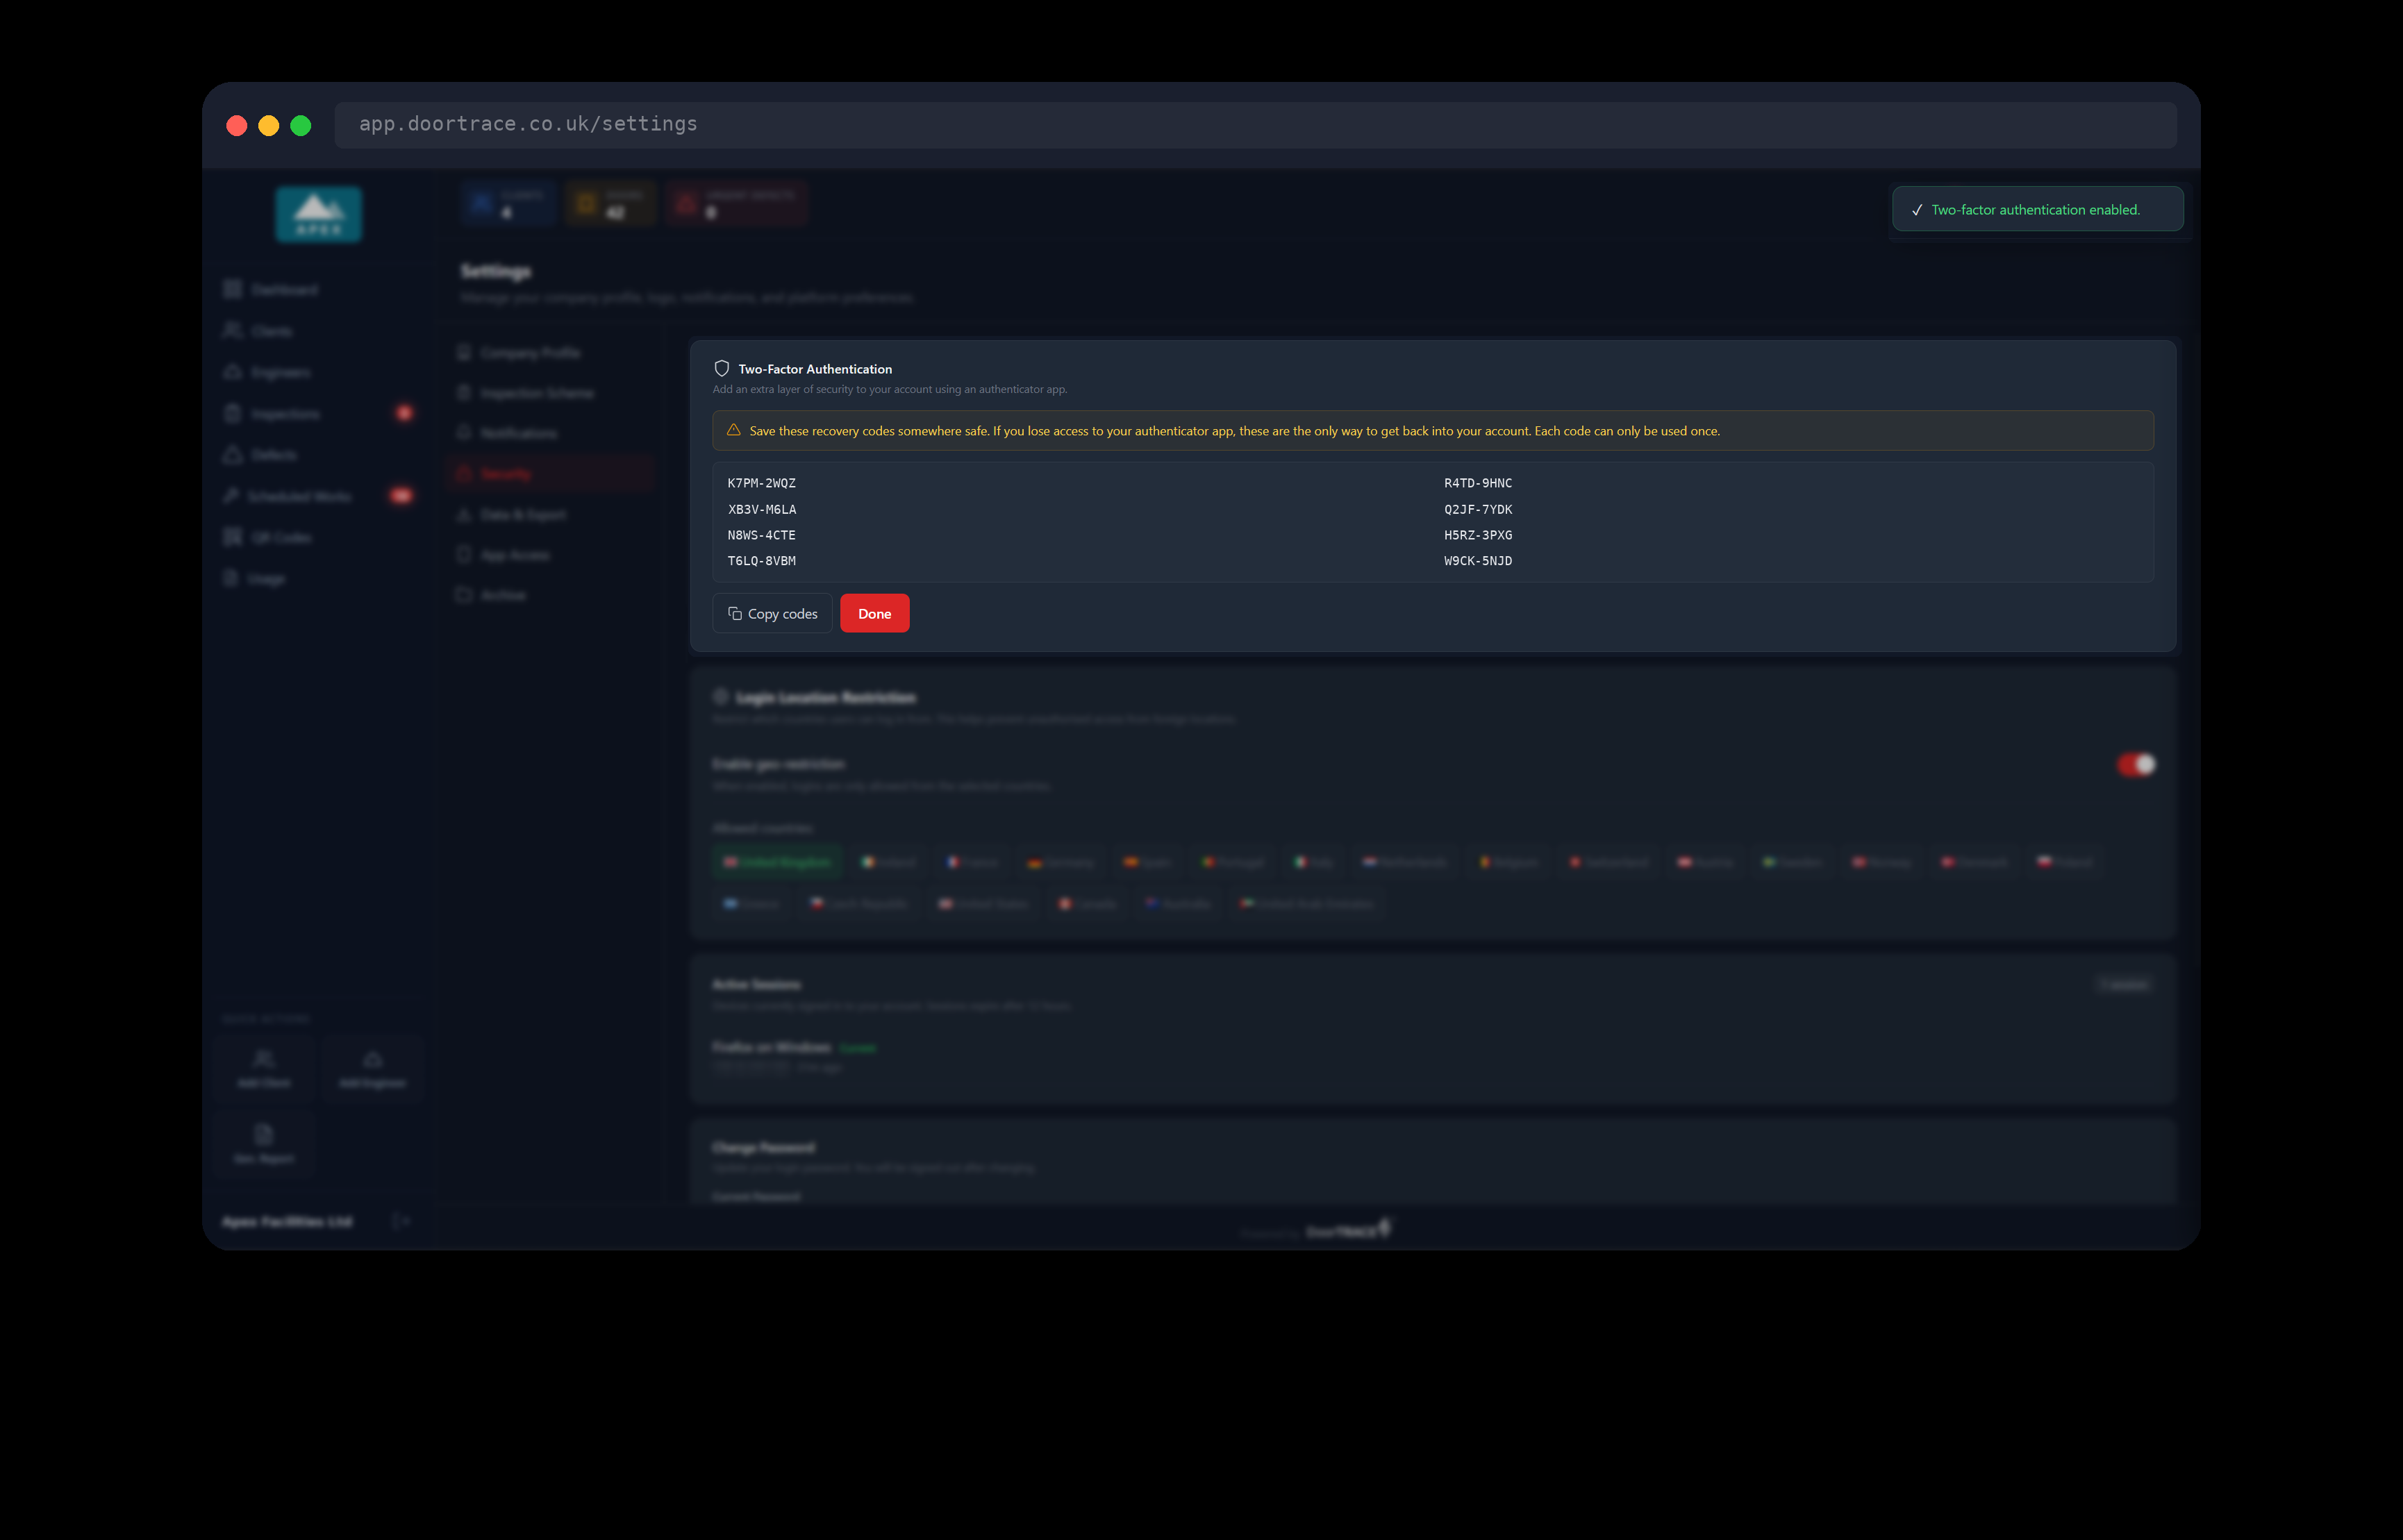
When the code is accepted, "Two-factor authentication enabled." appears at the bottom of the screen and the box shows your eight recovery codes. Each one is eight characters in the form XXXX-XXXX. Click Copy codes to copy all eight, then paste them somewhere safe, such as a password manager or a printed sheet kept away from your desk. Click Done when you have saved them.
Important: The recovery codes are shown once. There is no way to see them again or to make a new set, other than turning two-factor off and on again. If you lose your phone and have no recovery codes, you cannot get back into the portal.
Signing in with two-factor on
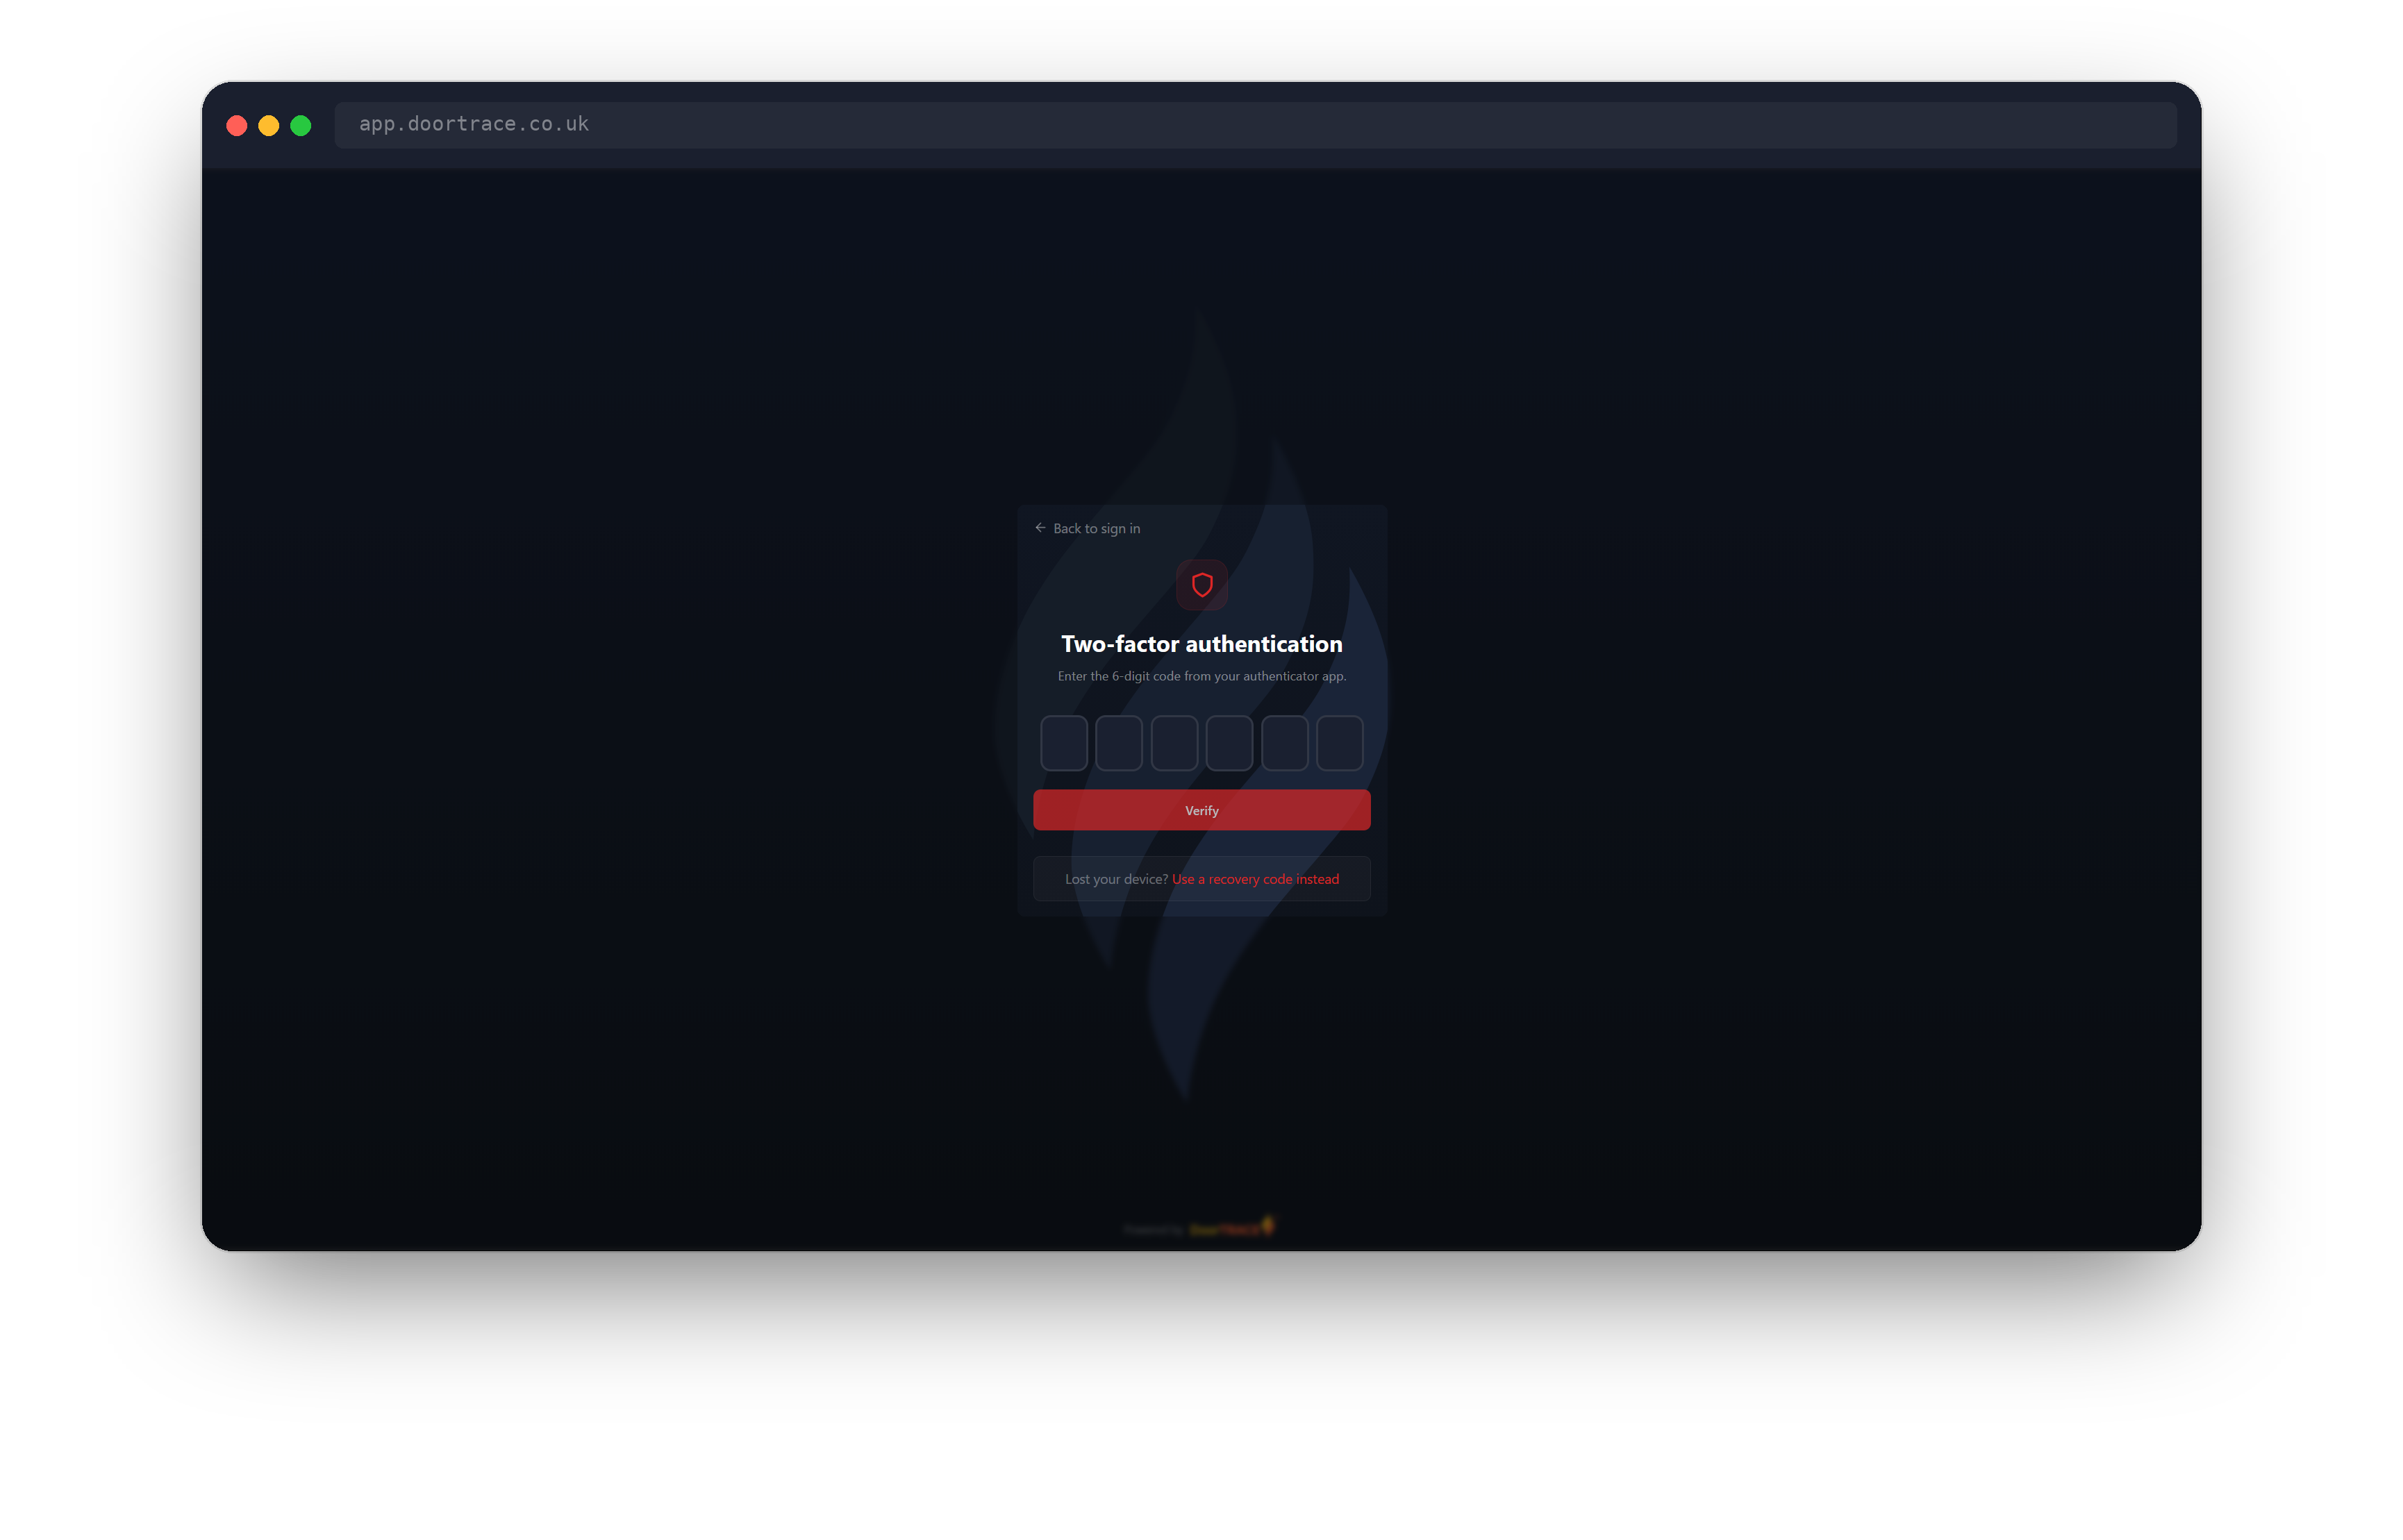
After you enter your email and password, the sign-in screen shows Two-factor authentication with six boxes and the line "Enter the 6-digit code from your authenticator app." Open your app, type the code shown, and click Verify. You have five minutes after entering your password to enter the code; after that, start again from your email and password. A wrong code shows "Invalid code. Please try again."
If you do not have your phone, click Use a recovery code instead under "Lost your device?". The screen changes to "Enter one of the recovery codes you saved when you set up two-factor authentication." with one box: type a code in the form XXXX-XXXX and click Verify. That code is then used up and will not work again; the count on the Security page drops by one. Use your authenticator code takes you back to the six boxes.
Tip: Once you are down to your last few recovery codes, turn two-factor off and on again to get a fresh set of eight, and save them.
Turning two-factor off
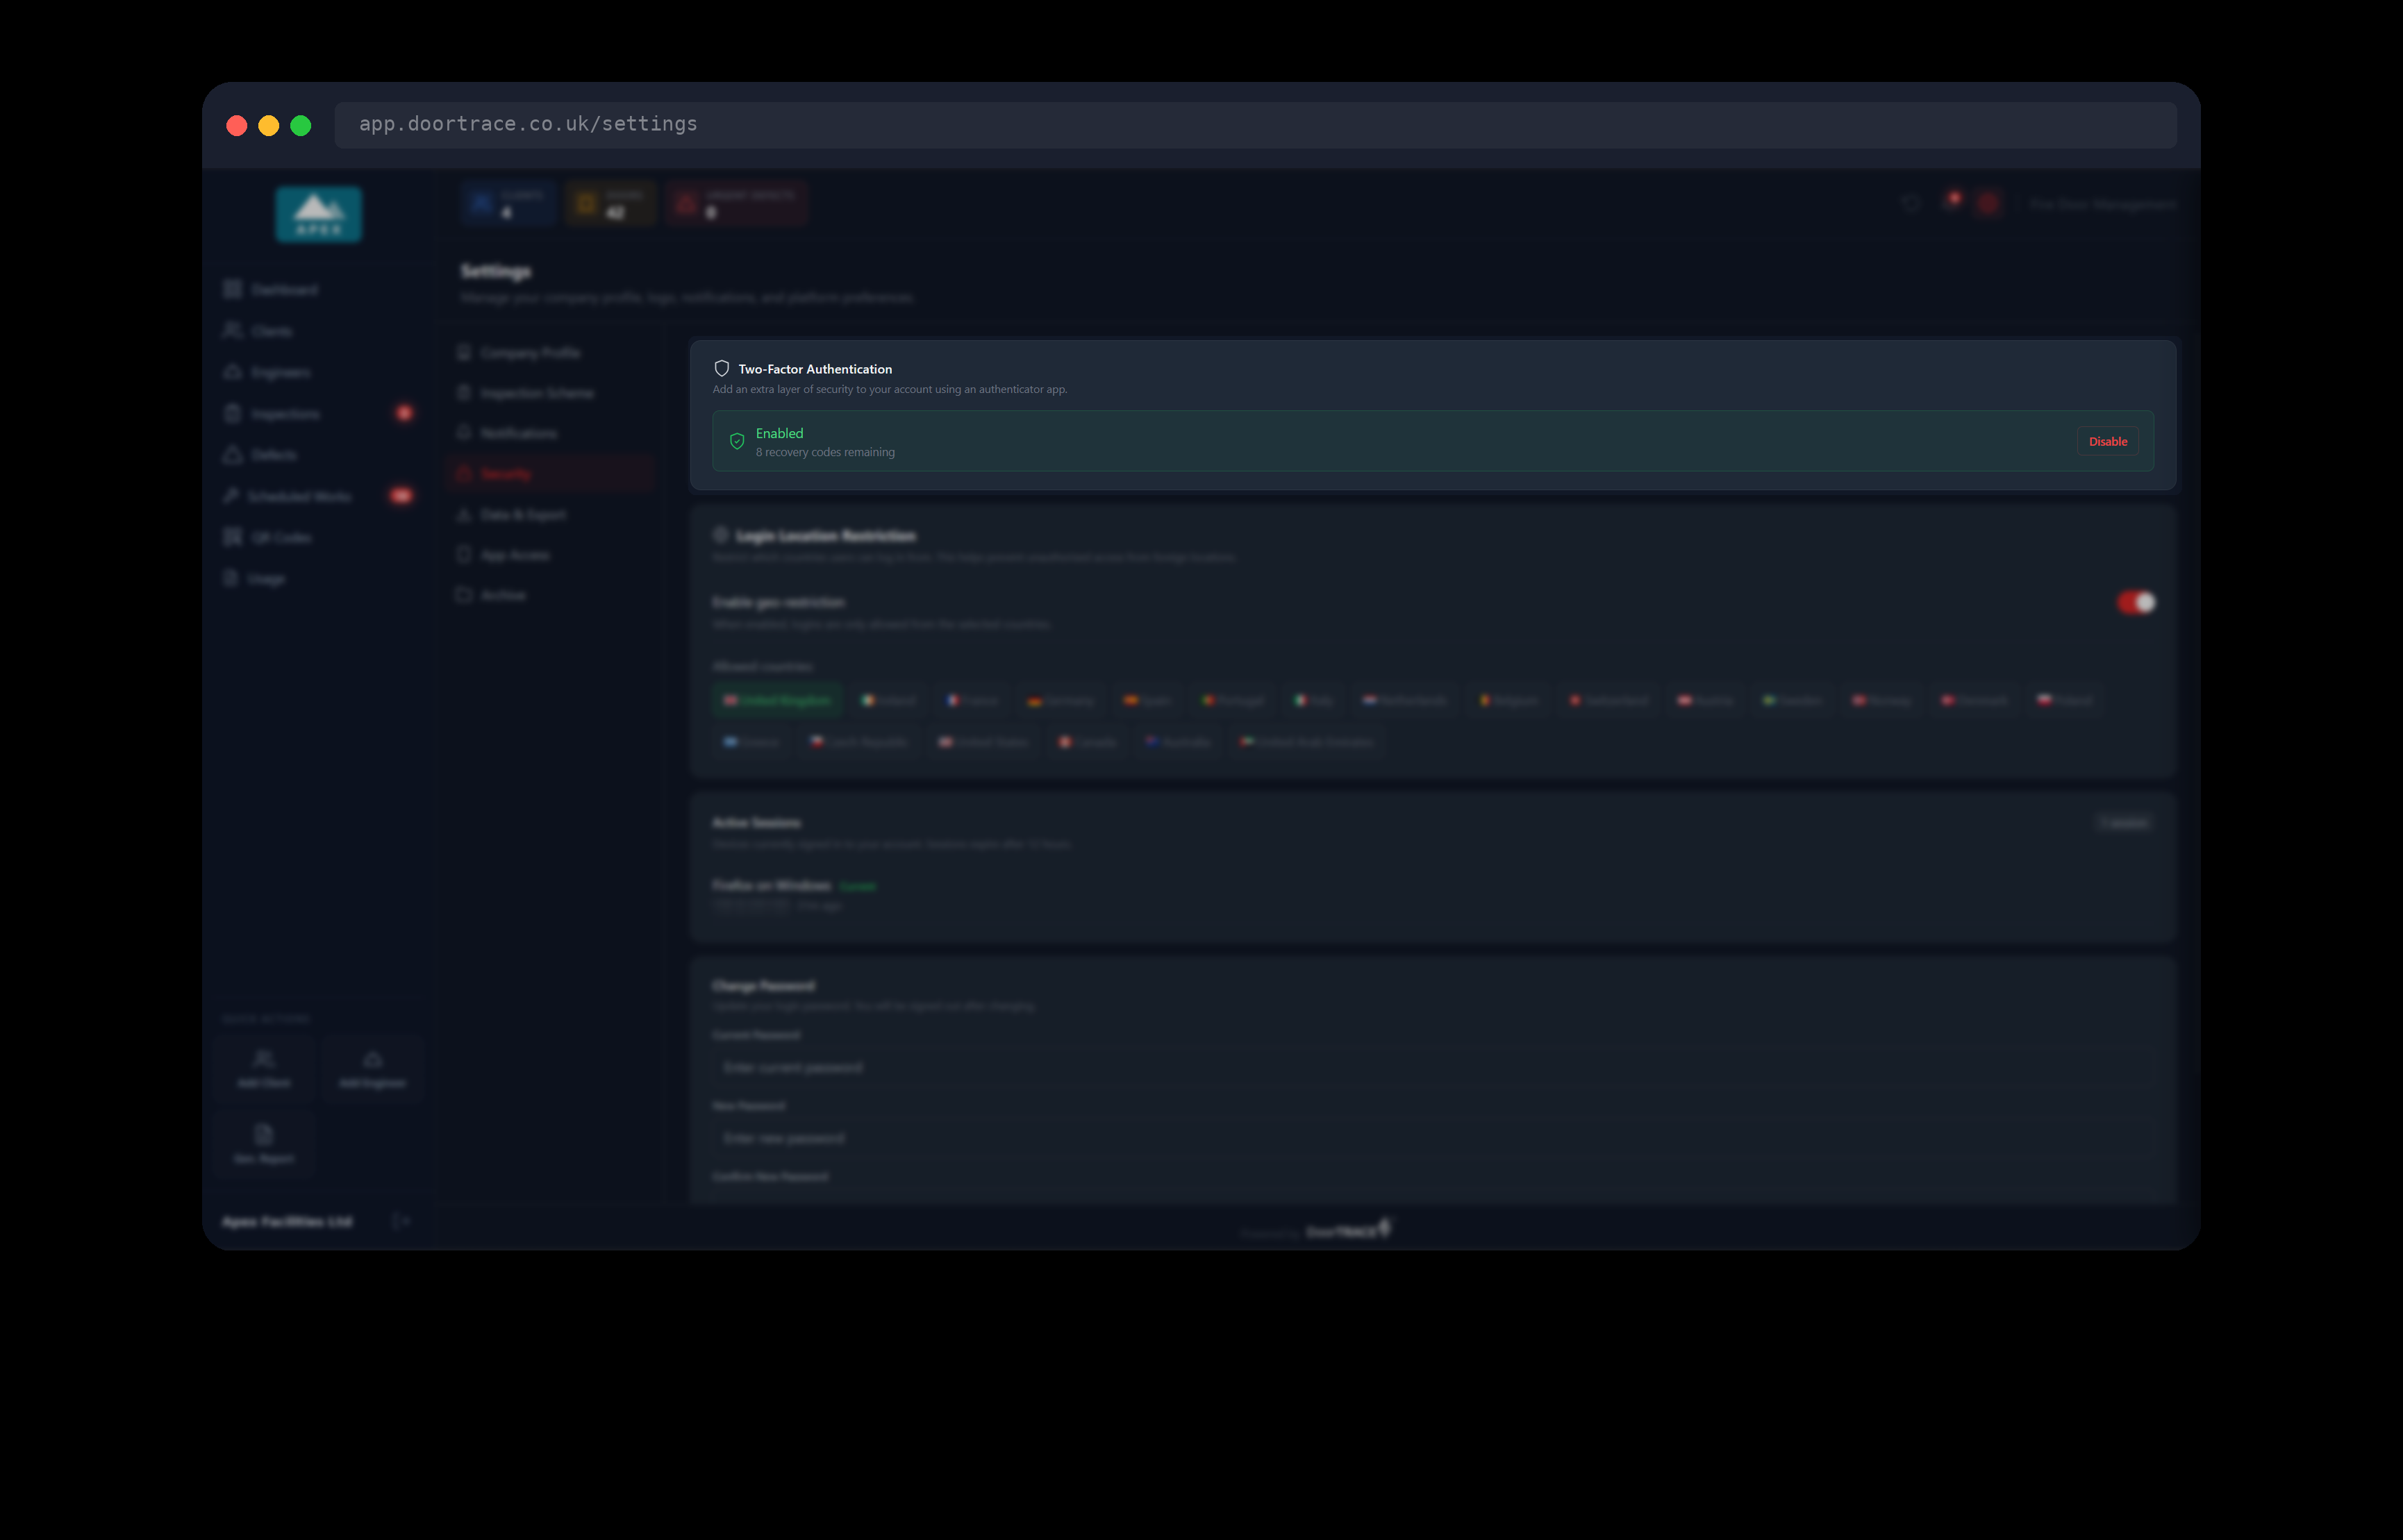
Once two-factor is on, the Two-Factor Authentication box shows a green Enabled with the number of recovery codes you have left, and a red Disable button at the right. You might turn it off to get a fresh set of recovery codes, before changing phones, or if the extra step is not wanted. Click Disable to start.
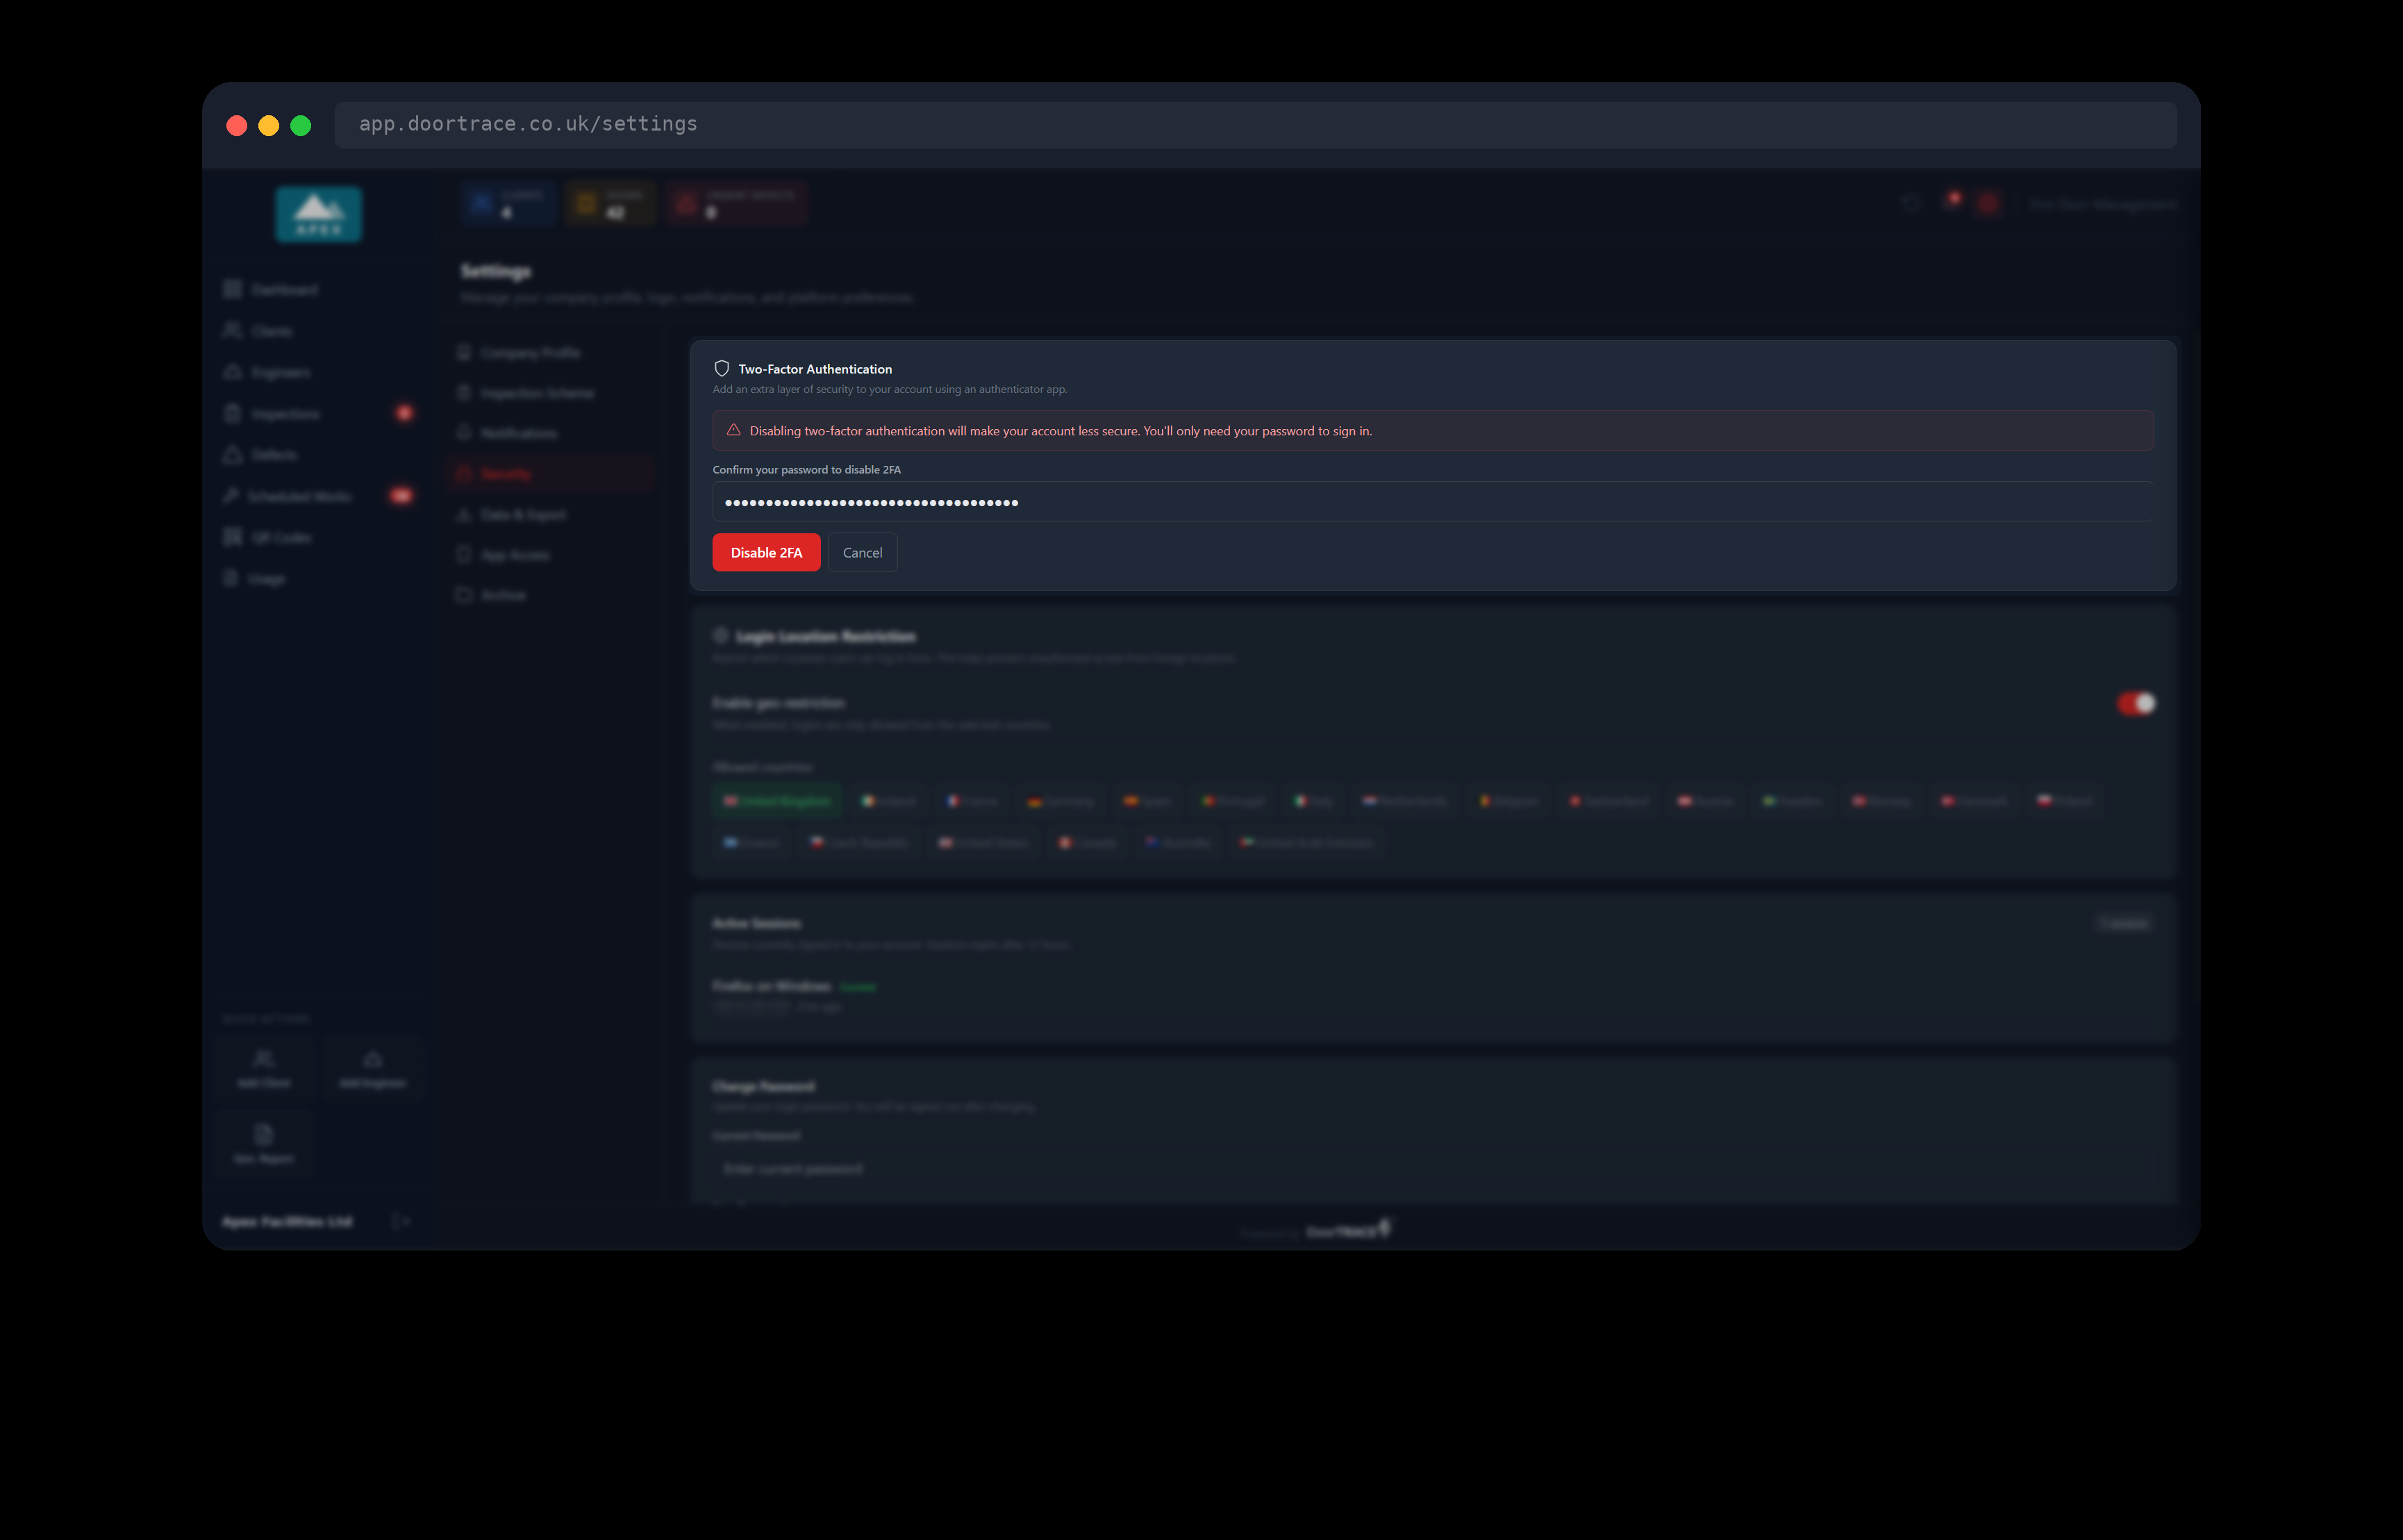
A red note reminds you that you will only need your password to sign in from then on. Type your password under Confirm your password to disable 2FA and click Disable 2FA. "Two-factor authentication disabled." appears at the bottom of the screen, the box goes back to Not enabled, and your recovery codes are discarded. Cancel leaves everything as it was.
Choosing where you can sign in from
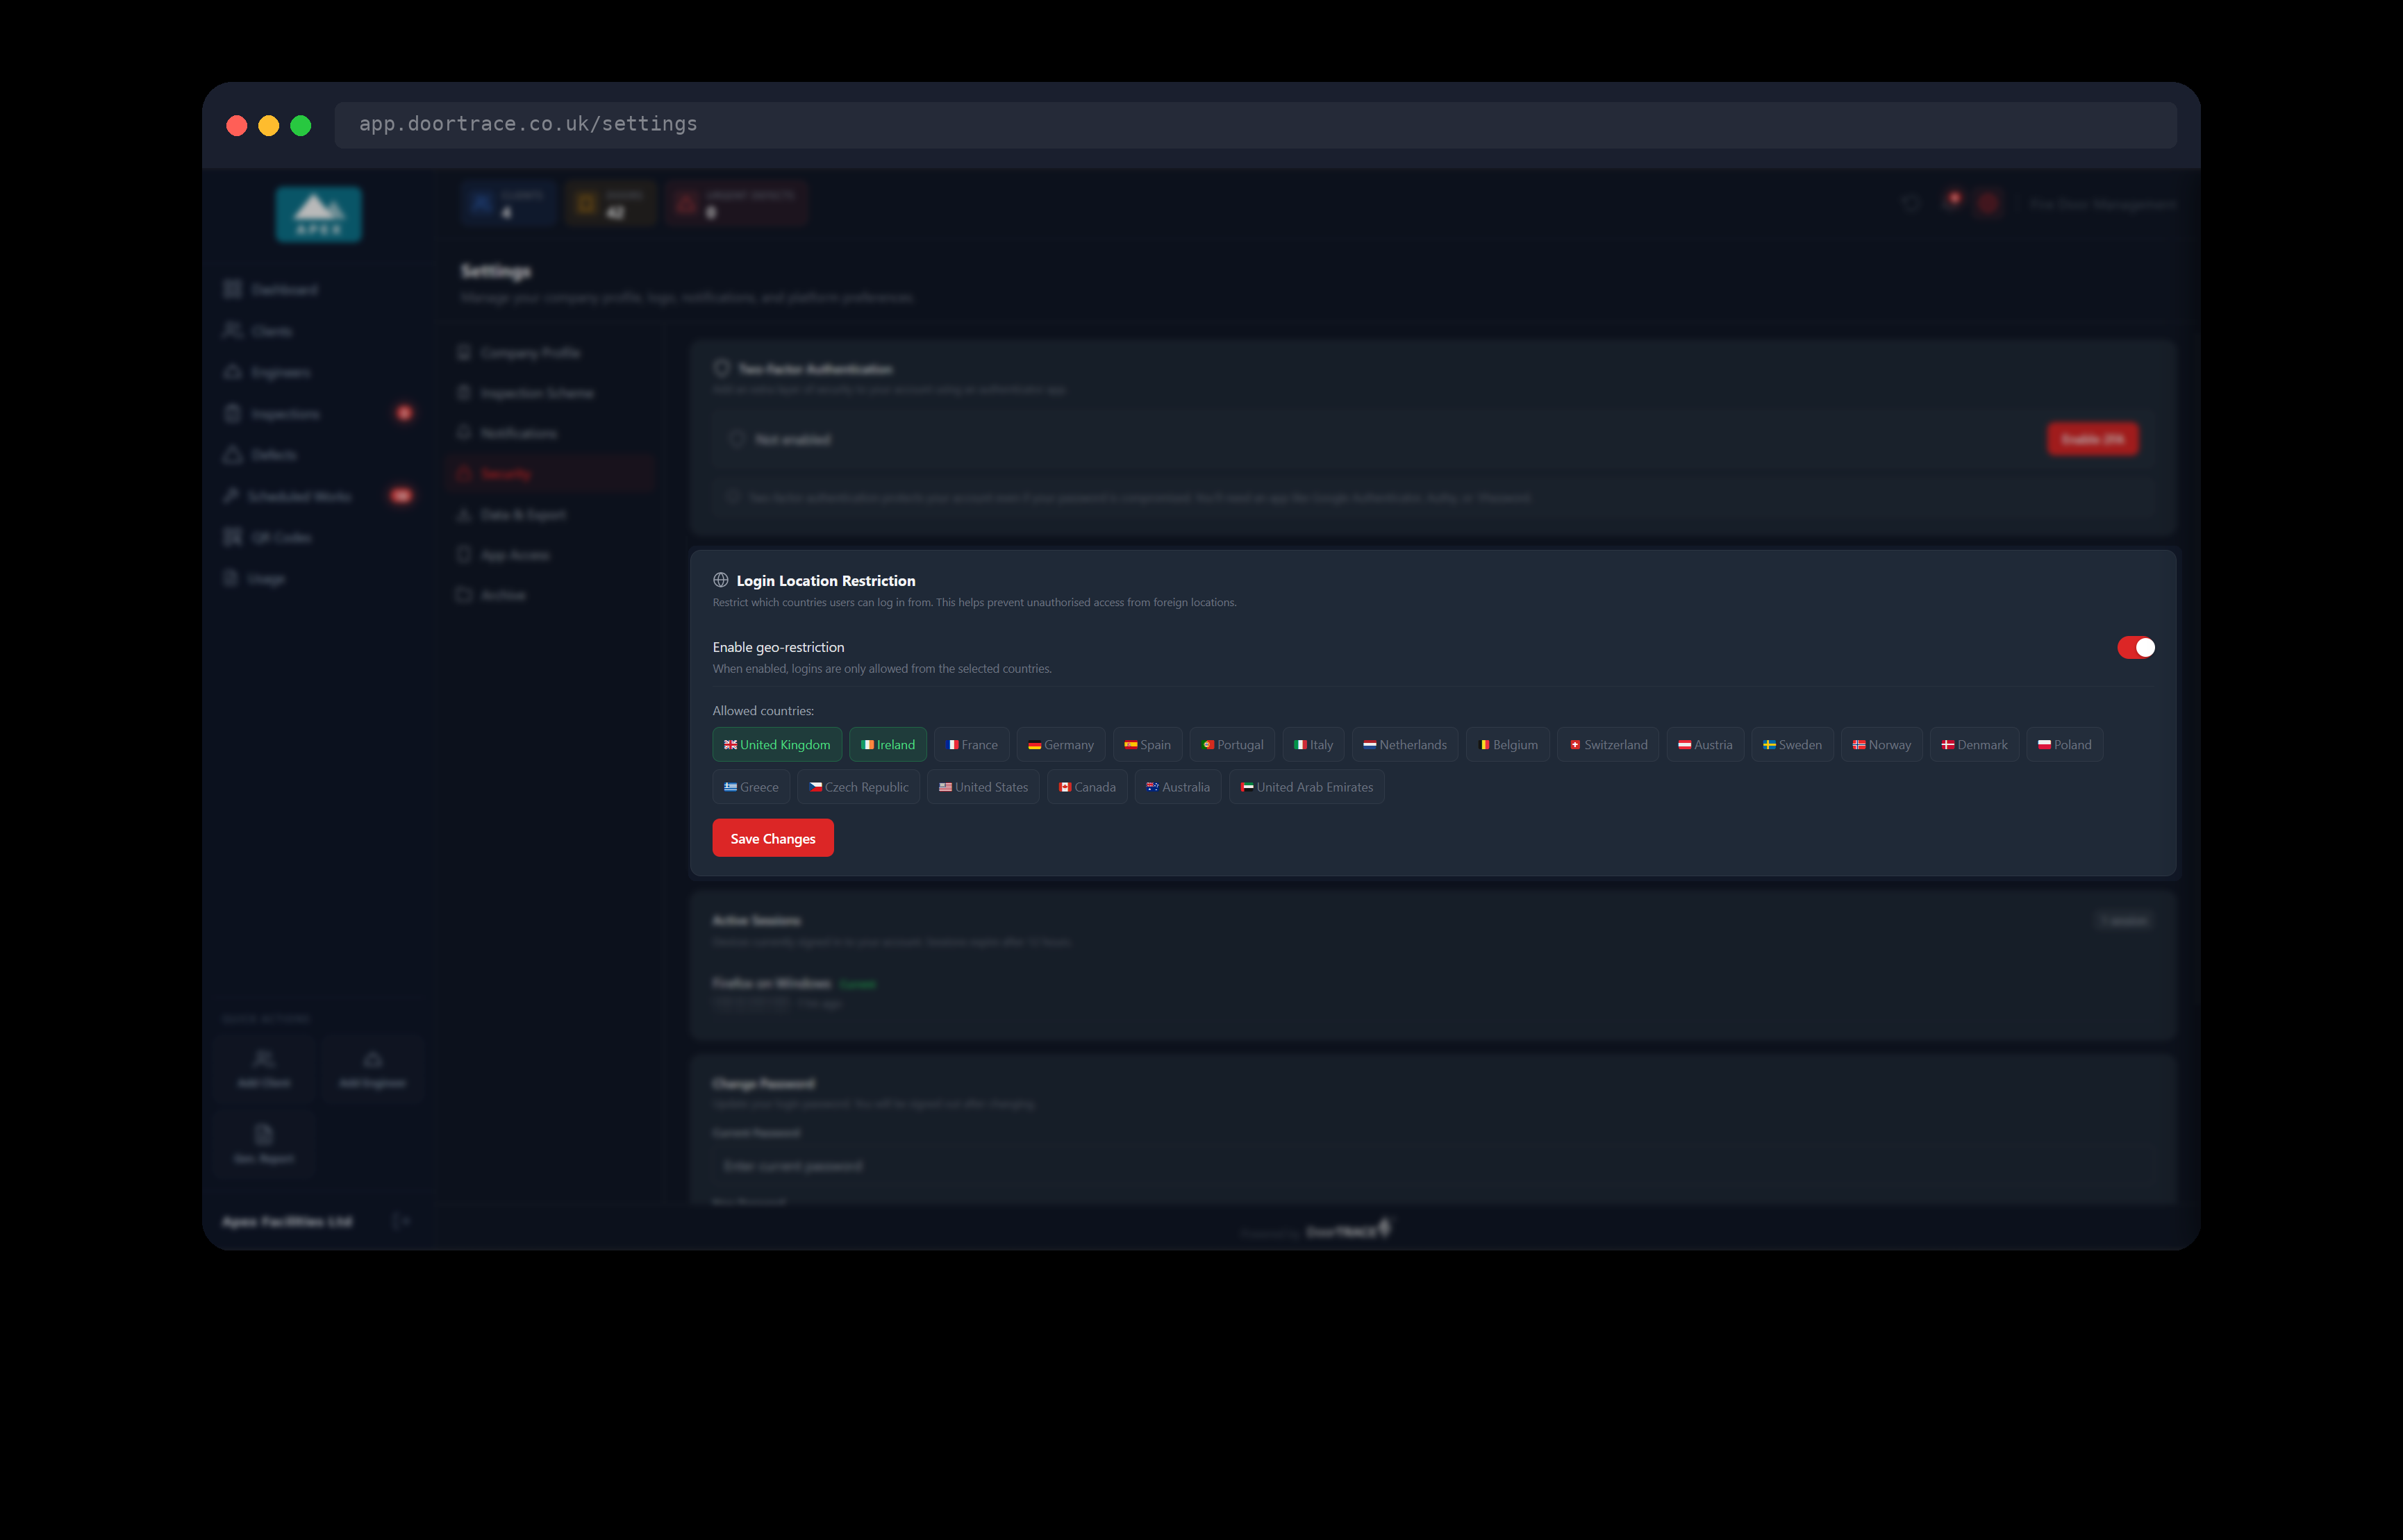
The Login Location Restriction box lets you allow sign-ins only from the countries your company works in. Turn on Enable geo-restriction and a list of 21 countries appears under Allowed countries:, from United Kingdom to United Arab Emirates. Click a country to allow it; it turns green. Click it again to remove it. Only countries in the list can be chosen. The Save Changes button appears as soon as your choices differ from what is saved; click it and "Login restriction updated." confirms. No password is asked for.
With the switch on you must keep at least one country chosen: the box shows "No countries selected. You must select at least one country or disable the restriction." in red until you do, and saving with none chosen is refused. With the switch off, an amber note reads "Geo-restriction is disabled. Logins are allowed from any country. Enabling this is recommended for security."
How it works:
- The check happens at sign-in only. DoorTRACE looks at the country the connection appears to come from. If it is not in your list, the sign-in is refused with "Login is not permitted from your current location. Contact your administrator if you believe this is an error." and counts as a failed attempt.
- It applies to every sign-in to your company, including your own engineers signing in to the engineer app and external engineers choosing your company in the app.
- Anyone already signed in stays signed in. The restriction only stops new sign-ins.
- If the country cannot be worked out, the sign-in is allowed.
Important: A VPN, a phone on roaming, or a trip abroad can put you outside your own list. If you or an engineer are refused while travelling, sign in from an allowed country and add the one you need, or turn the restriction off for the trip.
Seeing who is signed in
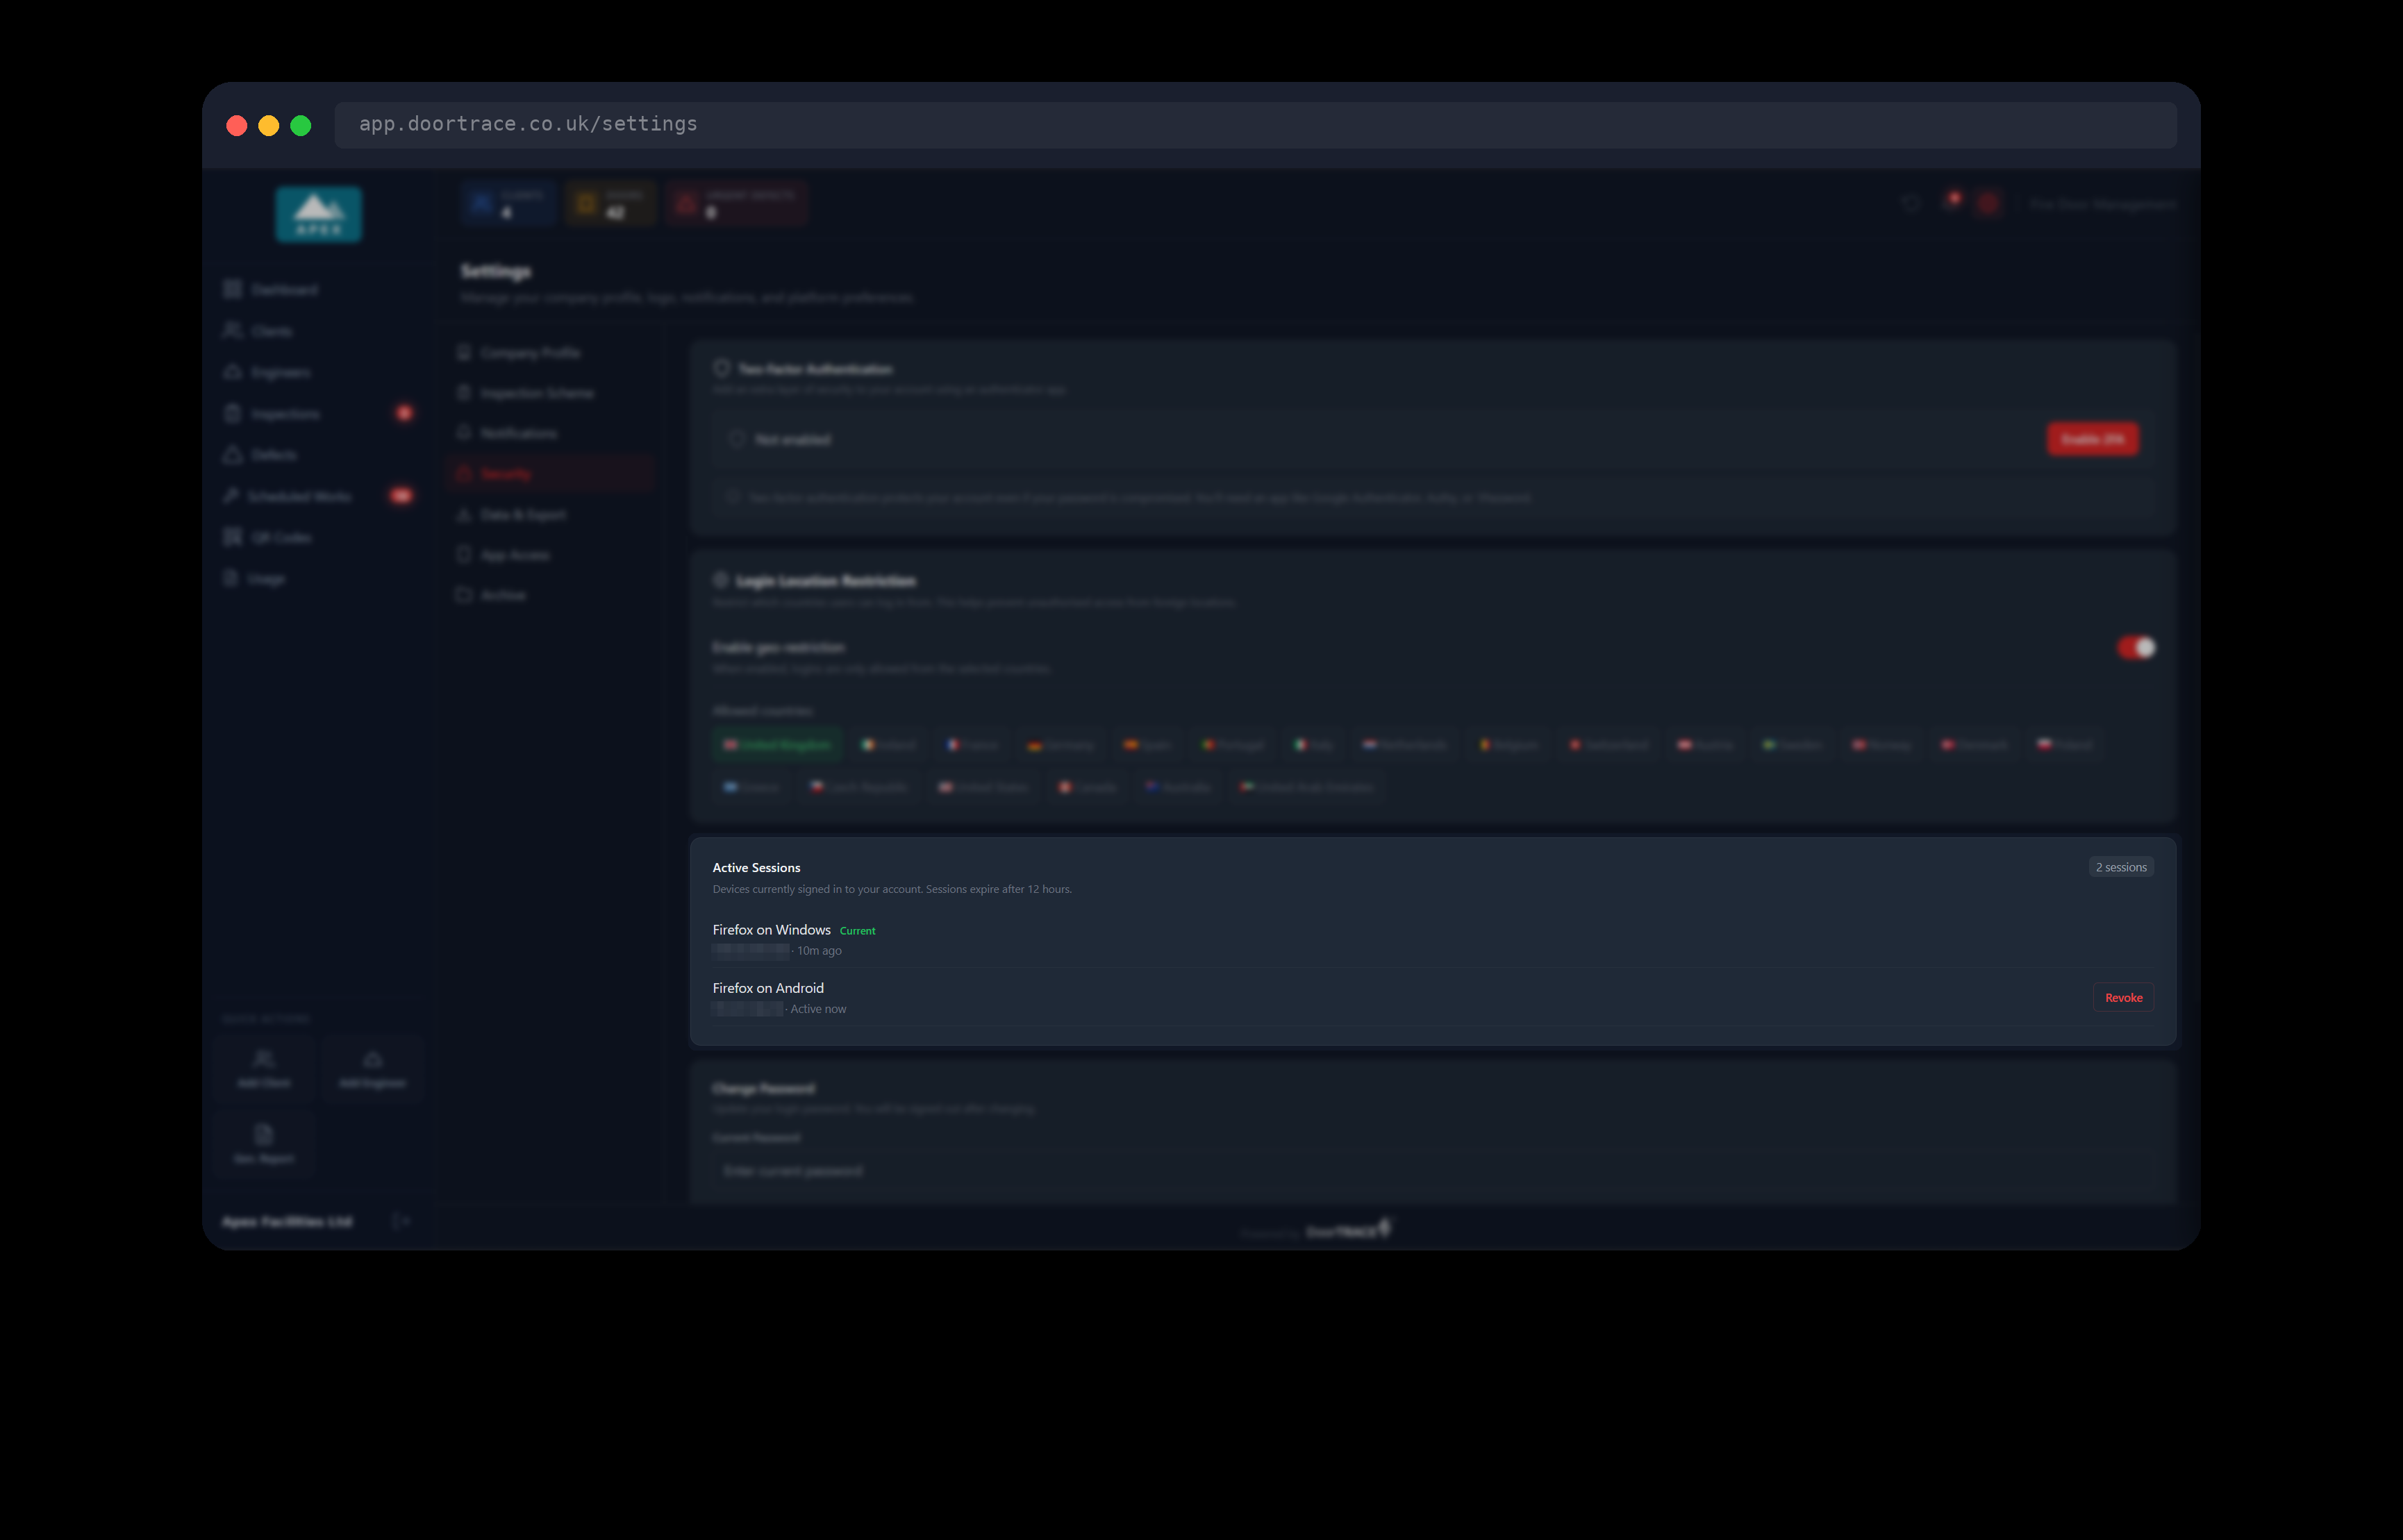
The Active Sessions box lists every browser currently signed in with your company's login. Each row shows the browser and device, such as "Chrome on Windows", with the connection's IP address and when it was last active: "Active now", "9m ago", "2h ago", "Yesterday" or "3d ago". The row for the browser you are using is listed first and marked Current in green; it has no Revoke button because you end it by signing out. When there are more than eight rows, Show N more sessions opens the rest.
Click Revoke next to any row you do not recognise, or on a device you no longer have. "Session revoked." confirms. That browser is signed out the next time it checks in with DoorTRACE, which it does every 13 minutes while a tab is open, so within about 15 minutes it sees "Session expired" with a Sign in button.
A few things worth knowing:
- Sessions expire after 12 hours. A browser that is still open renews its sign-in in the background, and each renewal starts a fresh 12 hours, so the clock really runs from the last time the portal was open. "9m ago" on your own row is normal.
- Remember me on the sign-in screen keeps you signed in after you close the browser. Without it, the sign-in belongs to that browser tab and is gone when the tab closes.
- To sign out, click the arrow icon next to your company name at the bottom of the menu on the left, then Sign out in the window that asks "Are you sure you want to sign out of the portal?". That ends only the browser you click it in. Other devices stay signed in until you revoke them here, or until they expire.
- Your engineers' phones are not listed here. The engineer app has its own login.
Changing your password
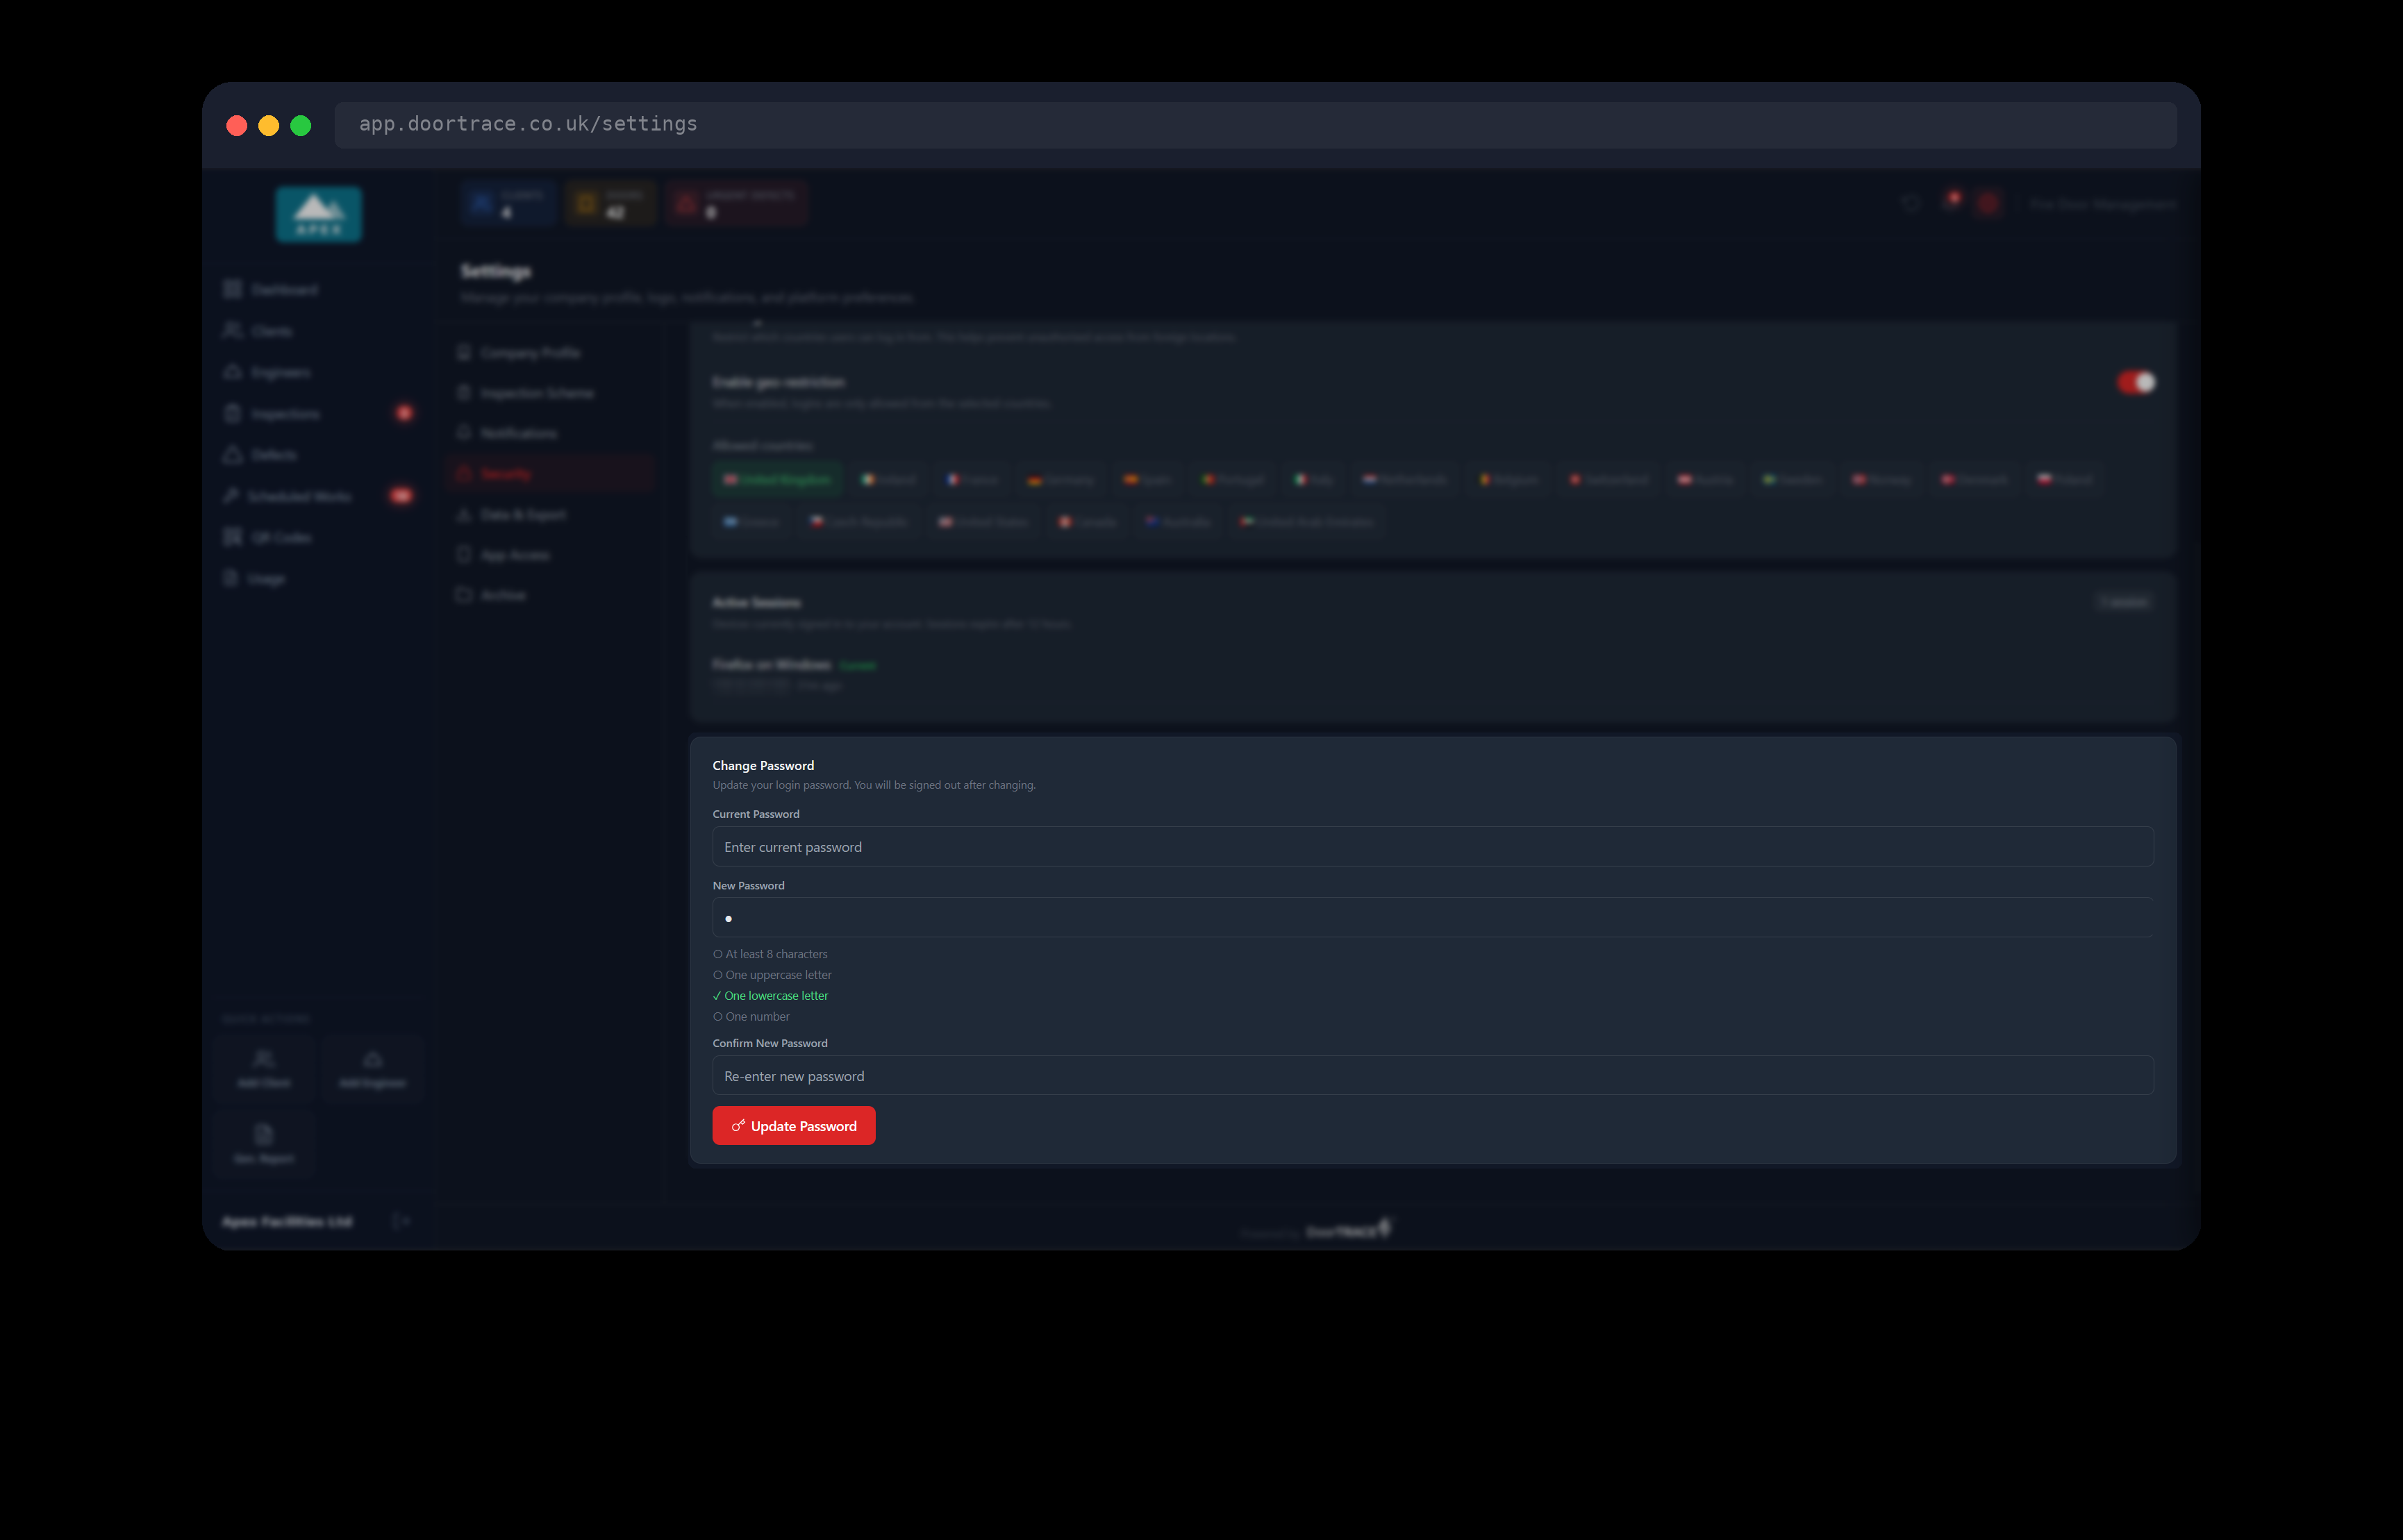
In the Change Password box, type your current password under Current Password, then your new one under New Password. As you type, four lines under the box turn green as each rule is met: At least 8 characters, One uppercase letter, One lowercase letter, One number. Type the new password again under Confirm New Password and click Update Password (it shows "Changing…" while saving).
If a box is empty you will see "All fields are required." If the new password misses a rule, the message names it, for example "New password does not meet the rules: one number." If the two new passwords differ, "New passwords do not match." If the current password is wrong, "Current password is incorrect".
Important: A successful change signs you out everywhere. "Password changed. Please sign in again." appears, the portal signs you out a moment later, and every other browser signed in with your login is ended too. Sign back in with the new password.
If you have forgotten your password
On the sign-in screen, click Forgotten password?, type your email address and click Send reset link. The screen always says "Check your email", whether or not the address is on DoorTRACE. If it is, you receive an email from DoorTRACE (noreply@doortrace.co.uk) titled "Reset your DoorTRACE password" with a Reset Password button. The link works for one hour and only once. Clicking it opens Set new password: type a new password that meets the same four rules, confirm it and click Reset password. "Password reset" confirms, and Go to sign in takes you back. A reset ends every session on every device, the same as a change.
If the link has been used or is more than an hour old, the page reads "This reset link has expired or already been used. Please request a new one." Go back to the sign-in screen and ask for a fresh one; each new request cancels any earlier link.
If you cannot sign in
- "Too many login attempts. Please wait a moment and try again.": more than five attempts came from your connection in a minute. Wait a minute and try again.
- "Too many failed attempts. This account is locked for 15 minutes.": ten wrong passwords in 15 minutes lock your email address for 15 minutes, and the right password is refused too until the lock lifts. Wait the 15 minutes before trying again; every further attempt keeps the lock going.
- "Login is not permitted from your current location.": see Choosing where you can sign in from above.
- Lost your phone with two-factor on: use a recovery code, as described under Signing in with two-factor on. If you have no recovery codes left, contact DoorTRACE.
If something goes wrong on this page
If a box shows a red could not be loaded message (for example Your active sessions could not be loaded), the portal could not reach DoorTRACE. Check your connection and click Try again. The settings in that box are not shown until they have loaded, so nothing can be saved over by mistake. If saving the location restriction fails, "Failed to save." shows at the bottom of the screen and nothing has changed.
What's next
App access for your own engineers sets up the shared engineer app login for your in-house engineers.
Still can't find the answer?
Send us a message and we'll help. We respond within one working day.