FM Portal guides
FM Portal · Clients and buildings
Maps and floor plans
Last updated 20 Sept 2026
The Maps page holds two kinds of drawing for a building. Building maps are the site-wide documents you want to hand an engineer or an inspector: the site plan, fire strategy plan, evacuation route plan and access plan. Floor plans are attached to the building's floors one at a time, and once a floor has a plan you can pin its doors to it and download the plan with every pin marked. This guide covers uploading, viewing, replacing and removing both kinds. Pinning doors is covered in Pinning doors on a floor plan.
Before you start
Open the client, then the building, and click Maps in the row of buttons at the top of the building page. The breadcrumb reads the building name followed by Maps & Site Plans, and the page is titled Maps & Site Plans.
Floor names come from the engineer app. When an engineer registers a door they pick its floor from a stepper (Basement 20 up to Roof Level), and the portal uses the same names. A plan you attach to Level 2 covers every door registered on Level 2, so you do not need to match anything up by hand.
Building maps
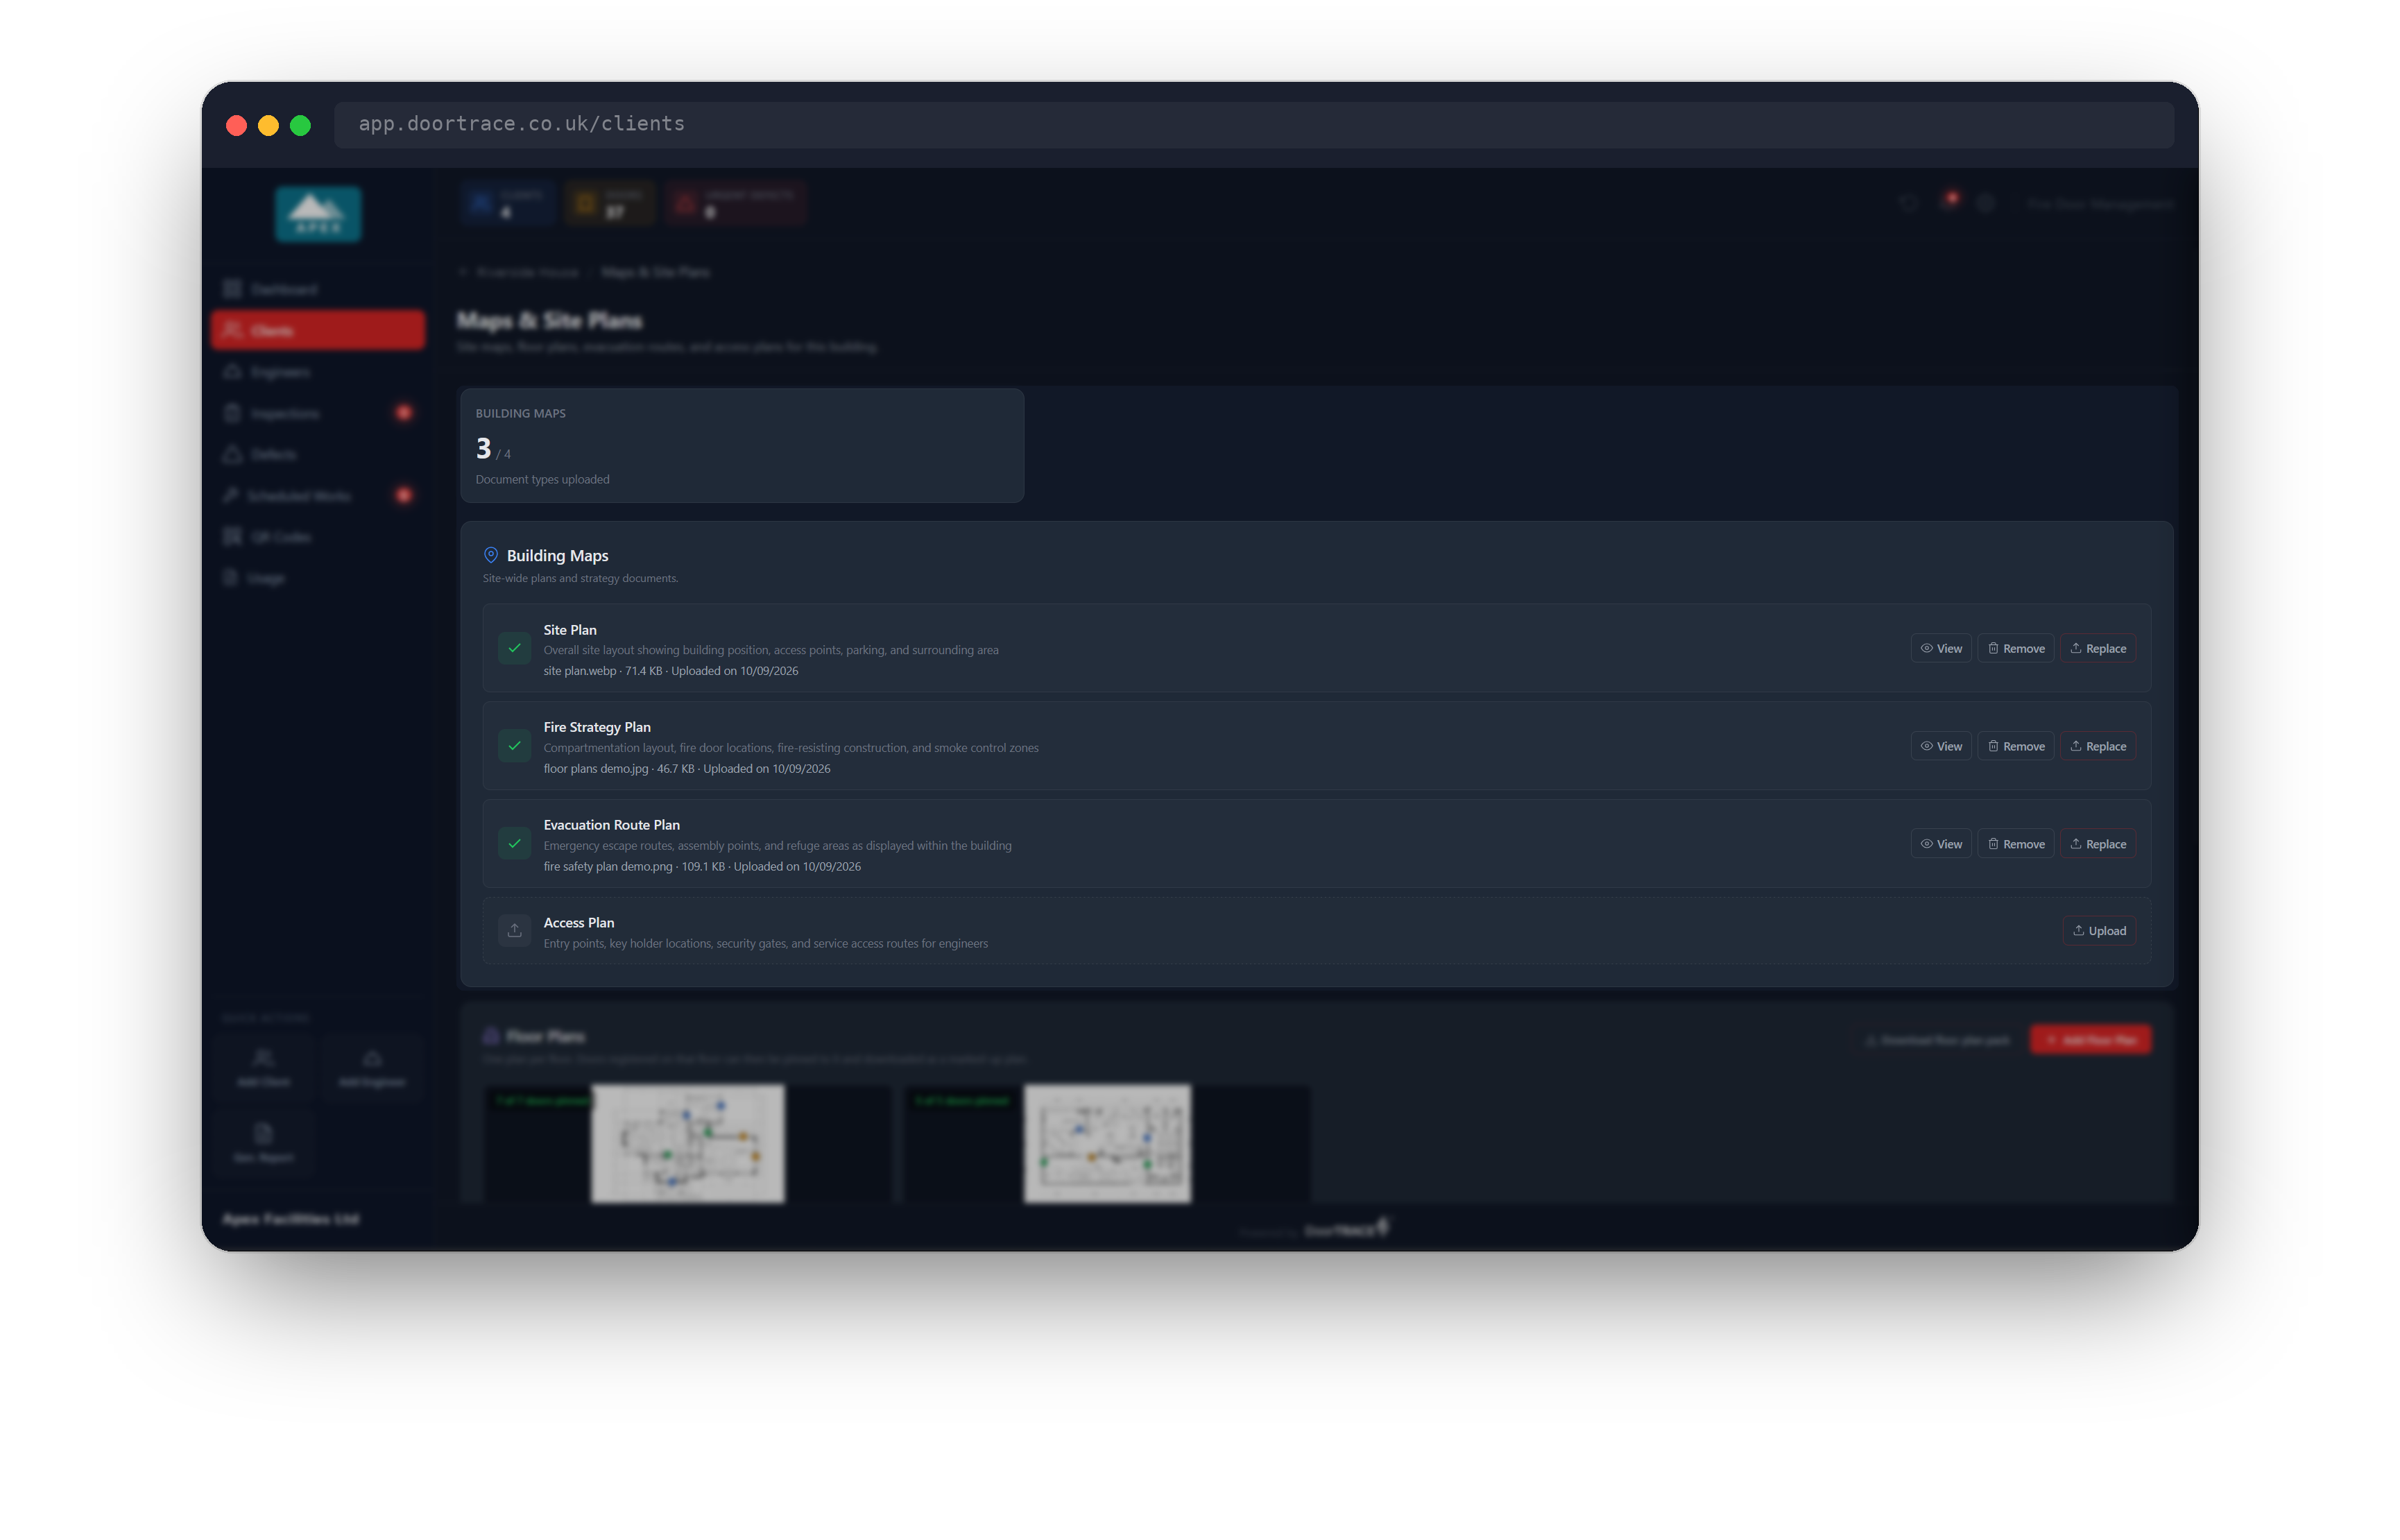
The card at the top shows how many of the four map types have a file (Building Maps, n / 4, "Document types uploaded"). Below it, the Building Maps section lists the four slots:
- Site Plan: overall site layout showing building position, access points, parking, and surrounding area
- Fire Strategy Plan: compartmentation layout, fire door locations, fire-resisting construction, and smoke control zones
- Evacuation Route Plan: emergency escape routes, assembly points, and refuge areas as displayed within the building
- Access Plan: entry points, key holder locations, security gates, and service access routes for engineers
An empty slot has a dashed outline and an Upload button. A filled slot has a green tick, the file name, its size and the date it was uploaded, with View, Remove and Replace buttons.
Uploading a building map
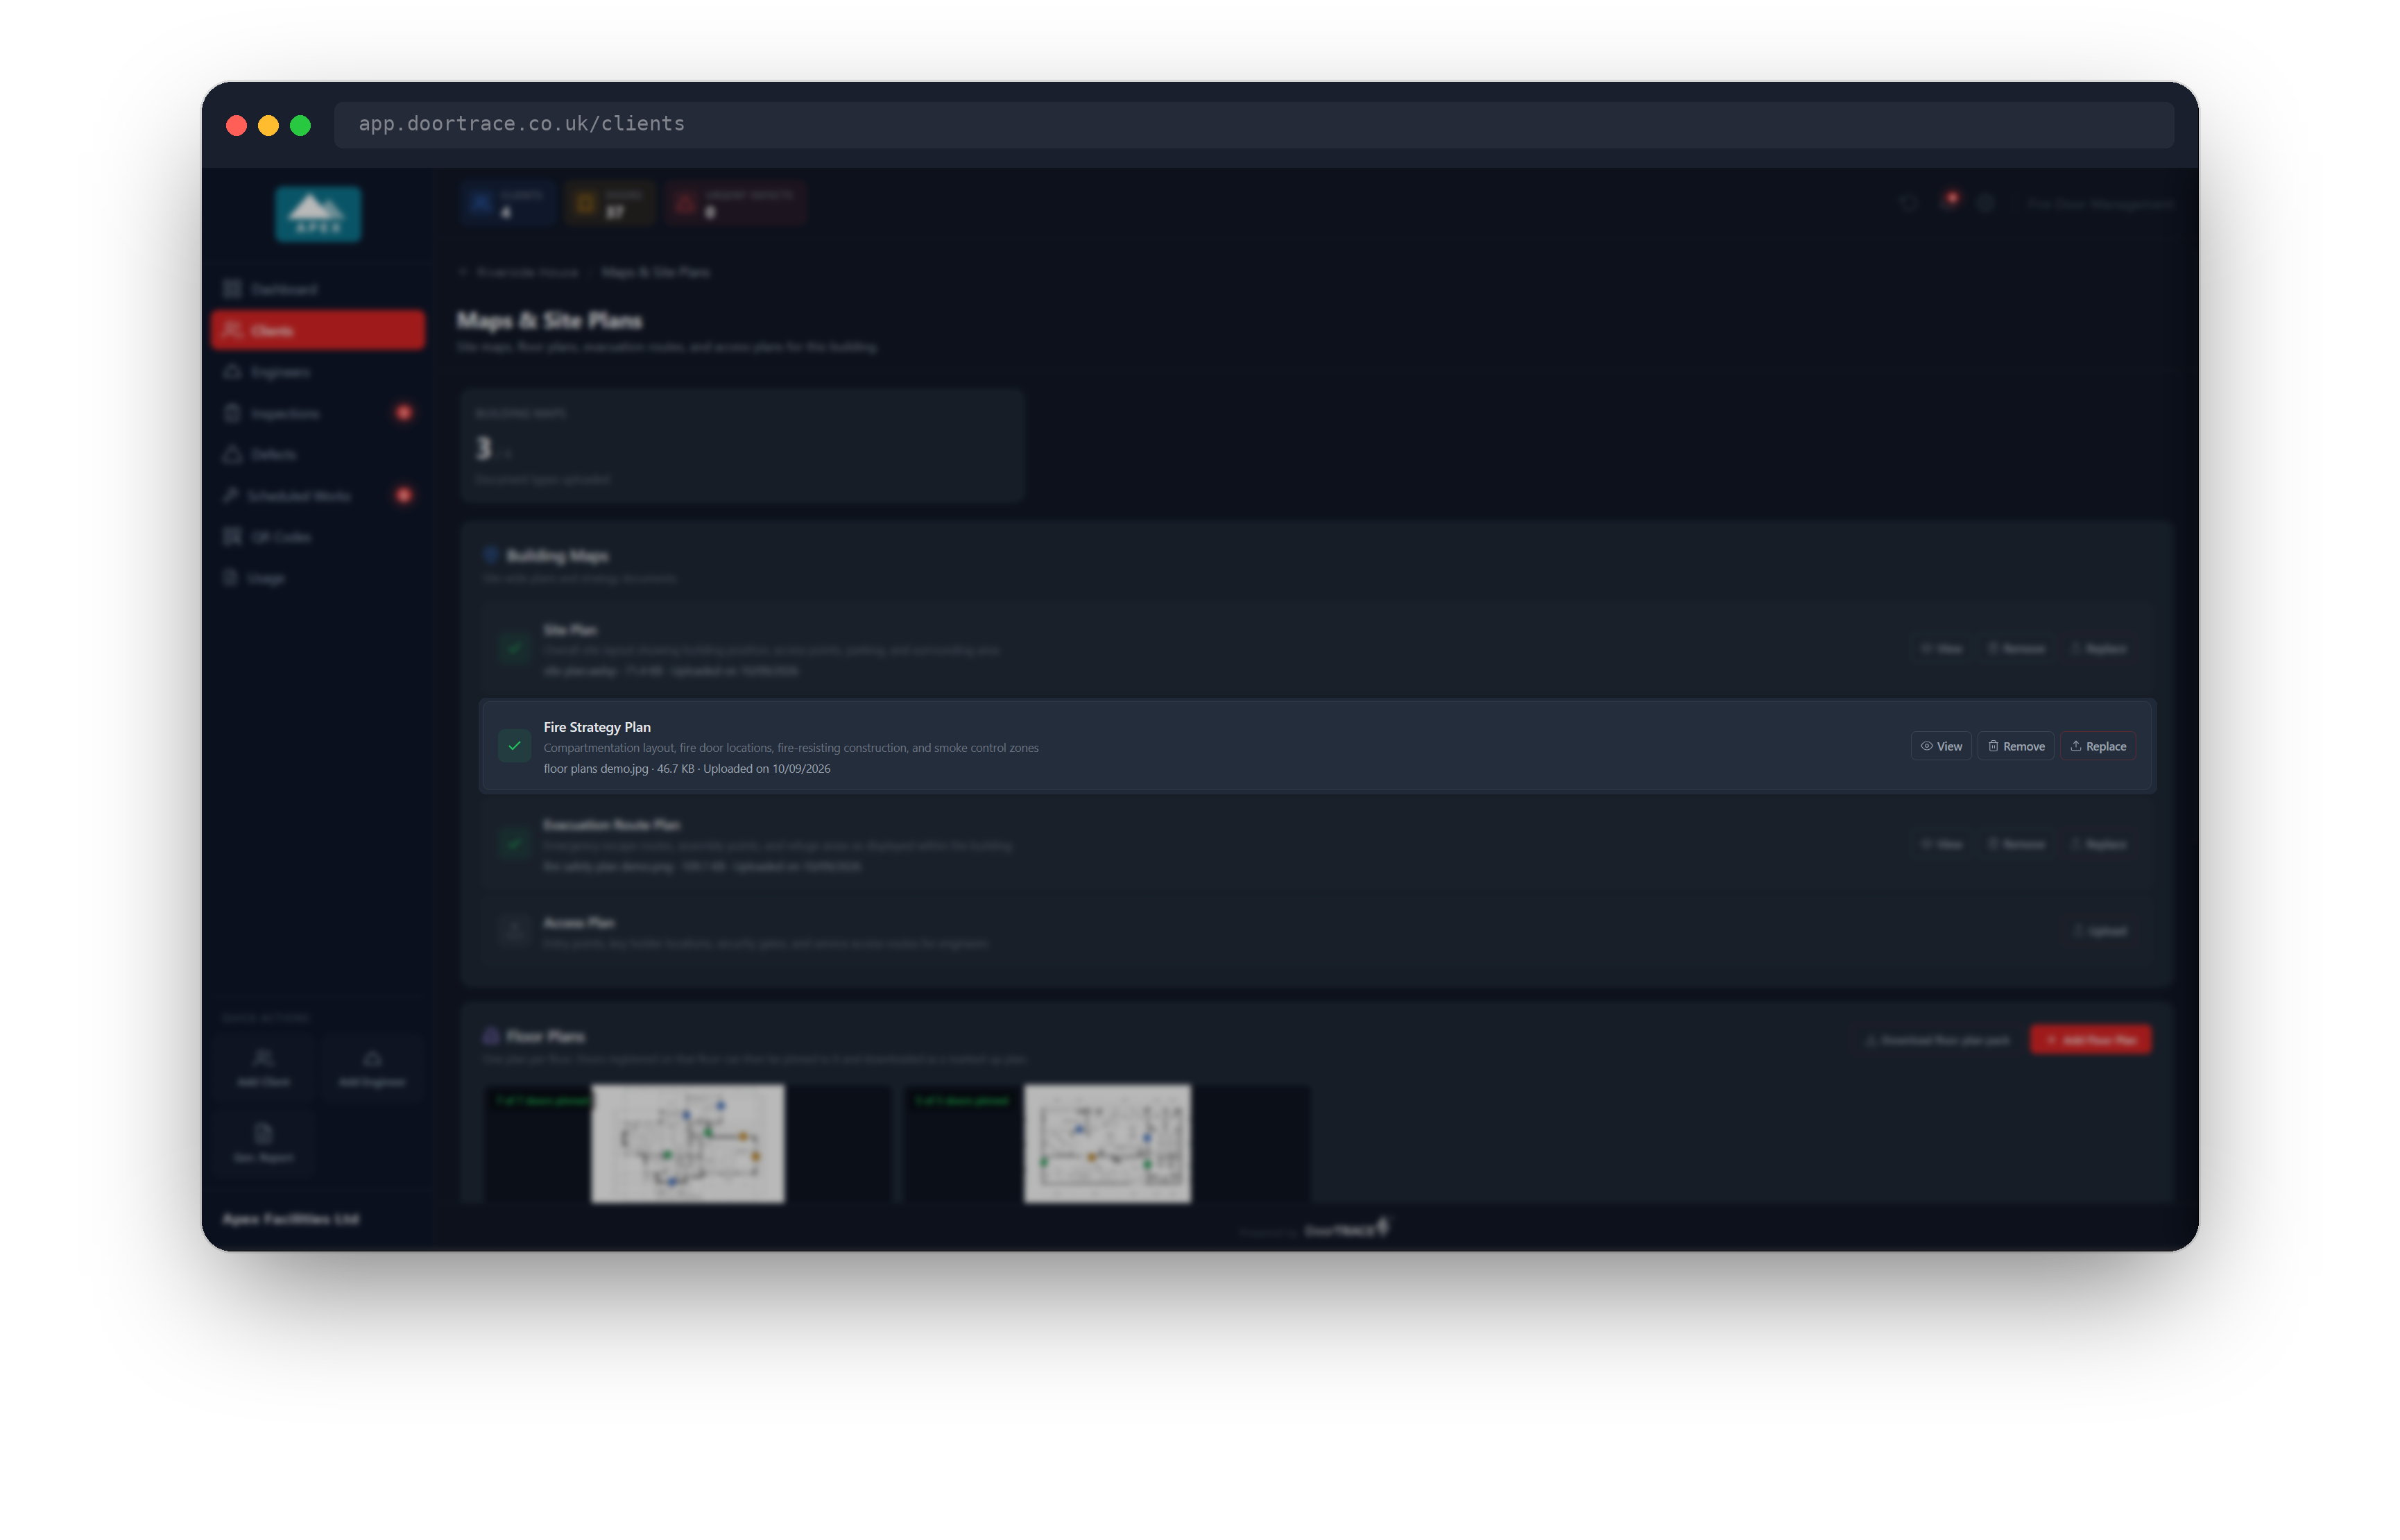
Click Upload on the slot and choose the file. Building maps can be a PDF, PNG, JPG, WebP or HEIC file up to 50MB. The button reads Uploading... while the file goes up, then the slot fills in and the message "Map uploaded successfully" appears. The slot line reads "<file name> · <size> · Uploaded on <date>".
To swap a file for a newer version, click Replace and choose the new file. The new file is saved first and only then is the old one deleted, so if anything goes wrong part way the slot still points at a file that exists.
View opens the file in a new browser tab. While it loads the button reads Opening....
Tip: Every upload, replacement and removal on this page is recorded in the audit trail, so you can always see when a map changed.
Removing a building map
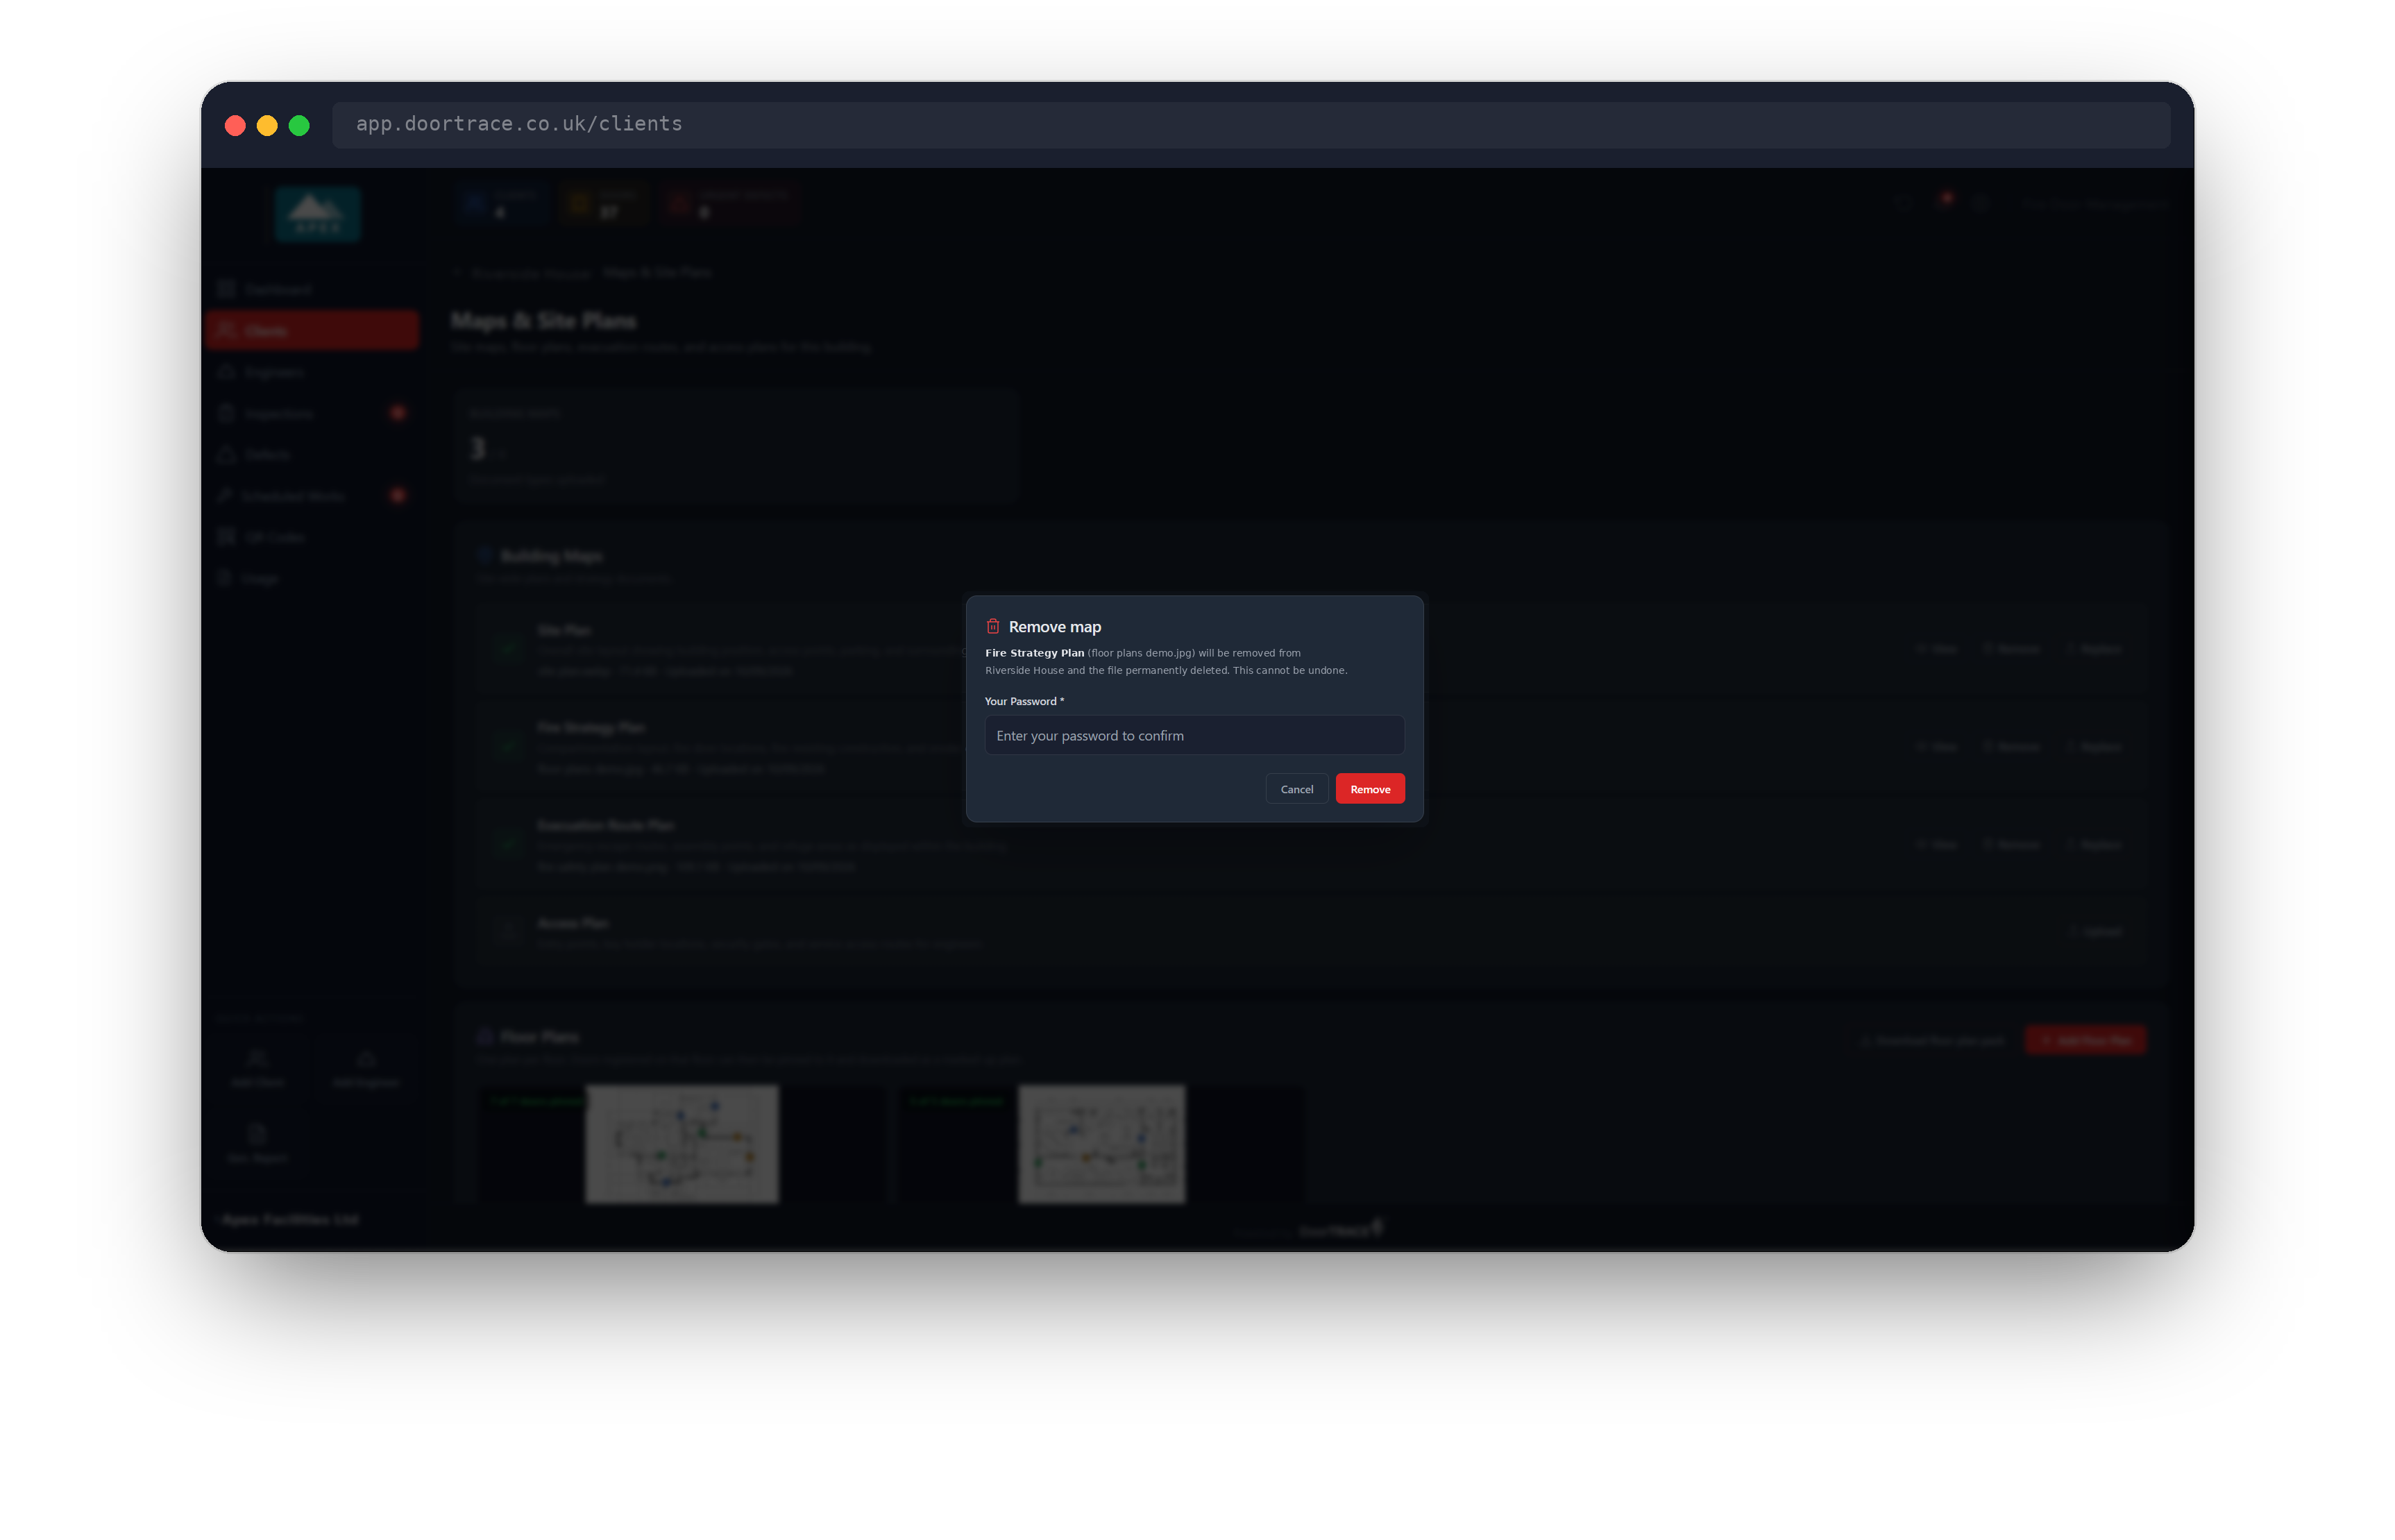
Click Remove on a filled slot. A pop-up titled Remove map names the slot and the file and explains that it will be removed from the building and the file permanently deleted. You will be asked for your portal password to confirm. Click Remove (the button reads Removing... while your password is checked and the map is removed), and the message "Map removed" appears. The slot goes back to empty and is ready for a new upload. There is no way to restore a removed map, so if you only want a newer version, use Replace instead.
Floor plans
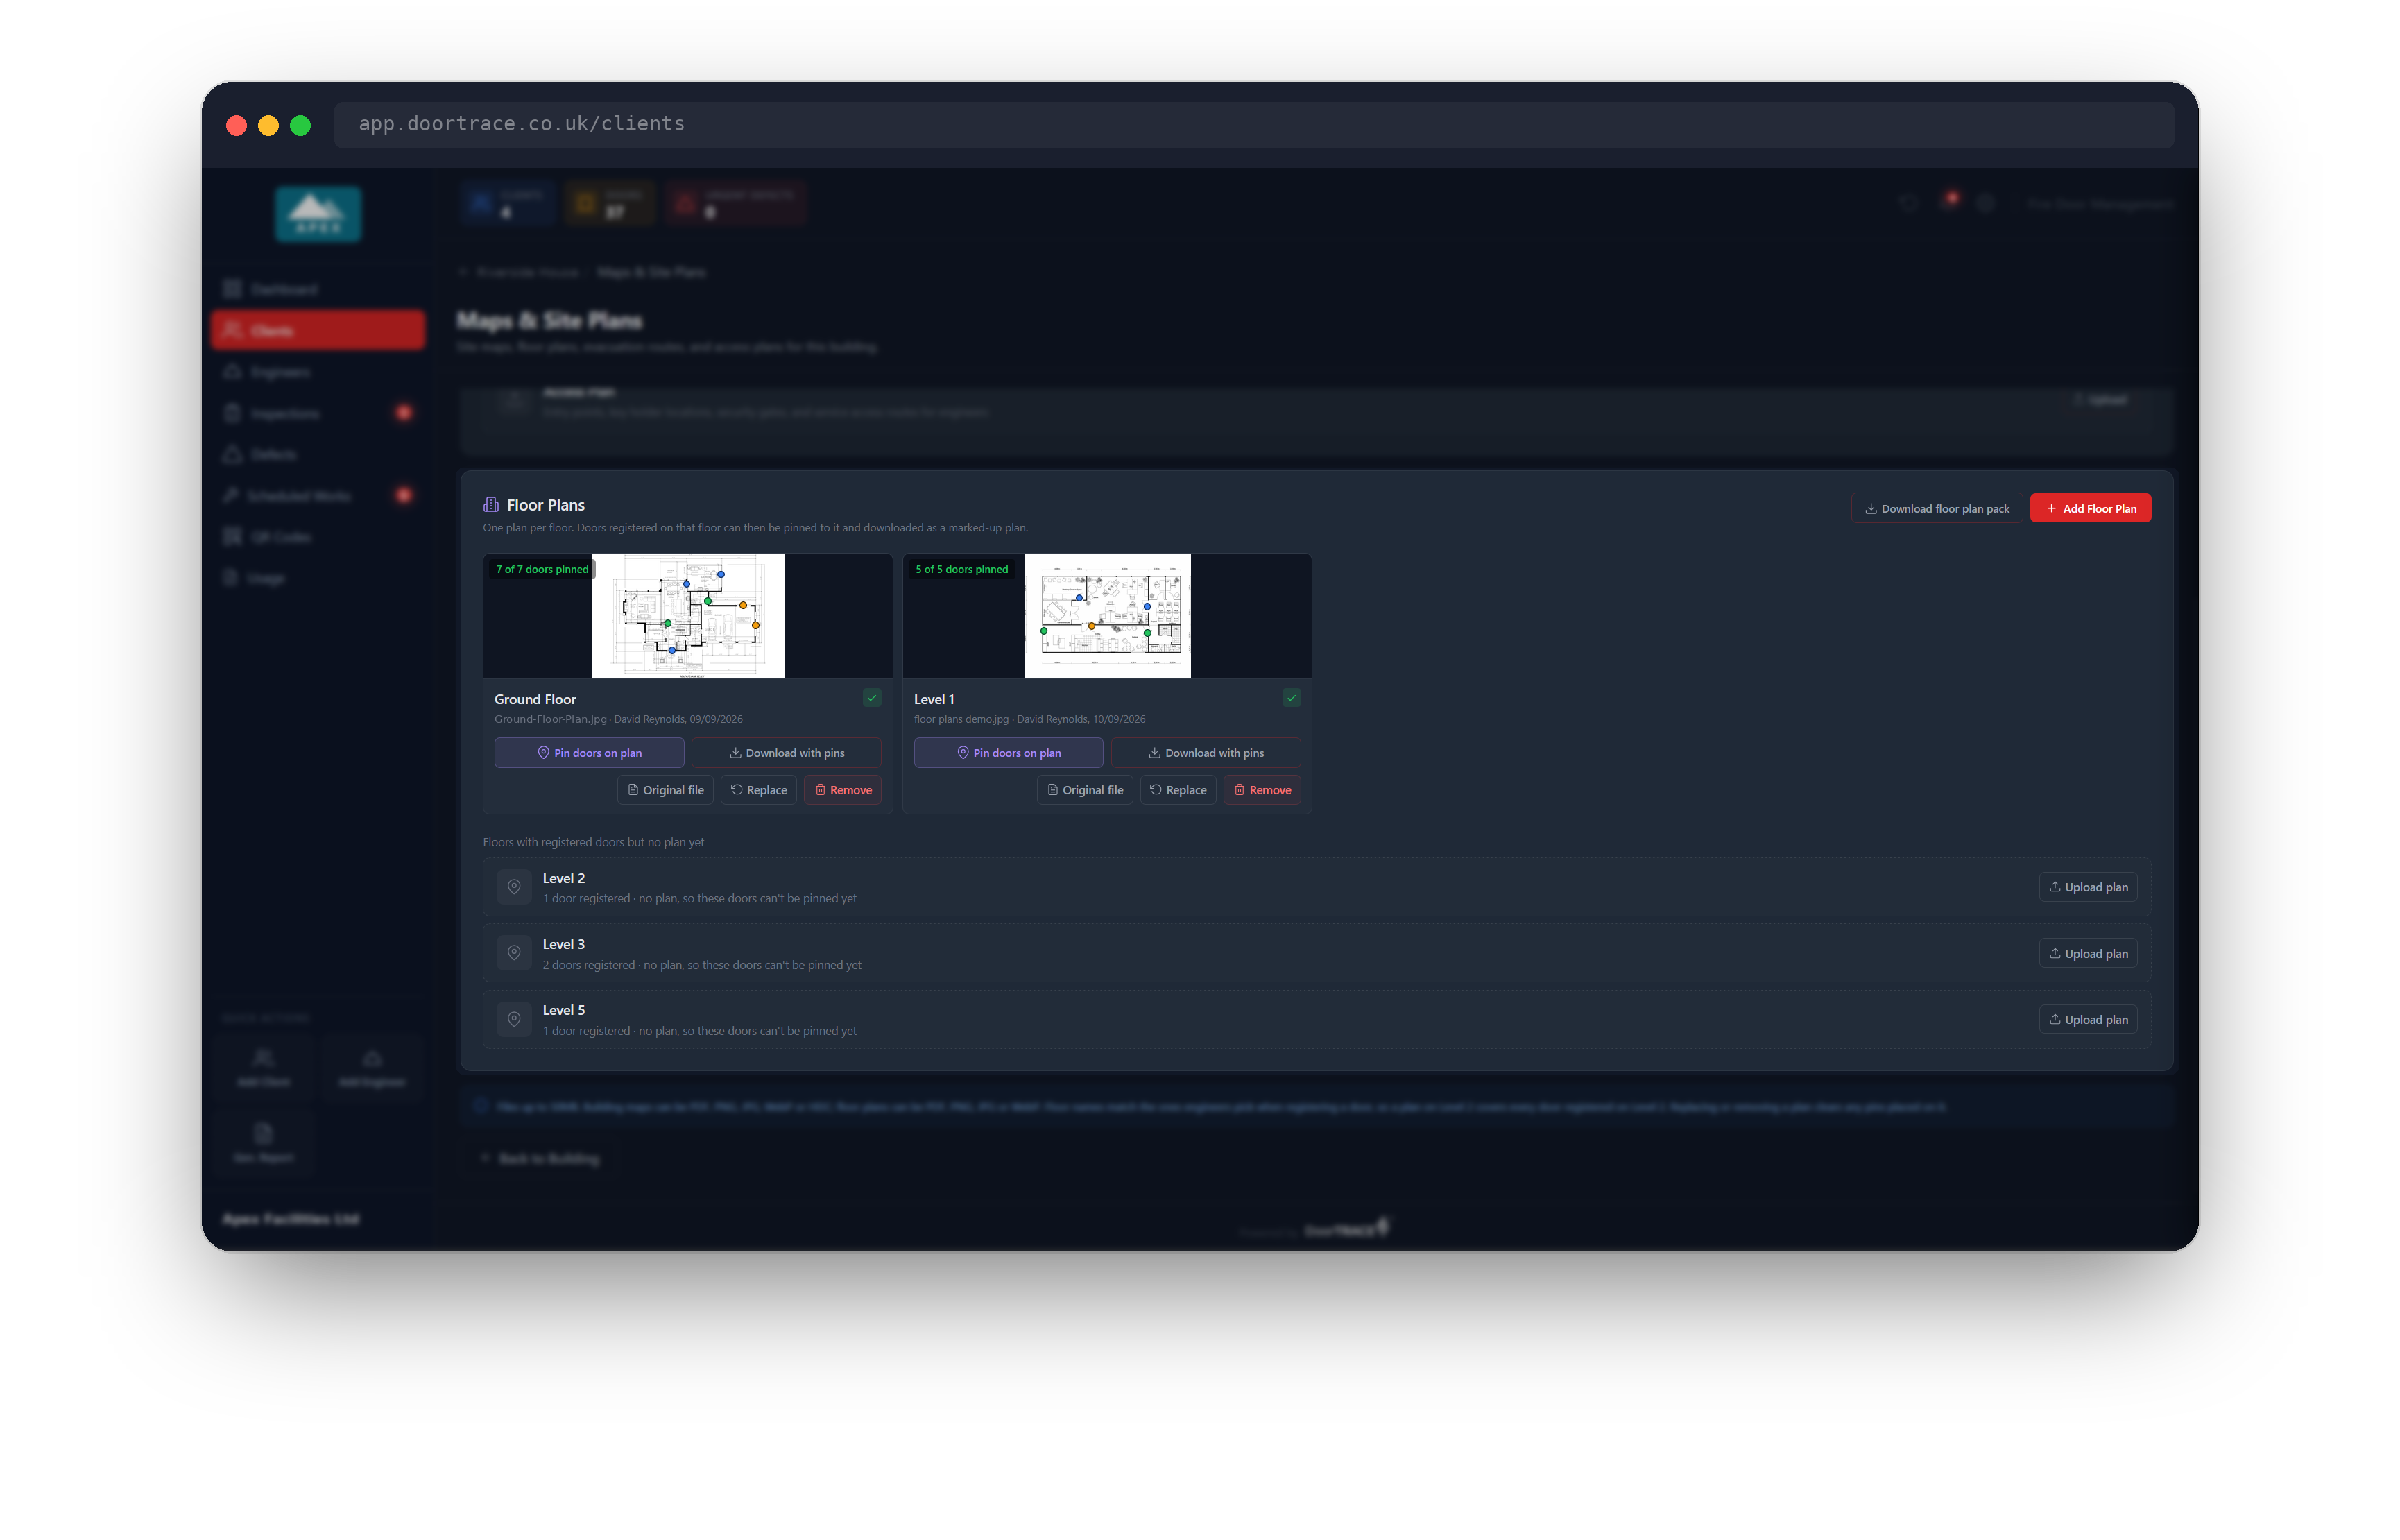
The Floor Plans section below the building maps works differently: one plan per floor, attached to the floor itself. Floors are always listed lowest to highest, from any basements through Ground Floor and the numbered levels to Roof Level.
Each floor that has a plan shows as a card with a thumbnail of the plan, coloured dots where doors have been pinned, and a badge reading "n of m doors pinned" (grey when nothing is pinned, amber when some doors are, green when every door on the floor is). Under the thumbnail are the floor name, the file name and the date, and five buttons:
- Pin doors on plan opens the plan viewer (see Pinning doors on a floor plan)
- Download with pins saves a PDF of this floor with every pinned door marked. It is greyed out until at least one door is pinned
- Original file opens the file exactly as you uploaded it, in a new tab
- Replace opens the attach form with this floor already chosen
- Remove takes the plan off the floor
Floors that have registered doors but no plan yet are listed underneath with an Upload plan button. If the building has no plans at all, the section shows "No floor plans yet" with an Add First Floor Plan button.
Attaching a floor plan
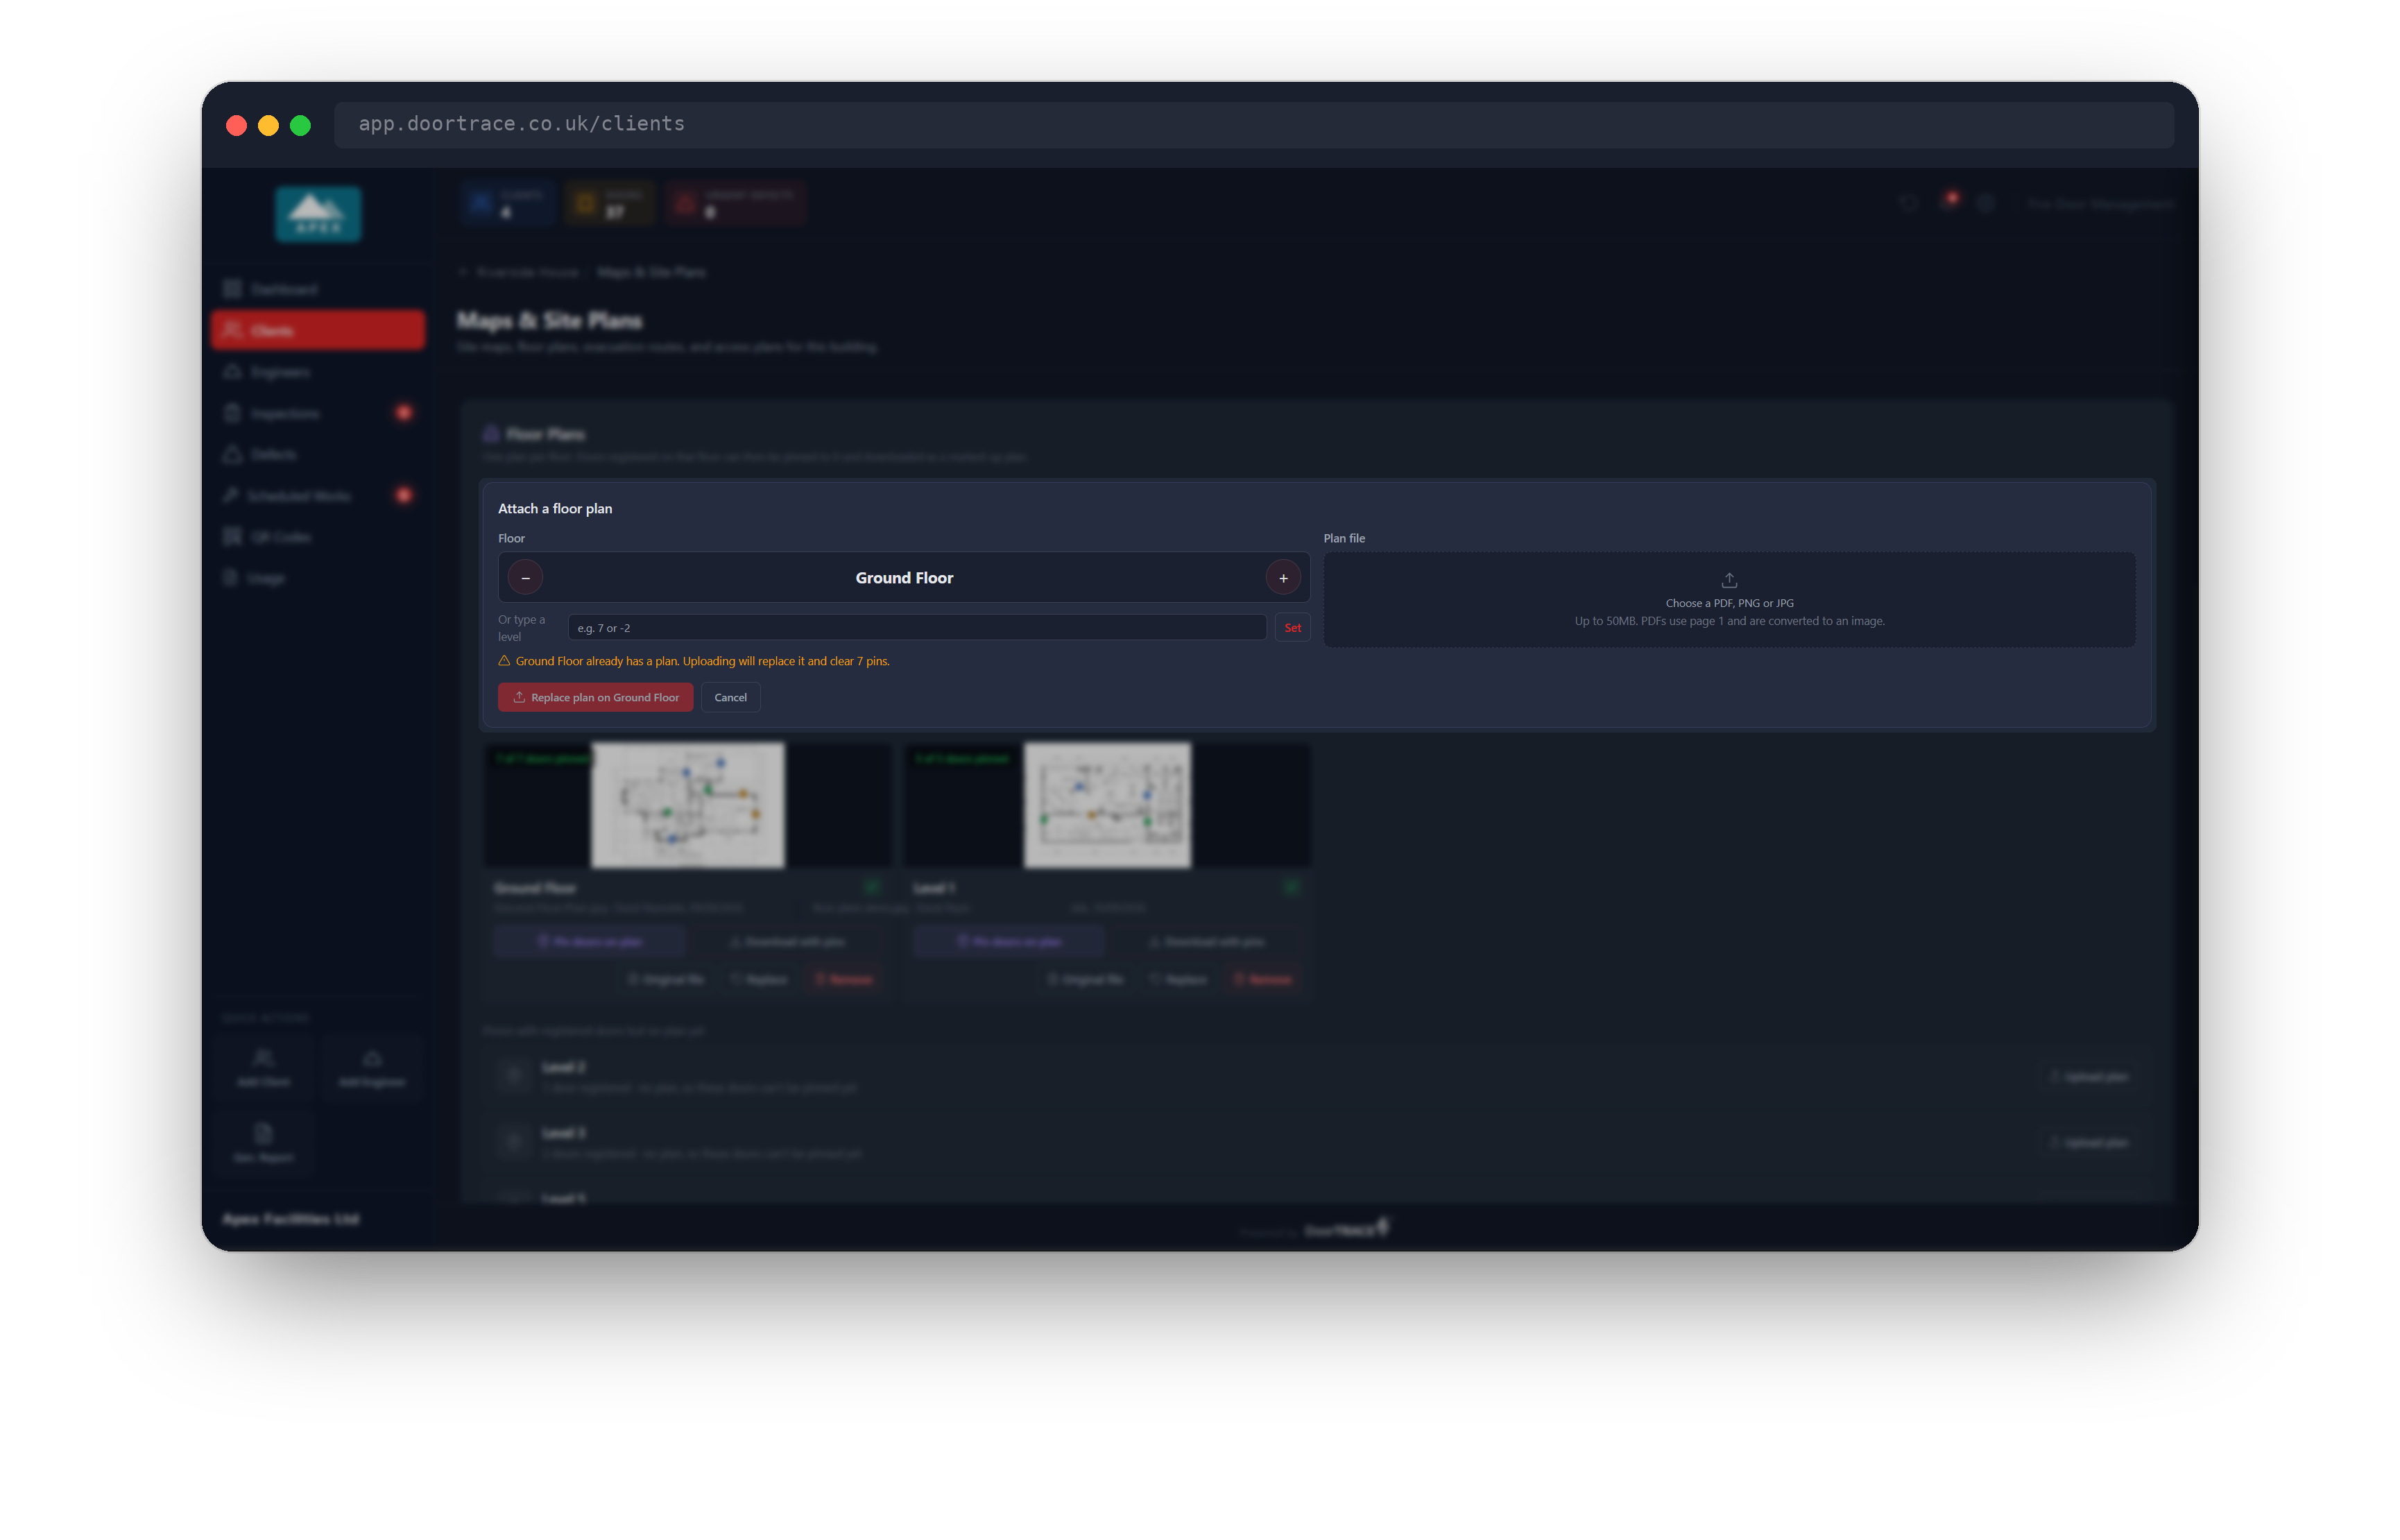
Click Add Floor Plan (or Upload plan on a floor without one). The form has two parts.
Floor. Use the − and + buttons to step through the floors, or type a number in Or type a level and click Set (7 for Level 7, 0 for Ground Floor, -2 for Basement 2; -1 is Lower Ground). The line under the picker tells you what you are about to do: how many doors are registered on that floor with no plan yet, that the floor will be created if no doors are on it yet, or, in amber, that the floor already has a plan and uploading will replace it and clear its pins.
Plan file. Click the box to choose a PDF, PNG, JPG or WebP file up to 50MB. A PDF is turned into an image in your browser before it is uploaded, using page 1 only, and the preview line tells you "page 1 of n as preview". Very large images are shrunk so their longest side is 4,000 pixels, and the preview line then reads "resized for the viewer". Click Change to pick a different file.
Click Attach to <floor> to save. The message "Floor plan attached on <floor>" appears and the new card is added to the list. The original PDF is kept alongside the converted image, which is what Original file opens.
Important: Only page 1 of a PDF is used. If your architect's drawing has one floor per page, save each page as its own PDF (or export each page as an image) and attach them one floor at a time.
Replacing or removing a floor plan
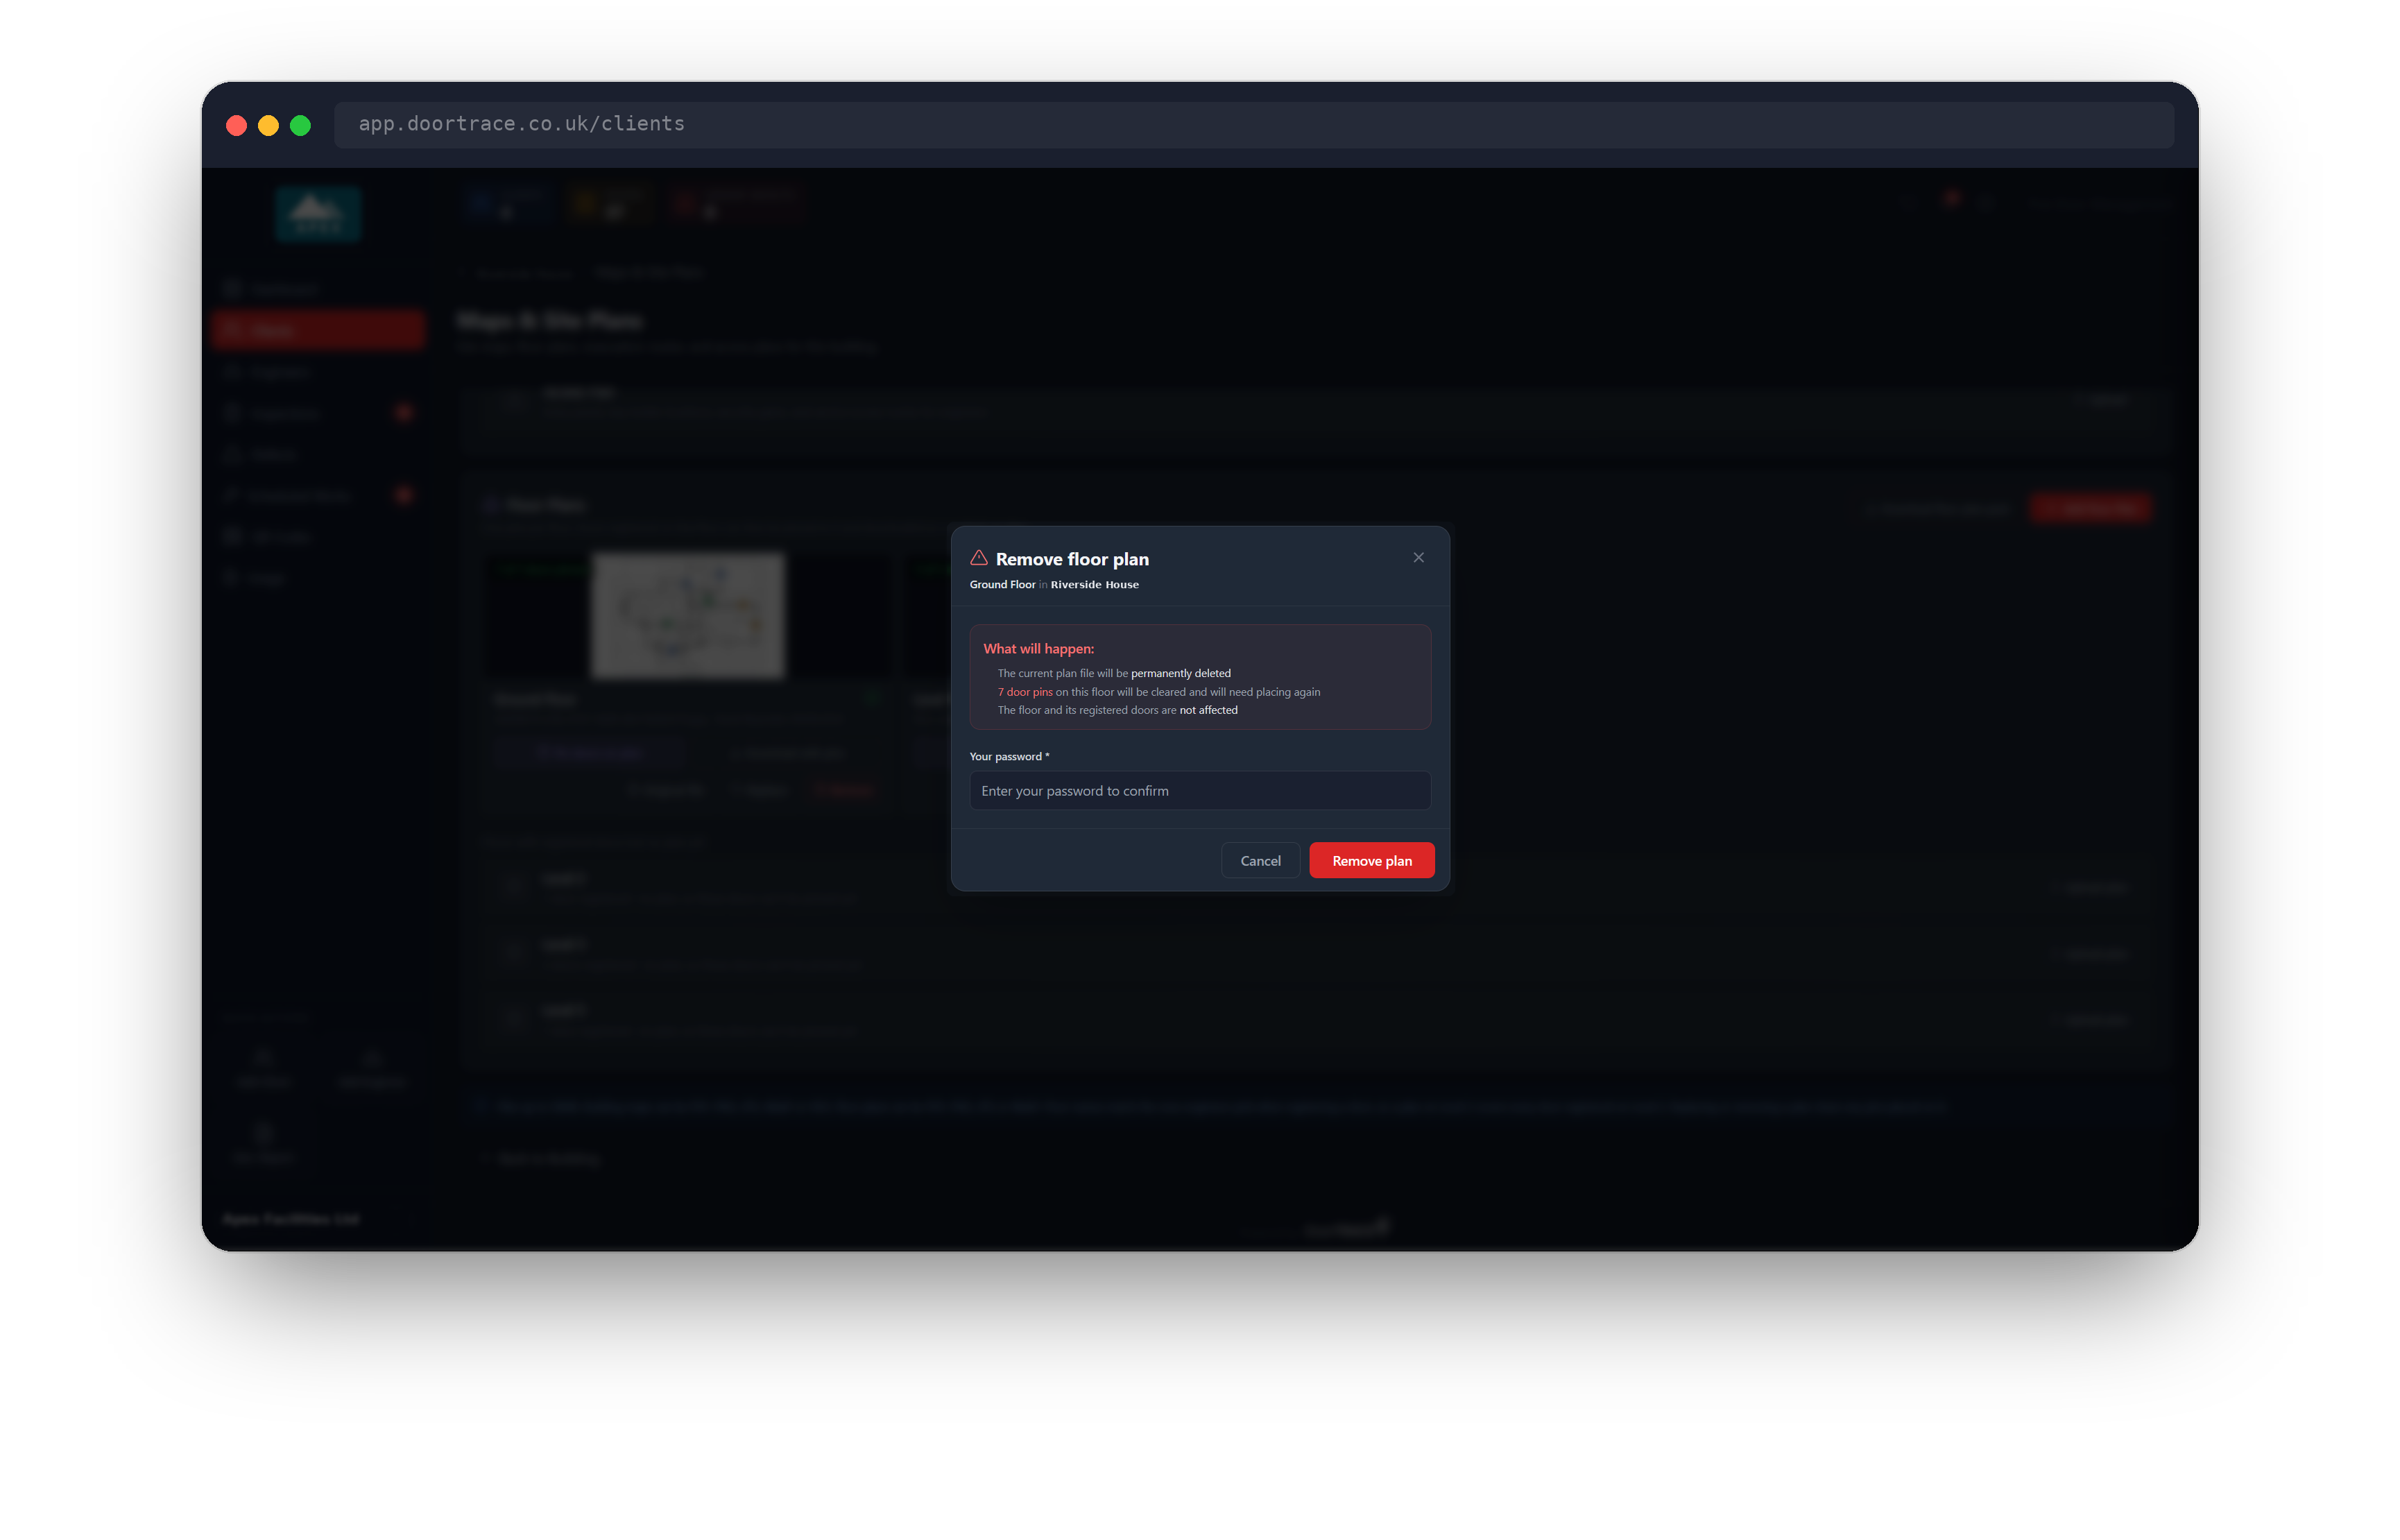
Door pins are positions on the plan image, so a new image would put every pin in the wrong place. Because of that, replacing or removing a plan clears every pin on that floor, and both actions ask for your password.
To replace a plan, click Replace on the card, choose the new file, and click Replace plan on <floor>. To remove one, click Remove on the card. Either way a pop-up titled Replace floor plan or Remove floor plan opens, names the floor and building, and lists what will happen: the current file is permanently deleted, how many door pins on the floor will be cleared and need placing again (or that none are pinned), and that the floor and its registered doors are not affected. You will be asked for your portal password to confirm, then click Replace plan or Remove plan. The message tells you what happened, for example "Floor plan removed from Level 2 and 6 pins cleared".
The floor itself and its doors are untouched. Removing a plan leaves the floor in the "no plan yet" list so you can attach a new one later.
Downloading plans with pins
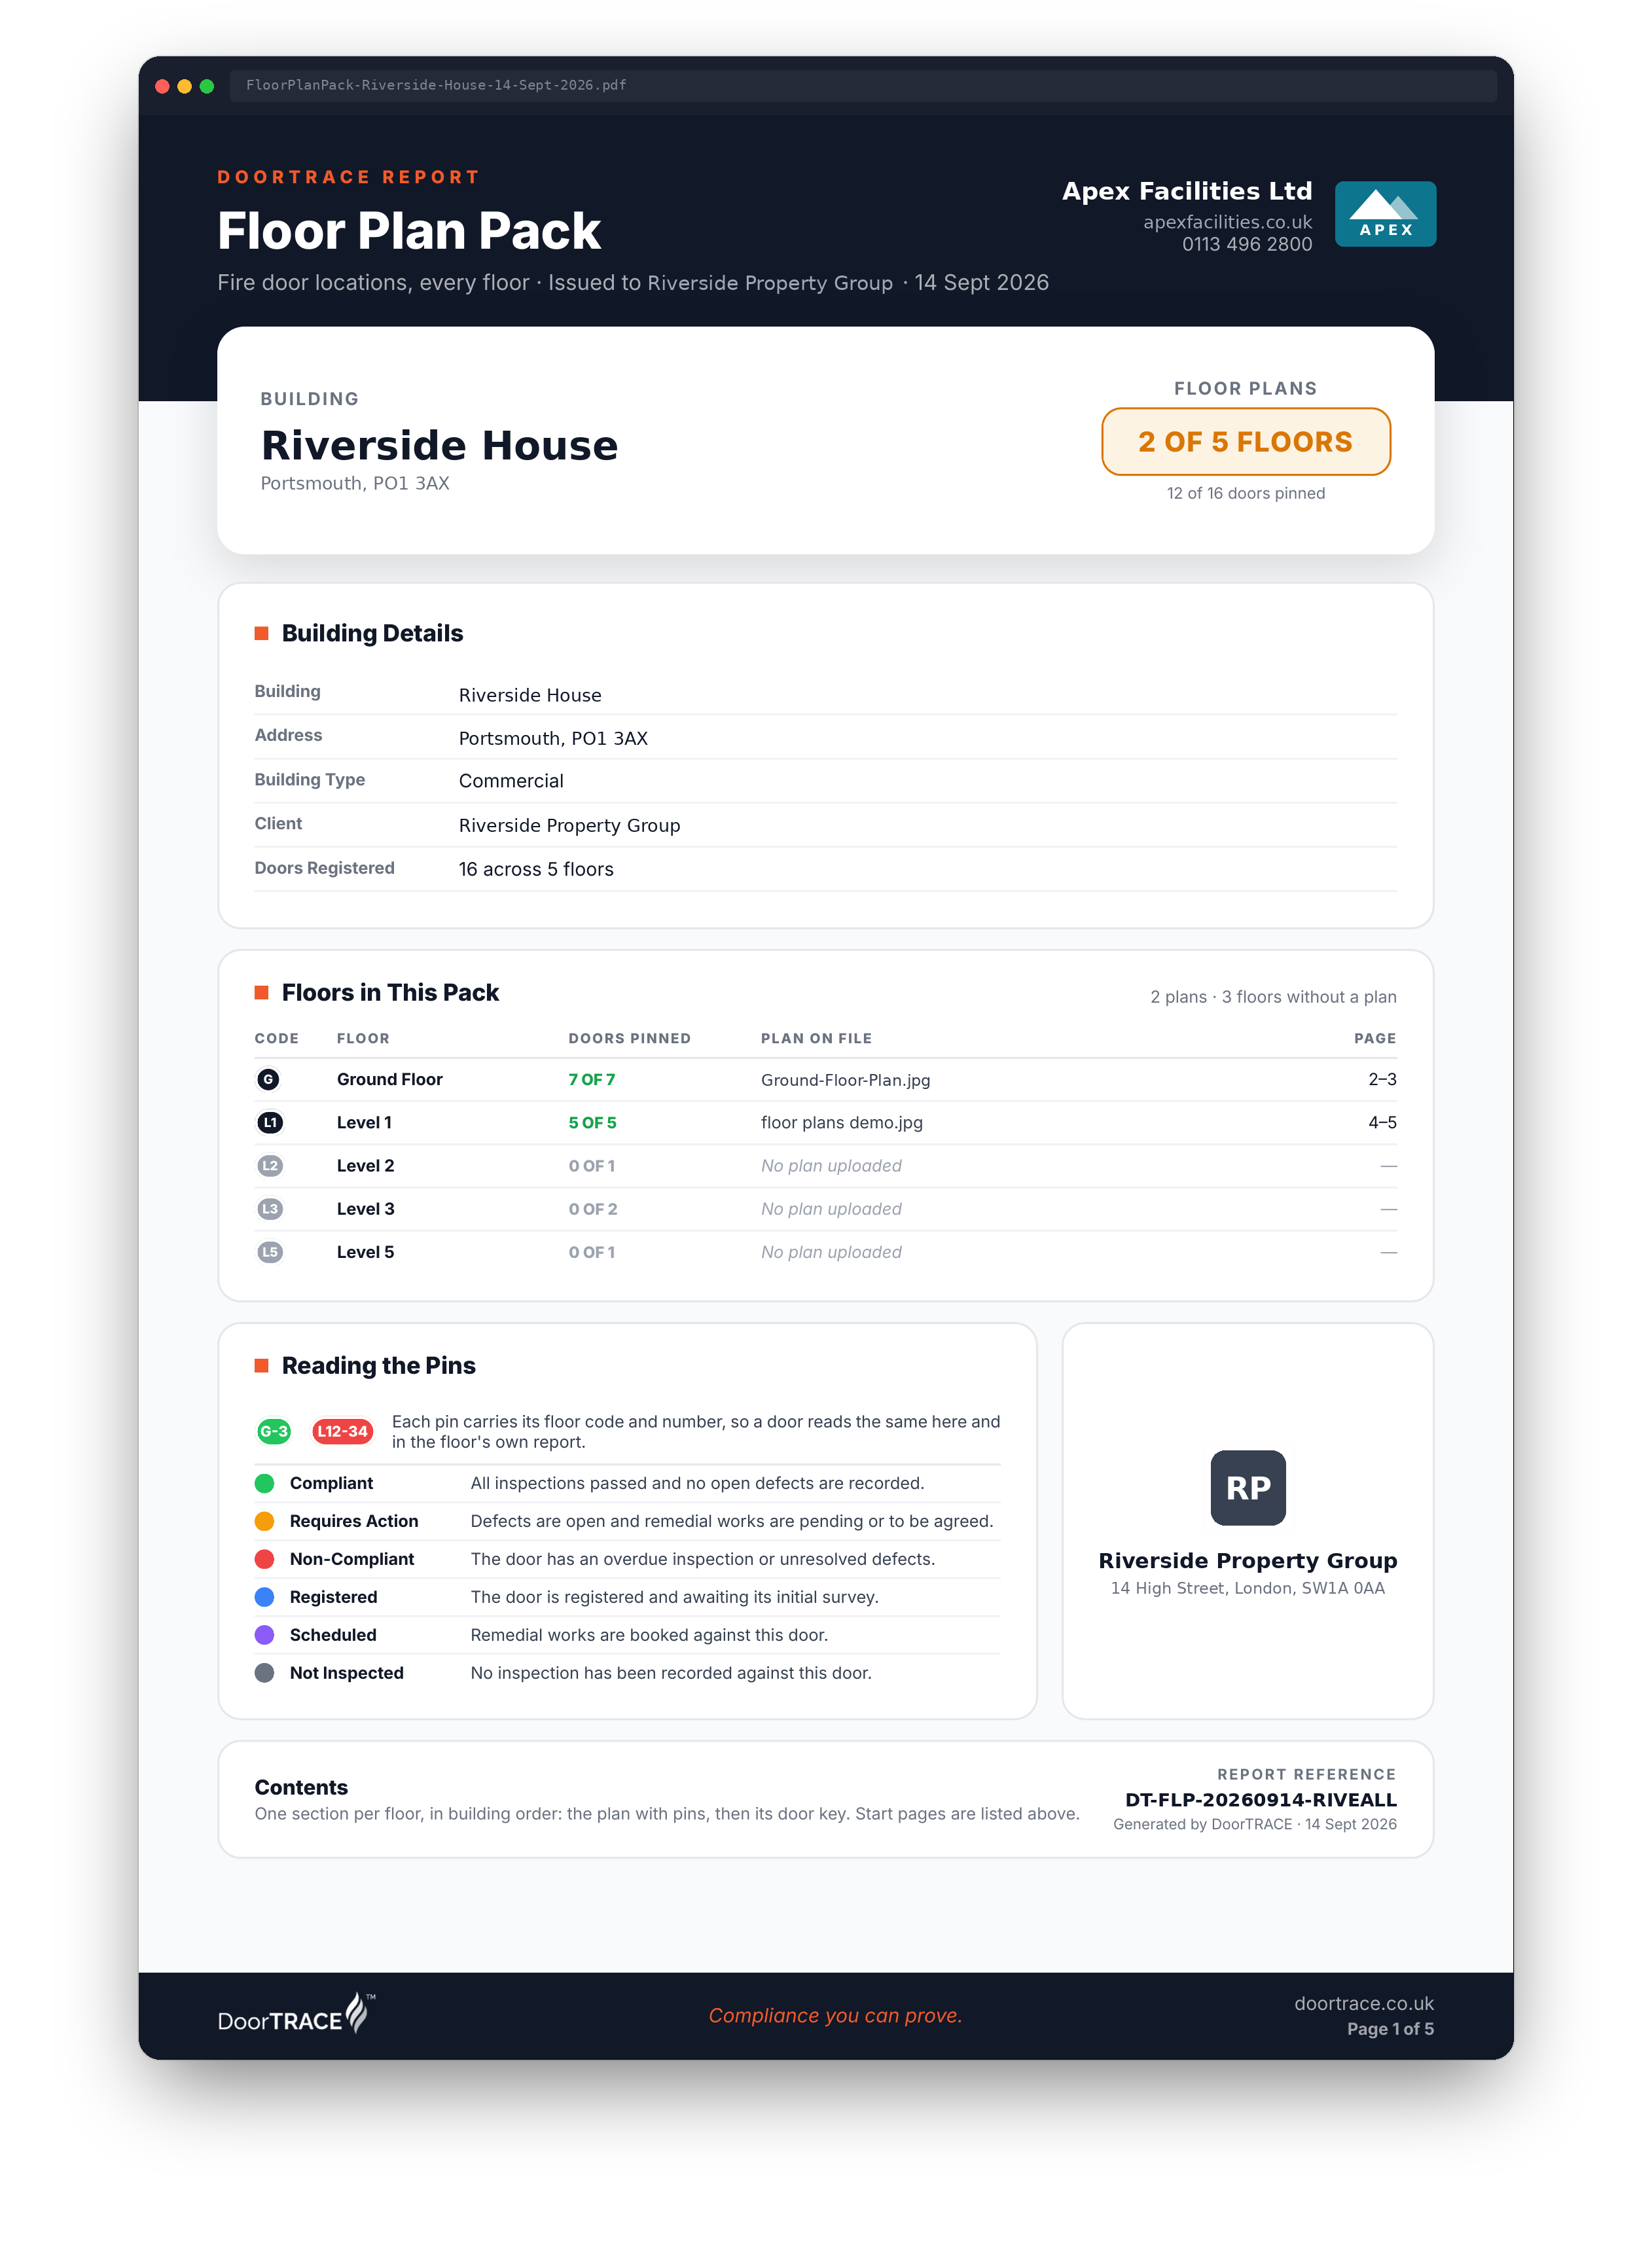
There are two downloads, both built in your browser in the same style as the building compliance report.
Download with pins on a floor card saves that one floor as a PDF, named FloorPlan-<building>-<floor>-<date>.pdf: the plan with a numbered pin on every pinned door, coloured by the door's status, followed by a key listing each pin with the door's location, QR code and status. Pins are labelled with the floor code and a number (G-3 on the Ground Floor, L12-34 on Level 12).
Download floor plan pack, at the top of the section once any floor has a plan, saves every floor in one PDF named FloorPlanPack-<building>-<date>.pdf. It opens with a cover for the building showing how many floors have a plan and how many doors are pinned, a contents table listing each floor's code, doors pinned, plan file and page number, and then each floor's plan and key in building order. Floors with doors but no plan appear in the contents only. While it builds, the button counts up "Preparing floor 1 of 3..." and then reads Generating....
Tip: The pin numbers are not stored. They are worked out from the door list each time a PDF is made, so if doors are added or removed a door's number can change between one download and the next. The QR code in the key is the reliable reference.
If something does not work
- "Could not load the map records" with Back to building and Retry: the page could not read the building's records, so uploading is turned off until it can, to avoid duplicating what is already saved. Click Retry.
- "Could not load floor plans." with Retry in the Floor Plans section: the same, for floors. Click Retry.
- "Floor plans must be a PDF, PNG, JPG or WebP file" or "That file is 62.3 MB. The limit is 50MB.": choose a smaller file, or a different format. A PDF larger than 50MB often exports much smaller as a PNG.
- "This PDF is password protected. Remove the password and try again.": save an unprotected copy first.
- "This PDF could not be read. It may be corrupted.": open it on your computer to check it, and re-export it if it does not open.
- "File content does not match its claimed type.": the file's contents do not match its extension, usually because it was renamed. Export it again from the program that made it.
- Download with pins is greyed out and reads "Pin at least one door first" when you hover: pin at least one door on the plan viewer first.
What's next
Once a floor has a plan, open Pinning doors on a floor plan to place each door on it and produce marked-up plans for your engineers.
Still can't find the answer?
Send us a message and we'll help. We respond within one working day.